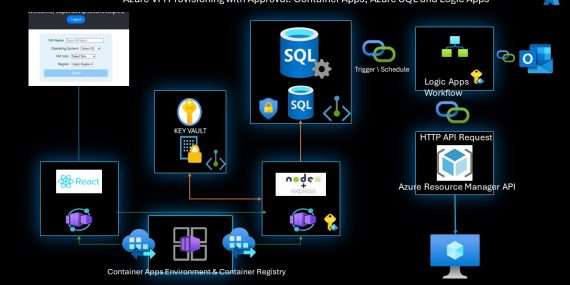
React Web App with Azure Container Apps, Azure SQL and Logic Apps approval flow.
Welcome to a new exciting post from CloudBlogger!
Intro
Today we are building an automatic Azure VM provisioning Web APP with approval workflow ! It is quite a responsibility to be an Administrator, especially on Azure. So when a VM provisioning request comes, the Administrator must take care a lot of things, from compliance and security to approval and of course provisioning! So here it is: A Web App that automates the request, send the approval email , and if approved proceeds to create the new VM! The Web App offers Entra ID Authentication and the user can select the VM Size along with the Operating System, set the VM name and select the region. So we have absolute control over specifics, The request is send to an Azure SQL DB Table, where we have enabled Change Tracking. Azure Logic Apps is triggering a workflow to initiate process. Send the approval request and depending the response it executes the relevant tasks, being either a set of API calls for the VM provisioning and inform with Email upon status or informing the User that the request was not approved. Finally it writes the request status to the SQL Database for compliance and logging.
Tools
Our Web App is a React Frontend with an Express JS Backend hosted as Docker containers on Azure Container Apps. We are using Azure SQL so we store every request, and Key Vault, as well as Logic Apps with Managed Identity.
A big shout-out to to Kristof Ivancza for the runtime-env-cra , where i managed to deploy the Container Apps with Runtime Environment Variables, literally a groundbreaking addition for React Web Apps! I will not explain the method, it is very easy to make the changes and enjoy the Environment Values added at Runtime!
Build
Every detail regarding Code and Terraform is available at GitHub, look for my account and you will find most if not all posts along with this one ! Now we are using Terraform to build our main Infrastructure quickly and some tuning and configurations steps to complete it !
Let’s see the React app and the NodeJS/ExpressJS backend. I am not posting the CSS, again everything is available at GitHub. Our React App has Entra ID Authentication, the reason being the fact that we want to capture the Username and save it to the SQL DB.
import React, { useState, useEffect } from 'react';
import './VMProvisioningForm.css';

function VMProvisioningForm({ account }) {
    const [vmConfig, setVmConfig] = useState({
        name: '',
        os: '',
        size: '',
        region: ''
    });
    const [message, setMessage] = useState('');
    const [isError, setIsError] = useState(false);

    // Extract the username (email) from the account object
    useEffect(() => {
        if (account) {
            setVmConfig(prevState => ({
                ...prevState,
                username: account.username
            }));
        }
    }, [account]);

    const handleInputChange = (e) => {
        const { name, value } = e.target;
        setVmConfig({ ...vmConfig, [name]: value });
    };

    const backendUrl = window.__RUNTIME_CONFIG__.API_URL || 'http://backend10:5000';

    const handleSubmit = async (e) => {
        e.preventDefault();
        setMessage('');
        setIsError(false);


        if (!account || !account.username) {
            setIsError(true);
            setMessage('User is not logged in.');
            return;
        }

        const provisioningData = {
            ...vmConfig,
            username: account.username
        };
        try {
            const response = await fetch(`${backendUrl}/provision-vm`, {
                method: 'POST',
                headers: {
                    'Content-Type': 'application/json',
                    'Access-Control-Allow-Origin': '*'
                },
                body: JSON.stringify(provisioningData),
            });

            if (response.ok) {
                const result = await response.json();
                setMessage('VM provisioning data saved successfully.');
            } else {
                setIsError(true);
                setMessage('Server responded with an error.');
            }
        } catch (error) {
            setIsError(true);
            setMessage('Failed to send data to the server.');
        }
    };


    return (
        <div className="form-container">
            <form onSubmit={handleSubmit} className="vm-form">
                <div>
                    <label>VM Name:</label>
                    <input
                        type="text"
                        name="name"
                        value={vmConfig.name}
                        onChange={handleInputChange}
                        placeholder="Enter VM Name"
                    />
                </div>
                <div>
                   <label>Operating System:</label>
                   <select name="os" value={vmConfig.os} onChange={handleInputChange}>
                   <option value="">Select OS</option>
                   <option value="Windows 11">Windows 11</option>
                   <option value="Windows 10">Windows 10</option>
                   {/* Add other OS options as needed */}
                 </select>
                </div>

                <div>
                    <label>VM Size:</label>
                    <select name="size" value={vmConfig.size} onChange={handleInputChange}>
                        <option value="">Select Size</option>
                        <option value="Standard_D4s_v3">Standard_D4s_v3</option>
                        <option value="Standard_DS2_v2">Standard_DS2_v2</option>
                        <option value="Standard_DS3_v2">Standard_DS3_v2</option>
                        {/* Add other size options */}
                    </select>
                </div>
                <div>
                    <label>Region:</label>
                    <select name="region" value={vmConfig.region} onChange={handleInputChange}>
                        <option value="">Select Region</option>
                        <option value="westeurope">West Europe</option>
                        <option value="northeurope">North Europe</option>
                        {/* Add other region options */}
                    </select>
                </div>
                <button type="submit">Submit</button>
            </form>
            {message && (
                <div className={isError ? 'error-message' : 'success-message'}>
                    {message}
                </div>
            )}
        </div>
    );
}

export default VMProvisioningForm;
Also here are the necessary files to integrate Entra ID Authentication on our Web App with MSAL:
// msalConfig.js
import { LogLevel } from "@azure/msal-browser";
export const msalConfig = {
    auth: {
        clientId: "xxxxxxx", // This is your application's ID in Azure AD
        authority: "https://login.microsoftonline.com/xxx", // Replace with your tenant ID
        redirectUri: "https://xxxxx", // This should be the URI where your app is running
    },
    cache: {
        cacheLocation: "sessionStorage", // This configures where your cache will be stored
        storeAuthStateInCookie: false, // Set this to "true" if you are having issues on IE11 or Edge
    },
    system: {
        loggerOptions: {
            loggerCallback: (level, message, containsPii) => {
                if (containsPii) {
                    return;
                }
                switch (level) {
                    case LogLevel.Error:
                        console.error(message);
                        return;
                    case LogLevel.Info:
                        console.info(message);
                        return;
                    case LogLevel.Verbose:
                        console.debug(message);
                        return;
                    case LogLevel.Warning:
                        console.warn(message);
                        return;
                    default:
                        return;
                }
            }
        }
    }
};

/**
 * Scopes you add here will be prompted for user consent during sign-in.
 * By default, MSAL.js will add OIDC scopes (openid, profile, email) to any login request.
 * For more information about OIDC scopes, visit:
 * https://docs.microsoft.com/en-us/azure/active-directory/develop/v2-permissions-and-consent#openid-connect-scopes
 */
export const loginRequest = {
    scopes: ["User.Read"]
};

/**
 * Add here the scopes to request when obtaining an access token for MS Graph API. For more information, see:
 * https://github.com/AzureAD/microsoft-authentication-library-for-js/blob/dev/lib/msal-browser/docs/resources-and-scopes.md
 */
export const graphConfig = {
    graphMeEndpoint: "https://graph.microsoft.com/v1.0/me",
};
// authConfig.js
import { PublicClientApplication } from '@azure/msal-browser';
import { msalConfig } from './msalConfig'; // Ensure this path is correct

export const msalInstance = new PublicClientApplication(msalConfig);

console.log('MSAL Instance:', msalInstance);
As we can see we have created a Web Form where the User can select the VM size from the available and the OS, set the name and select from a specific set of Regions. The Backend does a “mapping” of the OS into two parameters being ImageOffer and ImageSku. We need these if we want to deploy specific Images and of course we want to add them to our ARM Template. So let’s have a look on the Backend:
const express = require('express');
const fetch = require('node-fetch');
const { DefaultAzureCredential } = require('@azure/identity');
const { SecretClient } = require('@azure/keyvault-secrets');
const sql = require('mssql');

const osMapping = {
    "Windows 11": {
        imageOffer: "windows-11",
        imageSku: "win11-22h2-pro"
    },
    "Windows 10": {
        imageOffer: "windows-10",
        imageSku: "win10-22h2-pro-g2"
    },
    // Add other OS mappings here
};

function processVmConfig(requestBody) {
    const osDetails = osMapping[requestBody.os];
    if (!osDetails) {
        throw new Error('Unsupported OS selected');
    }
    return {
        vmName: requestBody.name,
        imageOffer: osDetails.imageOffer,
        imageSku: osDetails.imageSku,
        vmSize: requestBody.size,
        region: requestBody.region,
        username: requestBody.username // Include the username in the processed config
    };
}

const app = express();
const port = 3001;
app.use(express.json());

// Azure Key Vault details
const credential = new DefaultAzureCredential();
const vaultName = process.env["KEY_VAULT_NAME"];
const url = `https://${vaultName}.vault.azure.net`;
const client = new SecretClient(url, credential);

// Function to get secret from Azure Key Vault
async function getSecret(secretName) {
    const secret = await client.getSecret(secretName);
    return secret.value;
}

// Function to connect to Azure SQL Database
async function getSqlConfig() {
    const username = await getSecret("sql-admin");
    const password = await getSecret("sql-pass");
    const server = await getSecret("sql-server");
    const database = await getSecret("sql-db");

    return {
        user: username,
        password: password,
        server: server,
        database: database,
        options: {
            encrypt: true,
            trustServerCertificate: false
        }
    };
}

app.post('/provision-vm', async (req, res) => {
    try {
        const vmConfig = processVmConfig(req.body);

        // Connect to the SQL database
        let pool = await sql.connect(await getSqlConfig());

        // Perform the SQL INSERT operation
        let result = await pool.request()
            .input('username', sql.NVarChar, vmConfig.username) // Add username input
            .input('vmName', sql.NVarChar, vmConfig.vmName)
            .input('imageOffer', sql.NVarChar, vmConfig.imageOffer)
            .input('imageSku', sql.NVarChar, vmConfig.imageSku)
            .input('vmSize', sql.NVarChar, vmConfig.vmSize)
            .input('region', sql.NVarChar, vmConfig.region)
            .query(`
                INSERT INTO vmprovs
                (Username, VmName, ImageOffer, ImageSku, VmSize, Location)
                VALUES
                (@username, @vmName, @imageOffer, @imageSku, @vmSize, @region)
            `);

        res.status(201).send({ message: 'VM provisioning data saved successfully' });
    } catch (error) {
        console.error("Error details:", error);
        res.status(500).send({ message: 'Error saving VM provisioning data', error: error.message });
    }
});

app.listen(port, () => {
    console.log(`Server running on http://localhost:${port}`);
});
We are constructing also the Key Vault Client with the SDK, so we can get the Authentication details and write the Form Data into our DB Table. The Table has also ID , Timestamp , Username and ApprovalStatus Columns that make the Web App a well constructed Project that logs each request. This is the SQL commands that we run via a .sql script with Terraform:
CREATE TABLE vmprov (
    RequestId INT IDENTITY(1,1) PRIMARY KEY,
    VmName NVARCHAR(50) NOT NULL,
    VmSize NVARCHAR(50) NOT NULL,
    ImageOffer NVARCHAR(50) NOT NULL,
    ImageSku NVARCHAR(100) NOT NULL,
    Location NVARCHAR(50) NOT NULL,
    ApprovalStatus NVARCHAR(50) NOT NULL,
	Username NVARCHAR(50) NOT NULL,
    Timestamp datetime2 NOT NULL DEFAULT GETDATE()
);
ALTER DATABASE provdb01
SET CHANGE_TRACKING = ON
(CHANGE_RETENTION = 2 DAYS, AUTO_CLEANUP = ON)
For Logic Apps to be able to ‘watch’ changes on the SQL we need to enable Change Tracking on the Database level, thus the highlighted commands at the end.
So we need 2 Dockerfiles for the Frontend and the Backend, where the Frontend is aligned with the runtime-env-cra package and the instructions to make it work with Docker as well.
# Frontend
# Build stage
FROM node:18 AS build

# Set the working directory in the build stage
WORKDIR /usr/src/app

# Copy the frontend directory contents into the container at /usr/src/app
COPY . .

# Install dependencies and build the app
RUN npm install
RUN npm run build

# Serve stage
FROM nginx:alpine

COPY --from=build /usr/src/app/build /usr/share/nginx/html
# copy .env.example as .env to the relase build
COPY --from=build /usr/src/app/.env.example /usr/share/nginx/html/.env
COPY --from=build /usr/src/app/nginx/default.conf /etc/nginx/conf.d/default.conf

# (Optional) Copy the custom Nginx config into the image
# COPY custom_nginx.conf /etc/nginx/conf.d/default.conf
RUN apk add --update nodejs
RUN apk add --update npm
# Install runtime-env-cra
RUN npm i -g runtime-env-cra@0.2.0

# Expose port 80 for the app
EXPOSE 80

# Start Nginx with runtime-env-cra
CMD ["/bin/sh", "-c", "cd /usr/share/nginx/html && runtime-env-cra && nginx -g \"daemon off;\""]
# Backend
# Use the official Node.js 18 image as the base image
FROM node:18

# Set the working directory in the container
WORKDIR /usr/src/app

# Copy the package.json and package-lock.json (if available) files
COPY package*.json ./

# Install dependencies in the container
RUN npm install

# Copy the rest of your application's code
COPY . .

# Your app binds to port 3001, expose it
EXPOSE 3001

# Define the command to run the app
CMD ["node", "server.js"]
Finally building Azure Container Apps ! We are able to pass to our React Web App dynamically our Environment Values at runtime, that makes our life much easier and makes the automation quite solid! All we have to do is to build the Environment and run the relevant commands with the -env parameters to create our Apps!
Logic Apps
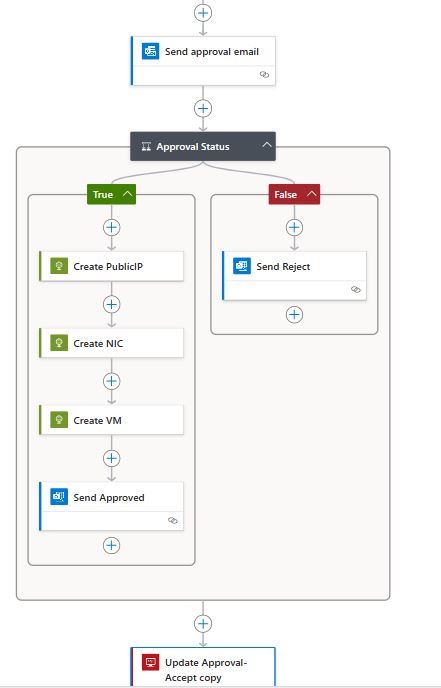
The approval workflow is quite a straightforward procedure. There is Documentation as well. But for our case the better and faster way is to utilize HTTP API requests to Azure Resource Manager. We need 3 requests as the NIC and the Public IP ( if we deploy one ) should exist for the 3rd API call to build the Virtual Machine. The flow reads the SQL Server and upon a new item creation is executed. The interesting part is shown below and the code will be in GitHub ( I am storing all variables, in addition as an array separately as strings so it is a long one!)
And for concept here is the Code of the Task that creates the Public IP ;
{
  "type": "Http",
  "inputs": {
    "uri": "https://management.azure.com/subscriptions/xxxxx/resourceGroups/xxxxx/providers/Microsoft.Network/publicIPAddresses/pip-@{triggerBody()?['VmName']}?api-version=2021-02-01\n",
    "method": "PUT",
    "headers": {
      "Content-Type": "application/json"
    },
    "body": {
      "location": "@{triggerBody()?['Location']}",
      "properties": {
        "publicIPAllocationMethod": "Dynamic",
        "publicIPAddressVersion": "IPv4"
      }
    },
    "authentication": {
      "type": "ManagedServiceIdentity",
      "audience": "https://management.azure.com"
    }
  }
}
It is really amazing the things we can do with Logic Apps workflows! Be careful with the Consumption Plan you may consider a Hosted Plan especially if you are new to Logic Apps and plan to make a LOT of tests! The final Task is to update the User that the request was Approved or Rejected and update the SQL ApprovalStatus Column with the result. It is really up to each one which details will include in the email, i happen to like simple as possible! If you find an awesome update for this Web App just contact me and we will try to make it happen!
Conclusion
I could not be more excited to present this React Azure Container App, a transformative solution designed to streamline the VM provisioning process for users and admins. It was kinda a dream of mine to reach the point to create this App and it has been a few years from the first thought of this idea! The application not only automates VM setup but is also scalable to accommodate other resources and operational needs. What’s more, it integrates seamlessly with Logic Apps for an efficient approval workflow, ensuring that provisioning meets organizational standards and protocols. I invite you to explore this app make suggestions or even fork it – clone it and use your own extension of it !
References:
- Logic Apps Reference Guide
- Azure Resource Manager API
- Azure Container Apps
- React – Runtime Environment Values Package