Deploy Azure Container Apps with one REST Call utilizing DevOps Build Pipelines

Intro
Welcome to CloudBlogger! Enjoy your stay while learning and building unique Projects and Solutions today with DevOps Pipelines!
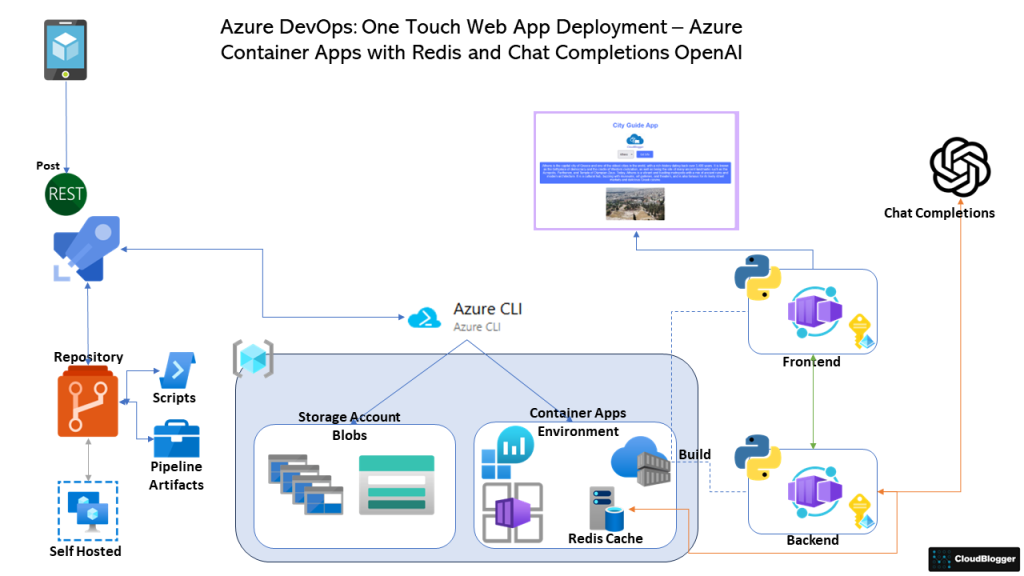
Today, let’s dive into building a full-stack web application hosted on Azure Container Apps, which you can deploy with just a touch on your smartphone—a REST API call to our DevOps Pipelines, to be exact! In our modern era, remote work is on the rise among IT professionals, and technology has fundamentally changed how we perform daily tasks.
The cloud has been a major driver of this change, allowing us to build and manage large infrastructures and numerous apps. Containers, in particular, provide the flexibility needed to develop these applications.
Azure Container Apps stand out as a cutting-edge innovation, packed with powerful capabilities and features. Not only do Azure Container Apps enable developers to employ creative approaches, but they also ensure the code base remains secure and robust. For example, imagine being anywhere in the world and suddenly receiving a call: “We need the demo online ASAP!” In such a situation, with just one click—or rather, a tap of your finger—you can effortlessly make a REST API call to your DevOps Pipelines.
As a result, within minutes, your application will be live. This seamless process highlights the efficiency and convenience Azure Container Apps provide. This level of efficiency and reliability truly sets Azure Container Apps apart from the rest.
DevOps Pipelines Builds
Azure DevOps provides robust build pipelines that are crucial for automating the software delivery process, ensuring consistent and reliable builds. These DevOps Pipelines are defined as YAML or through the Azure DevOps user interface, allowing you to script and configure your build steps according to your specific project requirements.
A typical build pipeline in Azure DevOps includes several key tasks, such as fetching code from the source repository, restoring dependencies, compiling the code, running tests, and finally, generating artifacts. Once these artifacts are created, they can then be seamlessly used by release pipelines to deploy applications across various environments. Consequently, this streamlined process ensures efficient and consistent application deployment, from development to production. Azure DevOps supports a wide range of languages and frameworks, making it a versatile tool for diverse development teams.
Full Stack Build
We are going to build a Web App where Users can ask about various Capitals of the World and get a Photo and a description from OpenAI Chat API. A Redis Cache instance will help us a lot with caching the respones from OpenAI. Our Project Code already exists in my GitHub account, and you can get it for this workshop.
Preparation for DevOps Pipelines
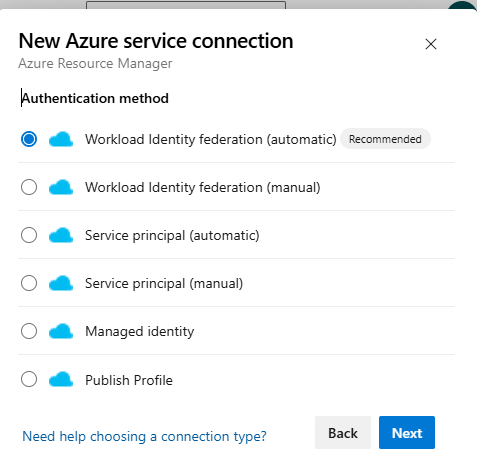
We need our Azure Subsctiption, a DevOps organization, connected with Federated Credential or Service Principal with Contributor rights. It is quite easy to make the connection. From your DevOps Project Settings select Service Connections, Add new and select Azure Resource Manager and Federated Credential (Automatic).
You can also go with the traditional way to create a new Service Principal or Automatic as well. Another important detail is the Self Hosted Agent. Unless you have enabled Microsoft Agent parallel jobs, i suggest to look into the Self Hosted Agent which allows us to run multiple tasks through our Pipeline.
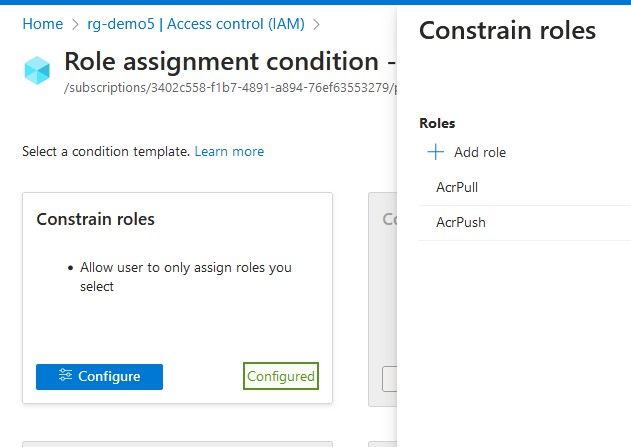
From the Repos menu in Azure DevOps select Import Repository and add the https link from GitHub. You can also create a new Repo and just upload the files. For the Azure Subscription we need Contributor and the new Role Based Access Control Administrator role, with the constraint to assign only acrPull , acrPush & ACR Repository Reader roles. We need that to assign the roles to a User Assigned Managed Identity as we execute the code.
Artifacts of our DevOps Pipelines
In our Azure Repo the “images” directory is considered an Artifact along with the next “scripts” directory which we will create.
Variable Groups
Variable groups in DevOps Pipelines allows us to create sets of variables and Link them to our Builds so we dont have to recreate variables and use them in a repetitive manner. From Library create a new Variable Group with the variables we are going to need, in fact you will notice in the Azure CLI Tasks some variables are written with parenthesis like $(rgName);these are from the Variable Group. Remember to Link it to the Pipeline from the Variabes setting, Variable Groups, Link Variable Group.
| Variable Name | Value |
| rgName | myresourcegroup |
| azconRegistry | myazurecontainerregistry |
| envName | myContainerAppsEnvironmentName |
| mgIdentity | myusermanagedidentity |
| backEnd | backend |
| frontEnd | frontend |
Scripts
We can follow many paths for this. But our goal is absolute automation, one touch setup, so i chose to create 1 Shell script running Azure CLI commands to build the Infrastructure. Create a “scripts” directory and store the file in it.
The base.sh script that creates the main Infrastructure:
#!/bin/bash

rgName='xxxxxx'
tenantId='xxxxxxx-xxxxxxxx-xxxxxx-xxxx-xxxxxx'
envName='xxxx'
azconRegistry='xxxxx'
mgIdentity='xxxxxx'
location='xxxxx'


# Login and set Subscription
az login --service-principal -u "xxxxx" -p='xxxxxxxx' --tenant $tenantId
az account set --subscription "xSubscriptionNamex"


# Create resource group
az group create --name $rgName --location "$location"

# Generate a random name for the storage account
prefix="str"
randomString=$(cat /dev/urandom | tr -dc 'a-zA-Z' | fold -w 10 | head -n 1)
storageAccountName="${prefix}${randomString,,}"

echo "Storage Name $storageAccountName"

# Create Storage Account & Container
az storage account create --name $storageAccountName --resource-group $rgName --allow-blob-public-access --location "$location" --sku "Standard_LRS"
strcommand="az storage account keys list --account-name $storageAccountName --resource-group $rgName --query '[0].value' -o tsv"
storageKey=$(eval "$strcommand")

az storage container create --account-name $storageAccountName --account-key $storageKey --name cities --public-access container


# Create Redis Cache
redisName="xredisNamex"
az redis create --location "$location" --name $redisName --resource-group $rgName --sku Basic --vm-size c0


# ACR and Container Apps Environment
az acr create --resource-group $rgName --name $azconRegistry --sku Basic --admin-enabled true

az containerapp env create --name $envName -g $rgName --location "$location"

# Create Managed Identity
az identity create --name $mgIdentity --resource-group $rgName
DevOps Pipelines: Build Pipeline
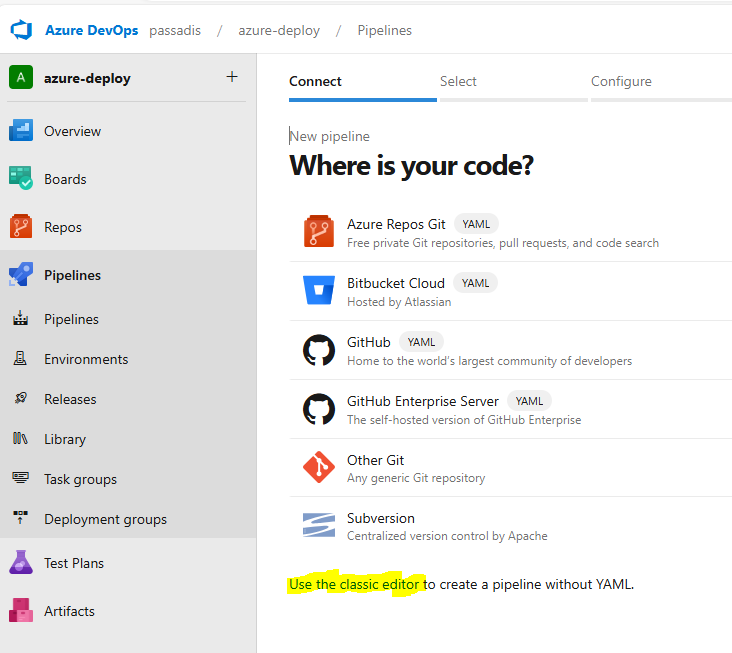
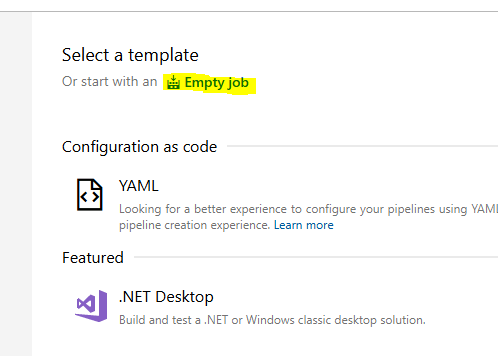
Time to create our Pipeline since everything is in place. From our DevOps Web Interaface we select Pipelines and New Pipeline. Select the “Use the classic editor to create a pipeline without YAML.”. Make sure you are in the correct Project – Azure Repos and proceed. Select “Empty Job” and you are taken to the Pipeline designer where we can create our Pipeline step-by-step.
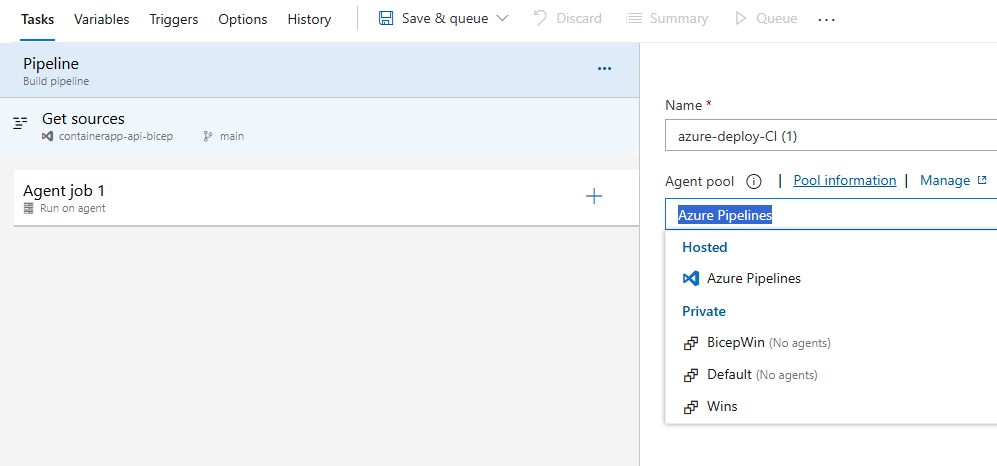
The Pipeline designer screen allows you to rename it and select where your code will run. Select either a Pool where you have your Self-Hosted Agent or a Microsoft Pool if you have enabled parallel jobs.
Lets start adding our steps! The first thing to do is create an Azure CLI Task so we can login to our Subscription and install required extensions and register Providers.

This is an Inline, Powershell Core script:
az account set --subscription "xxxxx-xxxx-xxxx-xxxx-xxxxxxxx"
az extension add --name containerapp --upgrade
az provider register --namespace Microsoft.App
az provider register --namespace Microsoft.OperationalInsights
Now we need to create 2 tasks, the Publish Pipeline Artifact and Download Pipeline Artifact tasks. Before that create a set of Variables so you can have a distinct folder in your Agent to downoad Artifcats. Go to Variables, and add Pipeline variables:
| Build.Scripts | c:\devtest\scripts |
| Build.Images | c:\devtest\images |
| Build.DockerBack | c:\devtest\backend |
| Build.DockerFront | c:\devtest\frontend |
The Publish Pipeline Artifact task is created so we can make our Pipeline “aware’ of what we want to download and the Download is the actual download task. Select the “scripts” directory from the Azure Repo and create both:
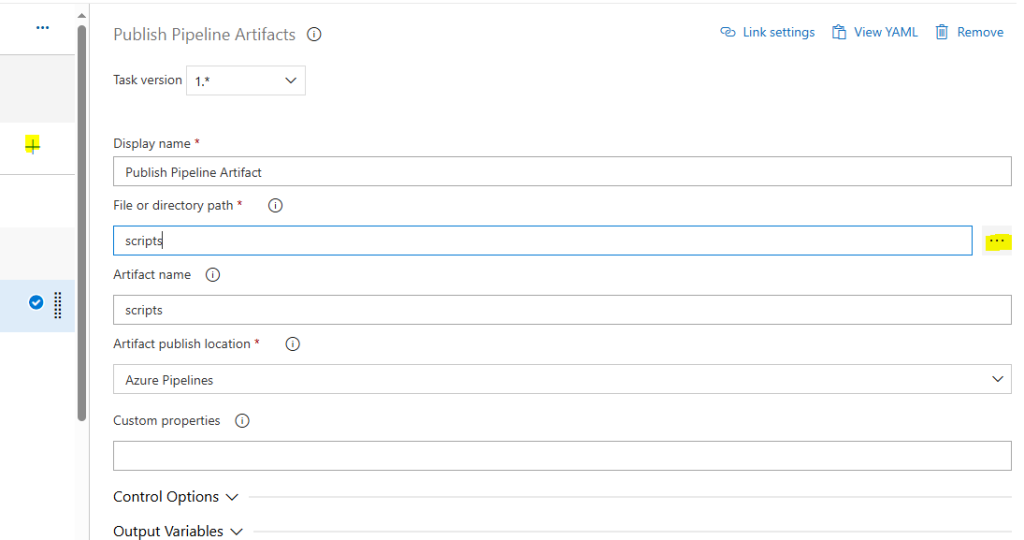
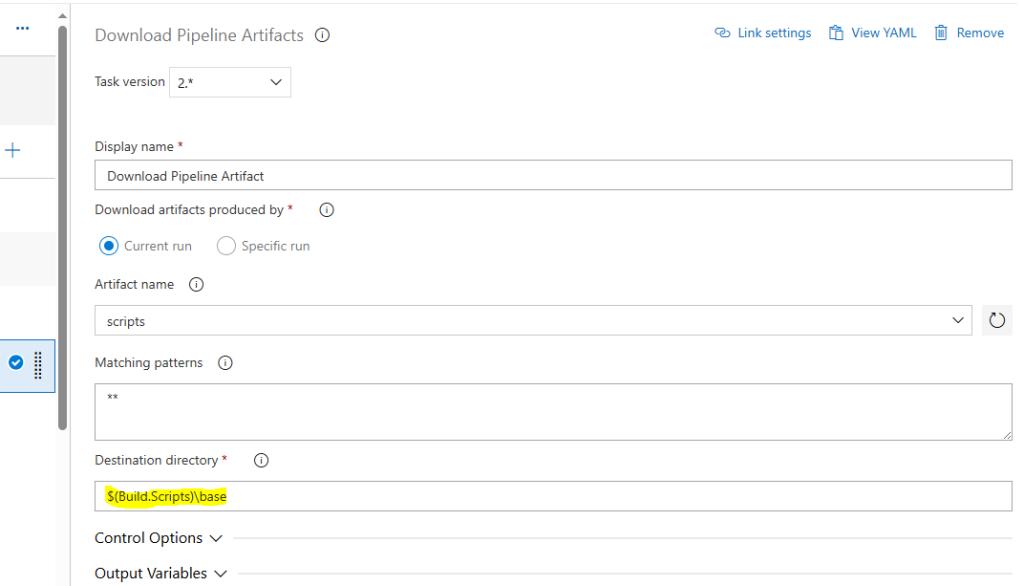
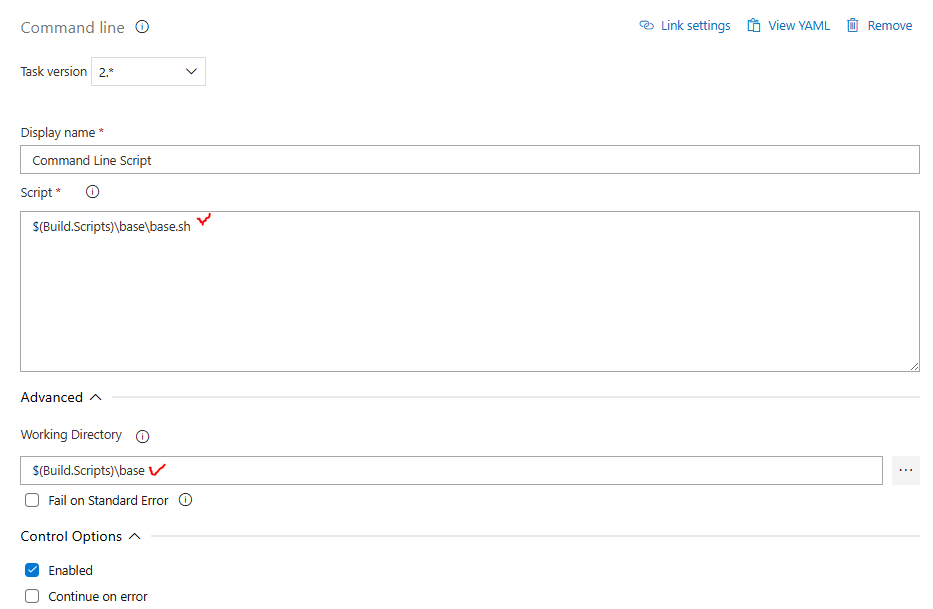
The destination directory is the path that we are going to enter for our next Task, Command Line Script and you got it this is the script we stored earlier in our Azure Repo.
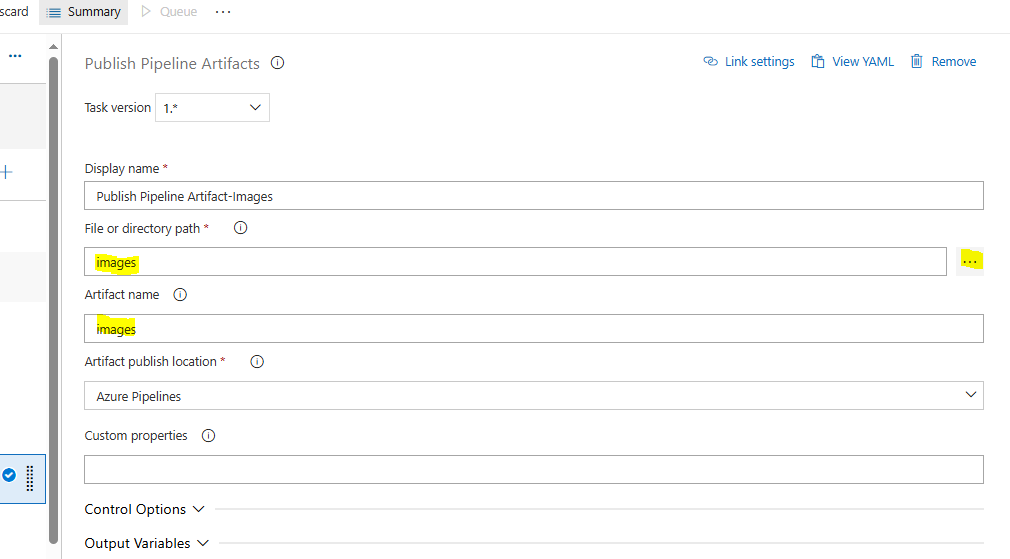
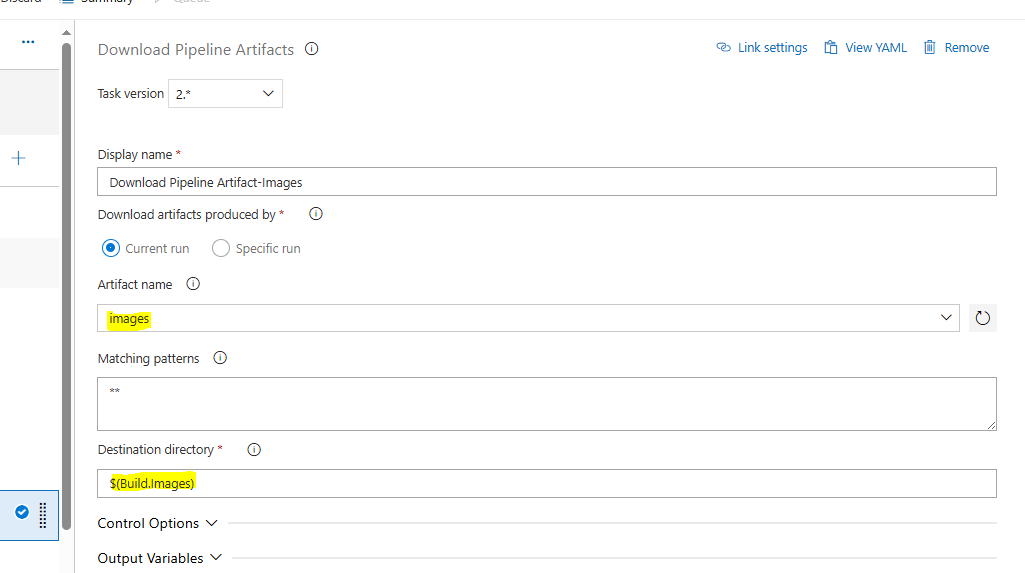
We continue with a new set of Publish and Download Artifact along with an Azure CLI Powershell Core, Inline script to upload the City Images.
$storageAccountName = az storage account list -g $(rgName) --query "[].name" -o tsv
Write-Host "Using Storage Account Name: $storageAccountName"
$storageKey=az storage account keys list --account-name $storageAccountName --resource-group $(rgName) --query '[0].value' -o tsv
Get-ChildItem -Path "$(Build.Images)/" -Filter *.jpg | ForEach-Object {
    az storage blob upload --account-name $storageAccountName --container-name cities --name $_.Name --file $_.FullName --account-key $storageKey
}
The following Task is again an Azure CLI, Powershel Core, Inline Script that will create a User Assigned Managed Identity and add the acrPull, acrPush and ACR Repository Reader roles to it.
az identity create --name $(mgIdentity) --resource-group $(rgName)
$mgprincipalId = az identity show --name $(mgIdentity) --resource-group $(rgName) --query principalId -o tsv
$mgId = az identity show --name $(mgIdentity) --resource-group $(rgName) --query id -o tsv
Write-Host "ManagedIDpr $mgprincipalId "

$acrId = az acr show --name $(azconRegistry) --query id --output tsv
Write-Host "ACRID $acrId "

# Assign AcrPull&Push to Managed Identity
az role assignment create --assignee-principal-type ServicePrincipal --assignee-object-id $mgprincipalId --scope $acrId --role acrPull
az role assignment create --assignee-principal-type ServicePrincipal --assignee-object-id $mgprincipalId --scope $acrId --role acrPush
az role assignment create --assignee-principal-type ServicePrincipal --assignee-object-id $mgprincipalId --scope $acrId --role "ACR Repository Reader"
We are ready now to download our Apps code, build and Push the Containers to Azure Container Registry and then pull them to new Azure Container Apps. We will Publish the backend and frontend folders as Artifacts and Download them as we previously did, this time we need the backend and frontend directories from our Repo.

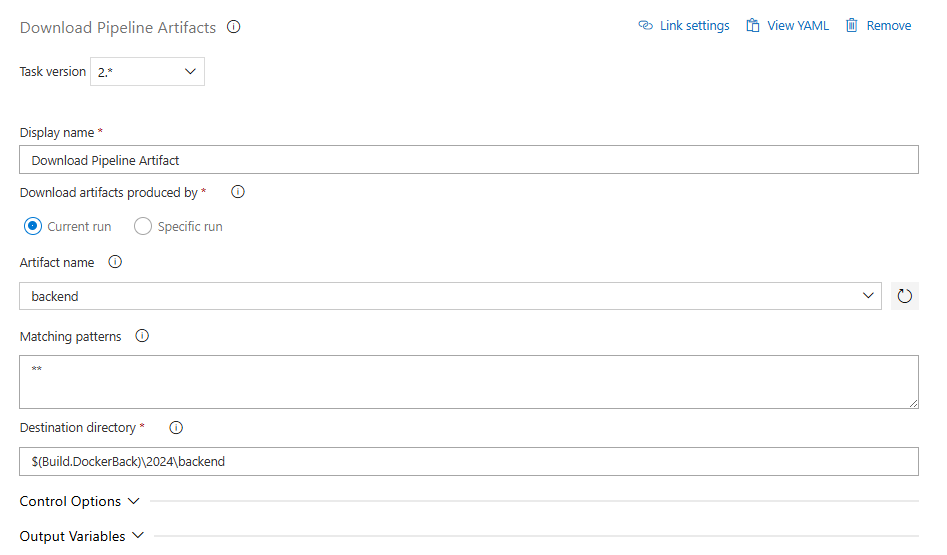
Repeat the process for frontend and pay attention to the destination directory we have to make sure it is correctly set, as we are going to run build commands within those directories; for backend $(Build.DockerBack)\2024\backend and for the frontend $(Build.DockerFront)\2024\frontend.
Time to run the Azure CLI tasks for building and deploying our Container Apps. First Azure CLI, Powershell Core, Inline Script Task is for the backend since we need it to be ready so the frontend can call it when the Web App is active.
$env:PYTHONIOENCODING = "utf-8"
$REDIS_HOST= az redis list -g $(rgName) --query "[].name" -o tsv
$REDIS_PASSWORD= az redis list-keys --resource-group $(rgName) --name $REDIS_HOST --query primaryKey -o tsv
# Ensure you are in the correct directory
cd "$(Build.DockerBack)\2024\backend"

# Get the Managed Identity details
$mgprincipalId = az identity show --name "$(mgIdentity)" --resource-group "$(rgName)" --query principalId -o tsv
$mgId = az identity show --name "$(mgIdentity)" --resource-group "$(rgName)" --query id -o tsv

$storageAccountName = az storage account list -g $(rgName) --query "[].name" -o tsv

# Log in to Azure Container Registry
az acr login --name "$(azconRegistry)"

# Build and push the Docker image to ACR
az acr build --registry "$(azconRegistry)" --image backend:latest .

# Create a container app with the built image
az containerapp create `
  --user-assigned $mgId `
  --registry-identity $mgId `
  --name "$(backEnd)" `
  --resource-group "$(rgName)" `
  --environment "$(envName)" `
  --image "$(azconRegistry).azurecr.io/backend:latest" `
  --target-port 5000 `
  --env-vars STORAGE_ACCOUNT_NAME=$storageAccountName OPENAI_API_KEY=$(OPENAI_API_KEY) REDIS_HOST=$REDIS_HOST REDIS_PASSWORD=$REDIS_PASSWORD `
  --ingress 'external' `
  --registry-server "$(azconRegistry).azurecr.io" `
  --query properties.configuration.ingress.fqdn

$API_URL=az containerapp show --resource-group $(rgName) --name $(backEnd) --query properties.configuration.ingress.fqdn -o tsv
We can now build and deploy our Frontend using another Azure CLI Task:
$env:PYTHONIOENCODING = "utf-8"
cd "$(Build.DockerFront)\2024\frontend"
Write-Host "Building and deploying frontend image to container registry..."
$storageAccountName = (az storage account list --resource-group $(rgName) --query "[0].name" -o tsv)
$API_URL = (az containerapp show --resource-group $(rgName) --name $(backEnd) --query "properties.configuration.ingress.fqdn" -o tsv)
# Build and deploy the frontend image
az acr build --registry "$(azconRegistry)" --image frontend:latest .
$mgId = (az identity show --name "$(mgIdentity)" --resource-group "$(rgName)" --query "id" -o tsv)
# Create or update the frontend container app
az containerapp create `
  --user-assigned $mgId `
  --registry-identity $mgId `
  --name "$(frontEnd)" `
  --resource-group "$(rgName)" `
  --environment "$(envName)" `
  --image "$(azconRegistry).azurecr.io/frontend:latest" `
  --target-port 8000 `
  --env-vars STORAGE_ACCOUNT_NAME=$storageAccountName BACKEND_API_URL=https://$API_URL `
  --ingress 'external' `
  --registry-server "$(azconRegistry).azurecr.io"

az containerapp show --resource-group $(rgName) --name $(frontEnd) --query "properties.configuration.ingress.fqdn" -o tsv
Select Save from the “Save and Queue” menu and we are done! The last line shows us the URL of the Frontend, where we can hit it on a browser and enjoy our Application once it is built ! Of course we can add more parameters like min/max replicas but the final result is the same.
Nevertheless the point of this workshop is to showcase absolute automation and the whole logic can be implemented at scale so whenever we need our Web Apps up and running we just hit that REST API call. Before that let’s have a look on how we can prepare our REST Client to make the Pipeline run from our Mobile phone. The logic applies to any REST API client.
REST Call
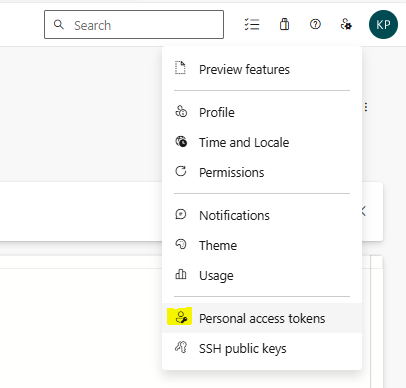
Azure DevOps has a specific way to initiate a build Pipeline. First of all we need a Personal Access Token (PAT) which we can create from the upper right corner where our username appears:
The following Access rights are more than enough. Set a name, a duration and the access rights:

Next we need to get the Pipeline Id. From the Pipeline editor in the Variables section we can find the system.definitionId with a number, that’s the ID we need. Now we need to construct our HTTPS POST call, which is: https://dev.azure.com/<ORGANIZATION>/<PROJECT>/_apis/build/builds?api-version=6.0. So if your Organization is named dev2024 and the Project azure you have:
https://dev.azure.com/dev2024/azure/_apis/build/builds?api-version=6.0
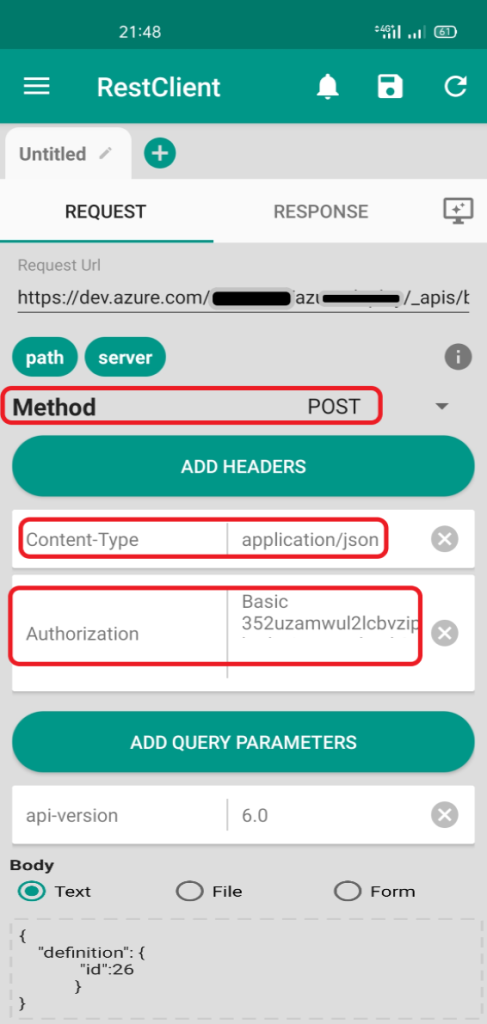
Finally we need specific Headers for our REST Call:
| Key | Value |
| Content-Type | application/json |
| Authorization | Basic yourpattoken |
The Body of the Call will include the Pipeline ID and the syntax is:
{
    "definition": {
        "id": 26
    }
}
The following is taken from my mobile showing a simple POST Call to our Pipeline:
For reference here is how the Pipeline looks from the designer:
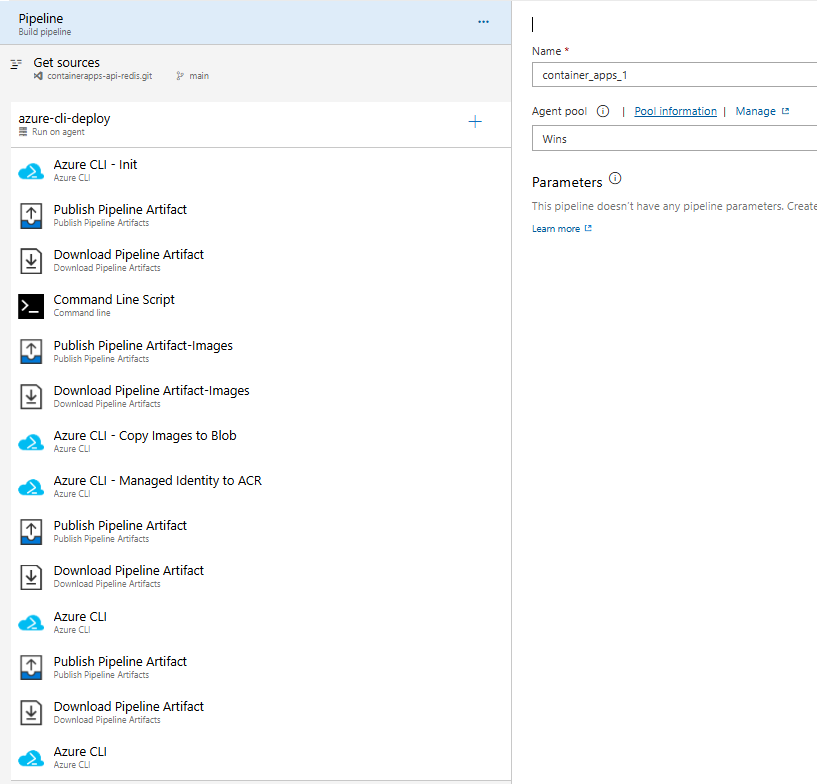
And here is the complete YAML with removed IDs :
# Variable 'Build.DockerBack' was defined in the Variables tab
# Variable 'Build.DockerFront' was defined in the Variables tab
# Variable 'Build.Images' was defined in the Variables tab
# Variable 'Build.Scripts' was defined in the Variables tab
# Variable 'tenantId' was defined in the Variables tab
# Variable Group 'demokp' was defined in the Variables tab
jobs:
- job: Job_1
  displayName: azure-cli-deploy
  pool:
    name: Wins
  steps:
  - checkout: self
    fetchDepth: 3
  - task: AzureCLI@2
    displayName: Azure CLI - Init
    inputs:
      connectedServiceNameARM: xxxxxxxxxxx
      scriptType: pscore
      scriptLocation: inlineScript
      inlineScript: "az account set --subscription \"xxxxxxxxx\"\naz extension add --name containerapp --upgrade\naz provider register --namespace Microsoft.App\naz provider register --namespace Microsoft.OperationalInsights "
  - task: PublishPipelineArtifact@1
    displayName: Publish Pipeline Artifact
    inputs:
      path: scripts
      artifactName: scripts
  - task: DownloadPipelineArtifact@2
    displayName: Download Pipeline Artifact
    inputs:
      artifact: scripts
      path: $(Build.Scripts)\base
  - task: CmdLine@2
    displayName: Command Line Script
    inputs:
      script: >
        $(Build.Scripts)\base\base.sh
      workingDirectory: $(Build.Scripts)\base
  - task: PublishPipelineArtifact@1
    displayName: Publish Pipeline Artifact-Images
    inputs:
      path: images
      artifactName: images
  - task: DownloadPipelineArtifact@2
    displayName: Download Pipeline Artifact-Images
    inputs:
      artifact: images
      path: $(Build.Images)
  - task: AzureCLI@2
    displayName: Azure CLI - Copy Images to Blob
    inputs:
      connectedServiceNameARM: xxxxxxxxxxxxxxx
      scriptType: pscore
      scriptLocation: inlineScript
      inlineScript: >
        $storageAccountName = az storage account list -g $(rgName) --query "[].name" -o tsv

        Write-Host "Using Storage Account Name: $storageAccountName"

        $storageKey=az storage account keys list --account-name $storageAccountName --resource-group $(rgName) --query '[0].value' -o tsv

        Get-ChildItem -Path "$(Build.Images)/" -Filter *.jpg | ForEach-Object {
            az storage blob upload --account-name $storageAccountName --container-name cities --name $_.Name --file $_.FullName --account-key $storageKey
        }
  - task: AzureCLI@2
    displayName: Azure CLI - Managed Identity to ACR
    inputs:
      connectedServiceNameARM: xxxxxxxxxxxx
      scriptType: pscore
      scriptLocation: inlineScript
      inlineScript: >
        az identity create --name $(mgIdentity) --resource-group $(rgName)

        $mgprincipalId = az identity show --name $(mgIdentity) --resource-group $(rgName) --query principalId -o tsv

        $mgId = az identity show --name $(mgIdentity) --resource-group $(rgName) --query id -o tsv

        Write-Host "ManagedIDpr $mgprincipalId "


        $acrId = az acr show --name $(azconRegistry) --query id --output tsv

        Write-Host "ACRID $acrId "


        # Assign AcrPull&Push to Managed Identity

        az role assignment create --assignee-principal-type ServicePrincipal --assignee-object-id $mgprincipalId --scope $acrId --role acrPull

        az role assignment create --assignee-principal-type ServicePrincipal --assignee-object-id $mgprincipalId --scope $acrId --role acrPush
  - task: PublishPipelineArtifact@1
    displayName: Publish Pipeline Artifact
    inputs:
      path: backend
      artifactName: backend
  - task: DownloadPipelineArtifact@2
    displayName: Download Pipeline Artifact
    inputs:
      artifact: backend
      path: $(Build.DockerBack)\2024\backend
  - task: AzureCLI@2
    displayName: 'Azure CLI '
    retryCountOnTaskFailure: 2
    inputs:
      connectedServiceNameARM: xxxxxxxxxxxxxxxxxxxxxx
      scriptType: pscore
      scriptLocation: inlineScript
      inlineScript: >
        $env:PYTHONIOENCODING = "utf-8"

        $REDIS_HOST= az redis list -g $(rgName) --query "[].name" -o tsv

        $REDIS_PASSWORD= az redis list-keys --resource-group $(rgName) --name $REDIS_HOST --query primaryKey -o tsv

        # Ensure you are in the correct directory

        cd "$(Build.DockerBack)\2024\backend"


        # Get the Managed Identity details

        $mgprincipalId = az identity show --name "$(mgIdentity)" --resource-group "$(rgName)" --query principalId -o tsv

        $mgId = az identity show --name "$(mgIdentity)" --resource-group "$(rgName)" --query id -o tsv


        $storageAccountName = az storage account list -g $(rgName) --query "[].name" -o tsv


        # Log in to Azure Container Registry

        az acr login --name "$(azconRegistry)"


        # Build and push the Docker image to ACR

        az acr build --registry "$(azconRegistry)" --image backend:latest .


        # Create a container app with the built image

        az containerapp create `
          --user-assigned $mgId `
          --registry-identity $mgId `
          --name "$(backEnd)" `
          --resource-group "$(rgName)" `
          --environment "$(envName)" `
          --image "$(azconRegistry).azurecr.io/backend:latest" `
          --target-port 5000 `
          --env-vars STORAGE_ACCOUNT_NAME=$storageAccountName OPENAI_API_KEY=$(OPENAI_API_KEY) REDIS_HOST=$REDIS_HOST REDIS_PASSWORD=$REDIS_PASSWORD `
          --ingress 'external' `
          --registry-server "$(azconRegistry).azurecr.io" `
          --query properties.configuration.ingress.fqdn
  - task: PublishPipelineArtifact@1
    displayName: Publish Pipeline Artifact
    inputs:
      path: frontend
      artifactName: frontend
  - task: DownloadPipelineArtifact@2
    displayName: Download Pipeline Artifact
    inputs:
      artifact: frontend
      path: $(Build.DockerFront)\2024\frontend
  - task: AzureCLI@2
    displayName: 'Azure CLI '
    retryCountOnTaskFailure: 2
    inputs:
      connectedServiceNameARM: xxxxxxxxxxxxxxxx
      scriptType: pscore
      scriptLocation: inlineScript
      inlineScript: >-
        $env:PYTHONIOENCODING = "utf-8"

        cd "$(Build.DockerFront)\2024\frontend"

        Write-Host "Building and deploying frontend image to container registry..."

        $storageAccountName = (az storage account list --resource-group $(rgName) --query "[0].name" -o tsv)

        $API_URL = (az containerapp show --resource-group $(rgName) --name $(backEnd) --query "properties.configuration.ingress.fqdn" -o tsv)

        # Build and deploy the frontend image

        az acr build --registry "$(azconRegistry)" --image frontend:latest .

        $mgId = (az identity show --name "$(mgIdentity)" --resource-group "$(rgName)" --query "id" -o tsv)

        # Create or update the frontend container app

        az containerapp create `
          --user-assigned $mgId `
          --registry-identity $mgId `
          --name "$(frontEnd)" `
          --resource-group "$(rgName)" `
          --environment "$(envName)" `
          --image "$(azconRegistry).azurecr.io/frontend:latest" `
          --target-port 8000 `
          --env-vars STORAGE_ACCOUNT_NAME=$storageAccountName BACKEND_API_URL=https://$API_URL `
          --ingress 'external' `
          --registry-server "$(azconRegistry).azurecr.io"

        az containerapp show --resource-group $(rgName) --name $(frontEnd) --query "properties.configuration.ingress.fqdn" -o tsv
Closing
In conclusion, the journey of building a full-stack Python containerized web app, complete with both frontend and backend components, and deploying it on Azure Container Apps, showcases the true power of automation via Azure DevOps build pipelines. This streamlined process not only enhances efficiency and consistency but also highlights the modern convenience of activating deployments with just a tap on your mobile device.
By leveraging a REST Client app to make POST calls to the Azure DevOps build pipeline, we demonstrated how easy it is to initiate and manage deployments from anywhere. This seamless integration and automation empower developers to focus more on innovation and less on manual tasks, truly embodying the future of agile and responsive development workflows. Embrace the power of automation, and elevate your development experience to new heights.
References
- Connect to Azure by using an Azure Resource Manager service connection
- Create your first pipeline
- Publish Pipeline Artifacts
- Azure Pipelines agents
- CloudBlogger: Deploy Azure Container Apps
- Azure Container Apps overview
- Manage environment variables on Azure Container Apps