This Workshop have been an idea of mine, when i was trying to interact Microsoft Defender Advanced Hunting queries, from Logic Apps. Needless to say, of course it is possible and due to the limiltless playground of Logic Apps we can do many many nice Workflows as this one!
So, let’s get into it! As we already know Infrastructure as a Code is the way and for our Workshops we will utilize Azure DevOps , Terraform and GitHub. For this one we will use DevOps pipelines to run our az cli script on a Self Hosted Windows Agent, grabbing the templates from GitHub Repos.
What we need:
- Azure Subscription
- Microsoft 365 Admin Access to the Security Portal
- Azure DevOps account, sign in here: https://aex.dev.azure.com/
- GitHub account
You can deploy without the need of a Self Hosted Agent, but as we are proceeding with more demanding deployments a Hosted Agent is coming very handy. We can have a look at the Microsoft Hosted Agents limitations, and decide when it is best to deploy our Self Hosted agent.
Create the resources (Azure Pipelines)
Let’s create a Service Principal with Contributor rights to connect our DevOps Project with our Azure Subscription, and a Personal Token from GitHub.
From Azure Cloud Shell run the command, give a name and add your Subscription Id :
az ad sp create-for-rbac --name azdev-sp --role Contributor --scopes /subscriptions/xxxxxxx-xxxxxxxx-xxxxxxxKeep the output values.
Login to https://aex.dev.azure.com/ and select or create an Organization and a Project. On the Project Settings you will find Service Connections and the option to create a new one:
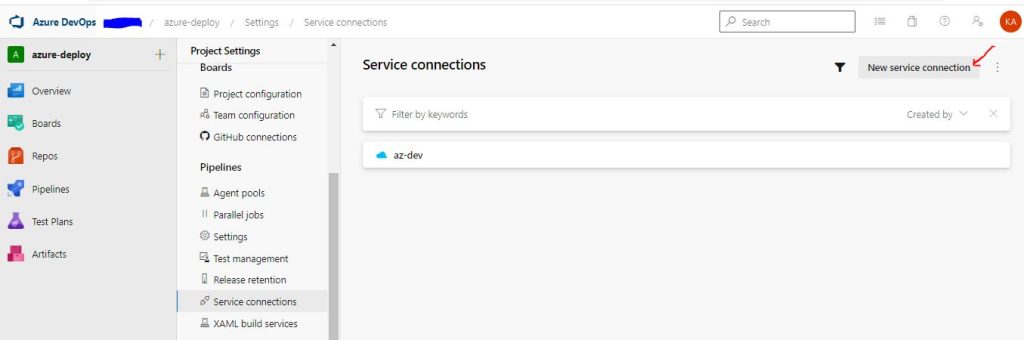
Select Azure Resource Manager, Service Principal ( Manual ) , and add the details in the fields. You may create the connection with the Automatic option as well, my preference is Manual. Verify the Service Connection, give a name and an optional Description and check Grant Access to all Pipelines, for our Workshop.
Fork or Copy the https://github.com/Azure/azure-quickstart-templates Repo and create a new one let’s name it logicappworkflow.
Now in the GitHub Portal select in the upper right Profile section the Settings and in the left vertical menu access the ‘Developer Settings”. Generate a new Personal Access Token, give it a name with Repo:All Checkboxes permissions and copy it somewhere safe. Return to Azure DevOps Project Settings and in a similar manner create a new Service Connection with GitHub of Type Personal Access Token. Allow the Repos “azure-quickstart-templates” and the “logicappworkflow‘ , verify and save.
The Template for a blank Consumption Logic App Workflow is this , followed by the parameters.json :
{
    "$schema": "http://schema.management.azure.com/schemas/2015-01-01/deploymentTemplate.json#",
    "contentVersion": "1.0.0.0",
    "parameters": {
        "logicAppApiVersion": {
            "type": "string"
        },
        "name": {
            "type": "string"
        },
        "location": {
            "type": "string"
        },
        "workflowSchema": {
            "type": "string"
        },
        "logicAppState": {
            "type": "string",
            "defaultValue": "Enabled"
        },
        "definition": {
            "type": "string",
            "defaultValue": "[concat('{\"contentVersion\":\"1.0.0.0\",\"parameters\":{},\"actions\":{},\"triggers\":{},\"outputs\":{},\"$schema\":\"', parameters('workflowSchema'), '\"}')]"
        },
        "parameters": {
            "type": "object",
            "defaultValue": {}
        }
    },
    "resources": [
        {
            "apiVersion": "[parameters('logicAppApiVersion')]",
            "name": "[parameters('name')]",
            "type": "Microsoft.Logic/workflows",
            "location": "[parameters('location')]",
            "tags": {},
            "properties": {
                "definition": "[json(parameters('definition'))]",
                "parameters": "[parameters('parameters')]",
                "state": "[parameters('logicAppState')]"
            }
        }
    ]
}
{
    "$schema": "https://schema.management.azure.com/schemas/2015-01-01/deploymentParameters.json#",
    "contentVersion": "1.0.0.0",
    "parameters": {
        "logicAppApiVersion": {
            "value": "2016-10-01"
        },
        "name": {
            "value": "logicdemo"
        },
        "location": {
            "value": "North Europe"
        },
        "workflowSchema": {
            "value": "https://schema.management.azure.com/providers/Microsoft.Logic/schemas/2016-06-01/workflowdefinition.json#"
        }
    }
}
Upload\Create these files as template.json and parameters.json to your logicappworkflow repo. In this example we created a folder inside the repository named logic.
So far we have created the DevOps connections to Azure and GitHub and we are ready to deploy! I know it would be much easier to use the Portal, but we may consider this approaches as introductory to DevOps. Trust me you will like it … a lot! So , this time we will create a Release Pipeline, with 2 Tasks. One task to create the resource group and the storage account, and the other one to create a blank Logic App workflow.
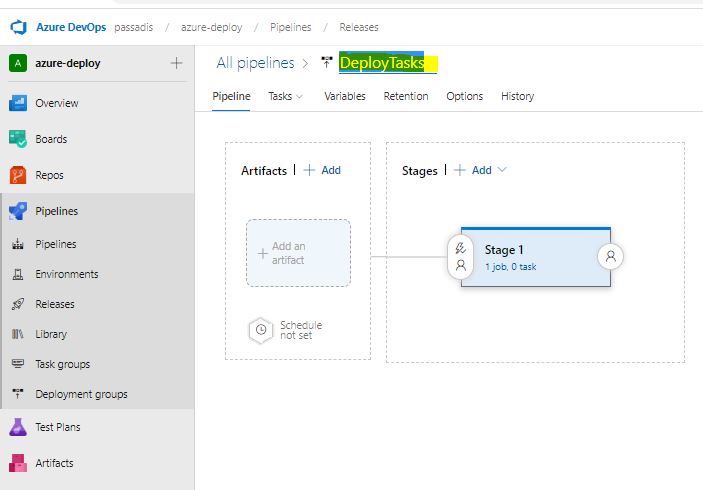
From the DevOps portal, Pipelines -Releases- New Release Pipeline, select Empty Job , leave default “Stage 1” and close the Pop Up. We won’t need an Artifact since we will use Az CLI with Remote Template Deployment, so we should be on this screen:
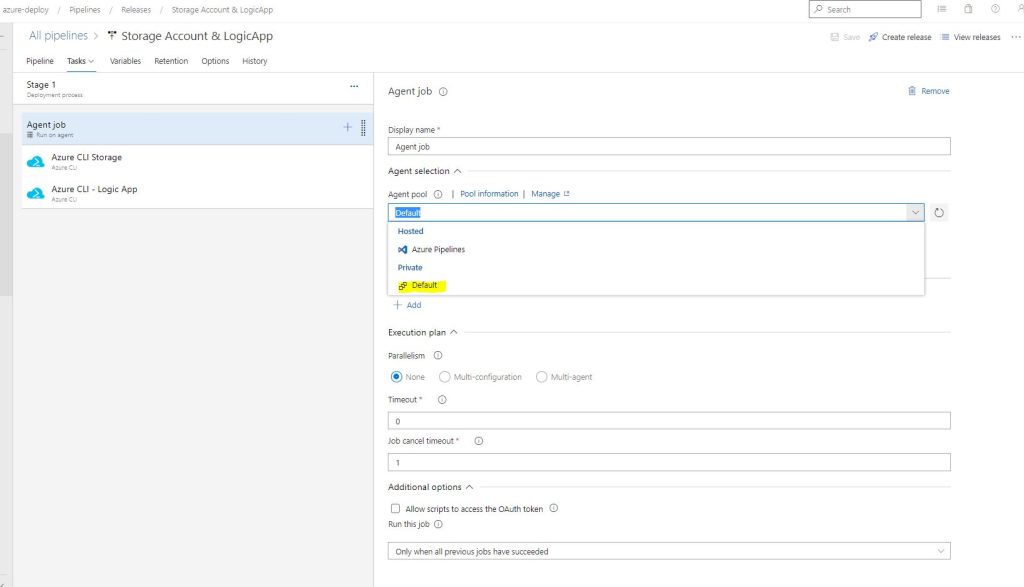
When we click on the 1 Job, 0 Tasks link, we can start adding Tasks to this Stage. The first thing we see is the Aget Job, it is the Compute where we will run our scripts; here we can leave the preset selection or change the Pool to our own pool where we have added our Self Hosted Agent. Remember the VM must be Running already! For this lab leave Azure Pipleines and windows-latest
Now we are ready to write our Release Pipeline, which will create an Azure Resource group with two Deployments, one for the Storage account and another one for the Logic App. Again, several options are available from cloning the Template repos to uploading them to Azure and so on. We are going to run a release pipeline with 2 tasks, the Az Cli scripts for Remote Template deployments. Here are the 2 scripts, insert them as Batch type and Inline Script :

call az group create --name rg-demo-01 --location "North Europe"
call az deployment group create --name "DeployStorage" --resource-group rg-demo-01 --template-uri "https://raw.githubusercontent.com/passadis/azure-quickstart-templates/master/quickstarts/microsoft.storage/storage-account-create/azuredeploy.json" --parameters storageAccountType=Standard_LRS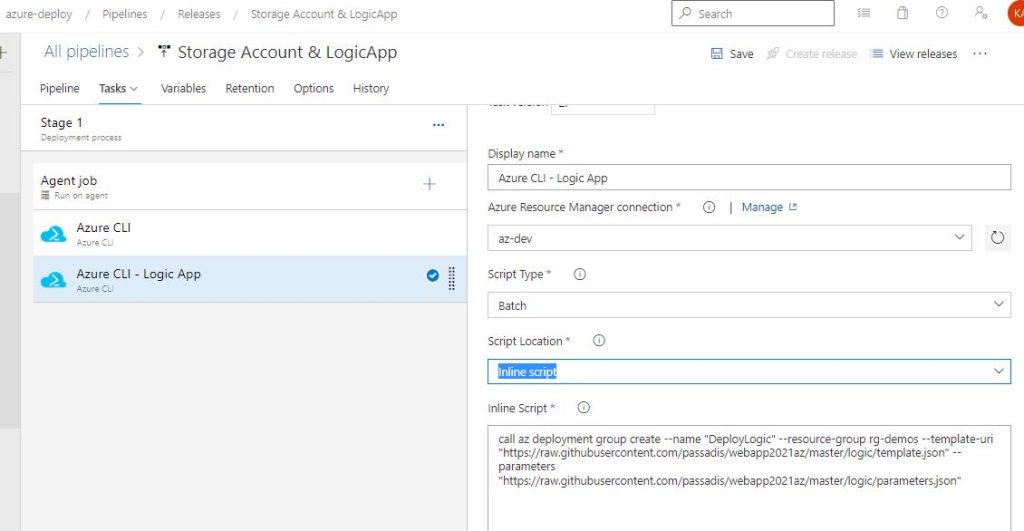
call az deployment group create --name "DeployLogic" --resource-group rg-demos --template-uri "https://raw.githubusercontent.com/passadis/webapp2021az/master/logic/template.json" --parameters "https://raw.githubusercontent.com/passadis/webapp2021az/master/logic/parameters.json"You can see the file Urls are from GitHub, but with a twist. Go to the Repo, select the first file from which we want the link and click Raw, so the correct link is opened. Copy the link and insert to the relevant Script inputs (–template-uri & –parameters):

We have our Pipeline ready , so Save and create a new Release. Select that Stage1 is triggered manually and deploy! We will see in Azure Management Portal the resource group and the deployements we created, as each Task from the Pipeline completes.

Design the Logic App Workflow, Create CSV to Azure Blob.
Now we are going to use the Logic App Designer to create our Workflow. The trigger is what will activate our workflow so it is the first step to create. Next are the ingestion of the Results from the Defender Advanced Hunting query of our choice. We have already seen the Schema and the capabilities regarding information, and the Kusto Language in a previous post. We make the connection to our Azure AD with an account which must have Security Administrator permissions on the Tenant ( additional settings if RBAC is turned on for Defender). So far , so good!
Create a sample Query and test it on the Defender Portal. For now we have :
DeviceEvents
| where ActionType contains "Antivirus"
| where Timestamp > ago(15days)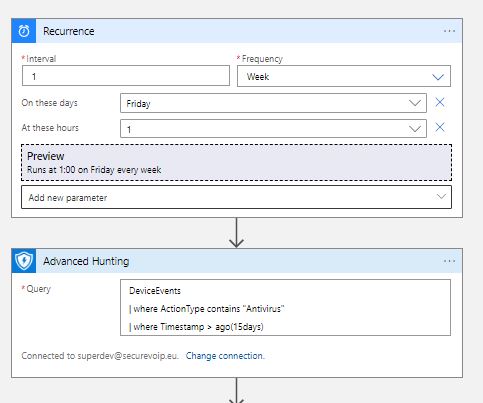
The next part does all the trick for us! We have a number of Device Events and we want these to create a CSV file and Upload to an Azure Blob. There is an action called Initialize Variable which allows us to create different types of variables, among them is the array variable. Pretty cool right ? Nice and neat the Results output is declared as the variable “myArray”, or whatever name, so we can work with it into the next steps.
We have our array ready, the only thing now is to create our CSV. The Data Operation “Create CSV table” is here for us! Select the array we declared earlier as the input, and customize the Columns. It is a little tricky to make it work so the trick is to write as an expression the data. So for the Name header we add into the value a custom expressin item()?['DeviceName'] , for the Type item()?['ActionType'] and we need one more detail, which file is affected so item()?['FileName']. Ok lets add another one, that shows which process initiated the Action. This step will look like this:

Now we have delcared our Outputs and these exist in our CSV table. So let’s put the table into our Blob Storage.The “Update Blob (V2)” step authenticates with Managed Identity, so we must create for our Logic App a System Managed Identity wth the Storage Blob Data Owner Role assignment. The new connection asks for the Storage Account name or Endpoint ( Detailed explanations HERE, is a must for you to understand which one needs what). We add the connection, set the Content to “Output” from the previous step ( remember to select Output from the Dynamic Content search bar), and add the content-type as application/octet-stream since we are dealing with CSV files. Alright i know what are you thinking about…What if the Blob is not there ? Our action Updates the Blob it does not create anything! Well, a Logic App should apply logic right ? yes! We will create a next step which Creates the Blob , only if the previous one fails! That’s right! On the dotted selection of each step we can see the “Configure Run After” option. This simple command allows us to select when the step will run based on the success, failure, expiration or skipped outcome of the previous step. So, we will add a new step with the “Create Blob V2” task , and select to Run after the previous step has failed!


And the Final Designer view :

And now we have our Files Uploaded to Azure Blob Storage , files that contain critical info as they are constructed from Defender for Endpoint Advanced Hunting Queries. Since Logic Apps now supports Data Lake Storage V2, we will explore in another workshop the beauty of Data Analytics with the help of Azure Data Factory, and Azure Synapse Analytics. We may also have a peek on the final stage of Data Ingestion and Analysis with PowerBI Reports and Dashboards! Remember this example is a basic “blueprint”. It’s purpose is to present and explore the various Deployment methods with Azure DevOps, the Integration of different Microsoft services through Applications and Connectors, and to give a taste of the vast amount of Scenarios and Deployments that can make our digital assets safer, making the better use of the enormous possibilities that come with Cloud , Software and Platform as a Service offerings.
References, links:
- Perform data operations in Azure Logic Apps
- Azure Logic Apps Overview
- MS Learn: Intro to Logic Apps
- How to use Azure Resource Manager (ARM) deployment templates with Azure CLI
- Azure Pipelines Agents