Content Moderation with Azure Content Safety and Blob Metadata for Analysis and Insights with Microsoft Fabric

Hello and welcome to a brand new post from CloudBlogger !
We as IT Professionals are facing a lot of challenges in everyday life, and problem solving is quite often a required skill spanning across various situations and Technologies. Some of these challenges are very special and i am talking about Content and moderation. Internet is everywhere and digital content is taking over, opening a Pandora’s box especially now where anyone from a Computer can create and spread false or “unwanted” text and images and video, to say the least. But we are fortunate enough to utilize countermeasures and moderate that content making the experience a little more safer and filtered, with the help of various tools one of them being Azure Content Safety. In addition we can use metadata for example on photos to perform analysis on the results. Enter Microsoft Fabric!
Intro
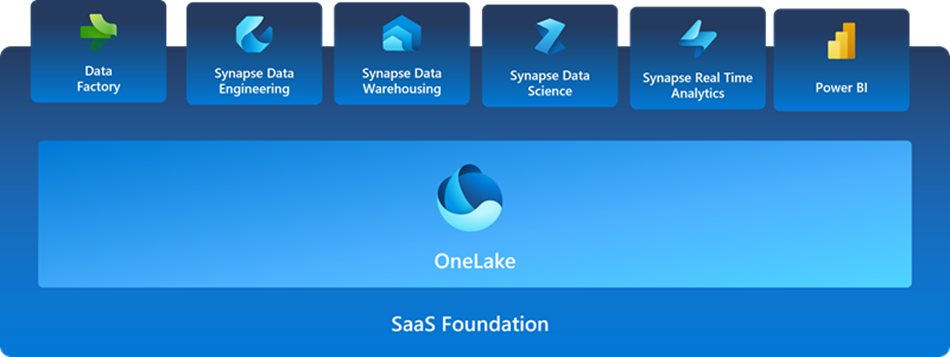
Microsoft Fabric is an end-to-end analytics solution with full-service capabilities including data movement, data lakes, data engineering, data integration, data science, real-time analytics, and business intelligence—all backed by a shared platform providing robust data security, governance, and compliance.
Your organization no longer needs to stitch together individual analytics services from multiple vendors. Instead, use a streamlined solution that’s easy to connect, onboard, and operate.
Azure AI Content Safety is an AI service that lets you handle content that is potentially offensive, risky, or otherwise undesirable. It includes the AI-powered content moderation service which scans text, image, and videos and applies content flags automatically.
So we are going to build a React Application where users upload Photos and select some categories about them, Content Safety performs moderation flagging , and Microsoft Fabric brings to life Analysis on the process and the results.
Build
For this workshop we need :
- Azure Subscription
- VSCode with Node.Js
- Content Safety Resource from Azure AI Services
- Azure Functions
- Azure Container Registry
- Azure Web APP
- Azure Logic Apps
- Azure Storage Accounts
- Microsoft Fabric ( Trial is fine)
Let’s start with our Front-end Web Application , React. We are quite fond of React since it is easy to understand and very flexible and powerful. Our Web App is a UI where users will Upload Photos, select Categorization for the Photos and submit. The process will take the Photos to a Storage Account and a Storage Trigger fires our Azure Function.
Our Application needs a basic folder structure:
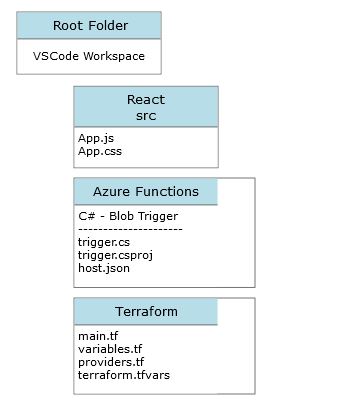
The files that are of interest is App.js and App.css, so we can have a basic style , buttons , check boxes and some coloring ! There is also a Dockerfile we need and we are going to see it here.
The Azure Functions Trigger is a local deployment of a C# (dotnet) function that is triggered once a blob (Photo) is uploaded into our Storage.
Terraform is our IaC tool that helps as create our Infrastructure so a basic structure looks like this one on the left.
We are not going to explore Terraform, since the code is available on GitHub
Let’s have a look on our required details. We have 2 Blobs ‘uploads’ & ‘content’ with Container Access level, and we need to create a SAS token for the React App . Once we have this let’s add it into our .env file in React. The App.js is like this :
/*App.js*/
// App.js
import React, { useState } from 'react';
import { BlobServiceClient } from '@azure/storage-blob';
import logoIcon from './logo-icon.png';
import './App.css';

function App() {
  const [selectedCategories, setSelectedCategories] = useState({});
  const [file, setFile] = useState(null);
  const [message, setMessage] = useState('');
  const [isCategorySelected, setIsCategorySelected] = useState(false);

  const handleCheckboxChange = (event) => {
    const { value, checked } = event.target;
    setSelectedCategories(prev => {
      const updatedCategories = { ...prev, [value]: checked };
      setIsCategorySelected(Object.values(updatedCategories).some(v => v)); // Check if at least one category is selected
      return updatedCategories;
    });
  };

  const handleFileChange = (event) => {
    setFile(event.target.files[0]);
    /*setFile(event.target.Files);*/
    setMessage(`File "${event.target.file} selected !`);
  };

  const handleSubmit = async (event) => {
    event.preventDefault();

    if (!file) {
      setMessage('Please select a file to upload.');
      return;
    }

    if (!isCategorySelected) {
      setMessage('Please select at least one category.');
      return;
    }

    const sasToken = process.env.REACT_APP_SAS_TOKEN;
    const storageAccountName = process.env.REACT_APP_STORAGE_ACCOUNT;
    const containerName = 'uploads';
    const blobServiceClient = new BlobServiceClient(
      `https://${storageAccountName}.blob.core.windows.net?${sasToken}`
    );

    // Concatenate the selected categories into a comma-separated string
    const categoriesMetadataValue = Object.entries(selectedCategories)
      .filter(([_, value]) => value)
      .map(([key]) => key)
      .join(',');

    const metadata = {
      'Category': categoriesMetadataValue
    };

    try {
      const containerClient = blobServiceClient.getContainerClient(containerName);
      const blobClient = containerClient.getBlockBlobClient(file.name);
      await blobClient.uploadData(file, { metadata });
      setMessage(`Success! File "${file.name}" has been uploaded with categories: ${categoriesMetadataValue}.`);
    } catch (error) {
      setMessage(`Failure: An error occurred while uploading the file. ${error.message}`);
    }
  };

  return (
    <div className="App">
      <div className="info-text">
        <h1>Welcome to the Image Moderator App!</h1>
        JPEG, PNG, BMP, TIFF, GIF or WEBP; max size: 4MB; max resolution: 2048x2048 pixels
      </div>
      <form className="main-content" onSubmit={handleSubmit}>

        <div className="upload-box">
          <label htmlFor="photo-upload" className="upload-label">
            Upload Photo
            <input type="file" id="photo-upload" accept="image/jpeg, image/png, image/bmp, image/tiff, image/gif, image/webp" onChange={handleFileChange} />
          </label>
        </div>
        <div className="logo-box">
      <img src={logoIcon} alt="Logo Icon" className="logo-icon" />
      <div className="submit-box">
        <button type="submit" disabled={!isCategorySelected} className="submit-button">Submit</button>
        </div>
      </div>
        <div className="categories-box">
          {['people', 'inside', 'outside', 'art', 'society', 'nature'].map(category => (
            <label key={category}>
              <span>{category}</span>
              <input type="checkbox" name="categories" value={category} onChange={handleCheckboxChange} checked={!!selectedCategories[category]} />
            </label>
          ))}
        </div>

      </form>
      {message && <div className="feedback-message">{message}</div>} {/* Display feedback messages */}
      <div className="moderator-box">
        {/* Data returned from Moderator will be placed here */}
      </div>
    </div>
  );
}

export default App;
There is an accompanying App.css file that is all about style, i am going to post that also to GitHub.
We can test our App with npm start and if we are happy time to deploy to Web App Service! So we have our Azure Container Registry and we need to login, tag and push our app ! Don;t forge we need Docker running and a Docker file as simple as this:
# Build stage
FROM node:18 AS build

# Set the working directory
WORKDIR /app

# Copy the frontend directory contents into the container at /app
COPY . /app

# Copy the environment file
COPY .env /app/.env

# Install dependencies and build the app
RUN npm install
RUN npm run build

# Serve stage
FROM nginx:alpine

# Copy the custom Nginx config into the image
# COPY custom_nginx.conf /etc/nginx/conf.d/default.conf

# Copy the build files from the build stage to the Nginx web root directory
COPY --from=build /app/build /usr/share/nginx/html

# Expose port 80 for the app
EXPOSE 80

# Start Nginx
CMD ["nginx", "-g", "daemon off;"]
And let’s deploy :
az acr login --name $(az acr list -g rgname --query "[].{name: name}" -o tsv)
az acr list -g rg-webvideo --query "[].{name: name}" -o tsv
docker build -t myoapp .
docker tag myapp ACRNAME.azurecr.io/myapp:v1
docker push ACRNAME.azurecr.io/myapp:v1
Once our App is pushed go to your Container Registry, from Registries select our image and deploy to a Web App:
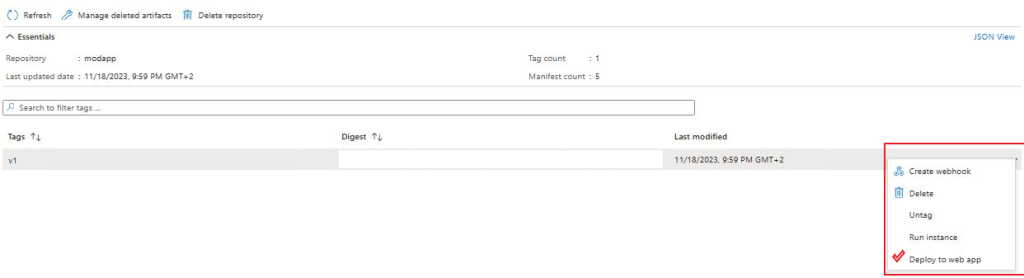
Some additional setting are needed on our Storage Account, beside the Container Level Anonymous read Access The settings are about CORS and we must add “*” in allowed Origins with GET, PUT and LIST for the allowed methods. Once we are ready, we can open our URL and Upload a sample file to verify everything is working as expected.
Now we have a Function App to build. Create a new Function App with an APP Service plan of B2, and .NET 6.0 since we are going to deploy a C# code for a new trigger. Also we need to add into the Function App configuration the CONTENT_SAFETY_ENDPOINT, and CONTENT_SAFETY_KEY, for our Azure AI Content Safety resource. From VSCode add a new Function, set it to Blob Trigger and here is the code for our Function to call the Safety API and get the Image moderation status. We can see that we can set our Safety levels depending on the case :
using System;
using System.IO;
using System.Threading.Tasks;
using Azure;
using Azure.AI.ContentSafety;
using Azure.Storage.Blobs;
using Microsoft.Azure.WebJobs;
using Microsoft.Extensions.Logging;
using System.Collections.Generic;
using System.Linq;

namespace Company.Function
{
    public static class BlobTriggerCSharp1
    {
        [FunctionName("BlobTriggerCSharp1")]
        public static async Task Run(
            [BlobTrigger("uploads/{name}.{extension}", Connection = "AzureWebJobsStorage_xxxx")] Stream myBlob,
            string name,
            string extension,
            ILogger log)
        {
            log.LogInformation($"Processing blob: {name}.{extension}");

            string connectionString = Environment.GetEnvironmentVariable("AzureWebJobsStorage_saizhv01");
            BlobServiceClient blobServiceClient = new BlobServiceClient(connectionString);
            BlobClient blobClient = blobServiceClient.GetBlobContainerClient("uploads").GetBlobClient($"{name}.{extension}");

            string endpoint = Environment.GetEnvironmentVariable("CONTENT_SAFETY_ENDPOINT");
            string key = Environment.GetEnvironmentVariable("CONTENT_SAFETY_KEY");
            ContentSafetyClient contentSafetyClient = new ContentSafetyClient(new Uri(endpoint), new AzureKeyCredential(key));

            ContentSafetyImageData image = new ContentSafetyImageData(BinaryData.FromStream(myBlob));
            AnalyzeImageOptions request = new AnalyzeImageOptions(image);

            try
            {
                Response<AnalyzeImageResult> response = await contentSafetyClient.AnalyzeImageAsync(request);
                var existingMetadata = (await blobClient.GetPropertiesAsync()).Value.Metadata;

                var categoriesAnalysis = response.Value.CategoriesAnalysis;
                bool isRejected = categoriesAnalysis.Any(a => a.Severity > 0); // Strict threshold

                string jsonResponse = System.Text.Json.JsonSerializer.Serialize(response.Value);
                log.LogInformation($"Content Safety API Response: {jsonResponse}");

                var metadataUpdates = new Dictionary<string, string>
                {
                    {"moderation_status", isRejected ? "BLOCKED" : "APPROVED"}
                };

                // Add metadata for each category with detected severity
                foreach (var category in categoriesAnalysis)
                {
                    if (category.Severity > 0)
                    {
                        metadataUpdates.Add($"{category.Category.ToString().ToLower()}_severity", category.Severity.ToString());
                    }
                }

                foreach (var item in metadataUpdates)
                {
                    existingMetadata[item.Key] = item.Value;
                }

                await blobClient.SetMetadataAsync(existingMetadata);
                log.LogInformation($"Blob {name}.{extension} metadata updated successfully.");
            }
            catch (RequestFailedException ex)
            {
                log.LogError($"Analyze image failed. Status code: {ex.Status}, Error code: {ex.ErrorCode}, Error message: {ex.Message}");
                throw;
            }
        }
    }
}
Now when we upload an Image via our App we can see the new Metadata values on the Blob Files:
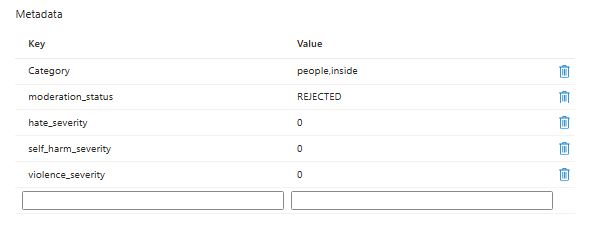
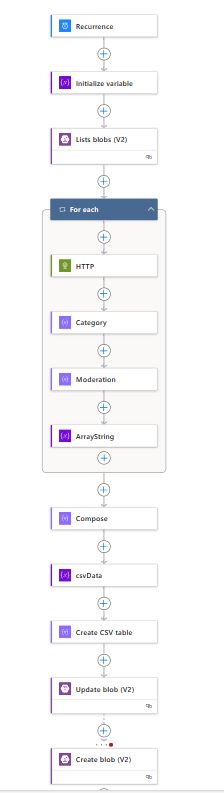
We have our Custom Metadata inserted on our Image Blob Files. Now we need a way to extract these into a CSV or JSON file, so later Microsoft Fabric would provide Analysis. Enter Logic Apps! With a simple Trigger either on a Schedule or whenever a Blob changes we will execute our workflow! The following is the whole code:
{
  "definition": {
    "$schema": "https://schema.management.azure.com/providers/Microsoft.Logic/schemas/2016-06-01/workflowdefinition.json#",
    "contentVersion": "1.0.0.0",
    "triggers": {
      "Recurrence": {
        "type": "Recurrence",
        "recurrence": {
          "interval": 1,
          "frequency": "Week",
          "timeZone": "GTB Standard Time",
          "schedule": {
            "weekDays": [
              "Monday"
            ]
          }
        }
      }
    },
    "actions": {
      "Initialize_variable": {
        "type": "InitializeVariable",
        "inputs": {
          "variables": [
            {
              "name": "Meta",
              "type": "array"
            }
          ]
        },
        "runAfter": {}
      },
      "Lists_blobs_(V2)": {
        "type": "ApiConnection",
        "inputs": {
          "host": {
            "connection": {
              "name": "@parameters('$connections')['azureblob']['connectionId']"
            }
          },
          "method": "get",
          "path": "/v2/datasets/@{encodeURIComponent(encodeURIComponent('strmodapp01'))}/foldersV2/@{encodeURIComponent(encodeURIComponent('JTJmdXBsb2Fkcw=='))}",
          "queries": {
            "nextPageMarker": "",
            "useFlatListing": true
          }
        },
        "runAfter": {
          "Initialize_variable": [
            "Succeeded"
          ]
        },
        "metadata": {
          "JTJmdXBsb2Fkcw==": "/uploads"
        }
      },
      "For_each": {
        "type": "Foreach",
        "foreach": "@body('Lists_blobs_(V2)')?['value']",
        "actions": {
          "HTTP": {
            "type": "Http",
            "inputs": {
              "uri": "https://strmodapp01.blob.core.windows.net/uploads/@{items('For_each')?['Name']}?comp=metadata&sv=2022-11-02&ss=bfqt&srt=sco&sp=rwdlacupiytfx&se=2023-11-30T21:56:52Z&st=2023-11-19T13:56:52Z&spr=https&sig=S4PlM4MJc9SI9e0iD5HlhJPZL3DWkwdEi%2BBIzbpLyX4%3D",
              "method": "GET",
              "headers": {
                "x-ms-version": "2020-06-12",
                "x-ms-date": "@{utcNow()}"
              }
            }
          },
          "Category": {
            "type": "Compose",
            "inputs": "@outputs('HTTP')['headers']['x-ms-meta-Category']",
            "runAfter": {
              "HTTP": [
                "Succeeded"
              ]
            }
          },
          "Moderation": {
            "type": "Compose",
            "inputs": "@outputs('HTTP')['Headers']['x-ms-meta-moderation_status']",
            "runAfter": {
              "Category": [
                "Succeeded"
              ]
            }
          },
          "ArrayString": {
            "type": "AppendToArrayVariable",
            "inputs": {
              "name": "Meta",
              "value": {
                "Category": "@{outputs('Category')}",
                "Moderation": "@{outputs('Moderation')}"
              }
            },
            "runAfter": {
              "Moderation": [
                "Succeeded"
              ]
            }
          }
        },
        "runAfter": {
          "Lists_blobs_(V2)": [
            "Succeeded"
          ]
        }
      },
      "Compose": {
        "type": "Compose",
        "inputs": "@variables('Meta')",
        "runAfter": {
          "For_each": [
            "Succeeded"
          ]
        }
      },
      "Update_blob_(V2)": {
        "type": "ApiConnection",
        "inputs": {
          "host": {
            "connection": {
              "name": "@parameters('$connections')['azureblob']['connectionId']"
            }
          },
          "method": "put",
          "body": "@body('Create_CSV_table')",
          "headers": {
            "ReadFileMetadataFromServer": true
          },
          "path": "/v2/datasets/@{encodeURIComponent(encodeURIComponent('strmodapp01'))}/files/@{encodeURIComponent(encodeURIComponent('/content/csvdata.csv'))}"
        },
        "runAfter": {
          "Create_CSV_table": [
            "Succeeded"
          ]
        },
        "metadata": {
          "JTJmY29udGVudCUyZmNzdmRhdGEuY3N2": "/content/csvdata.csv"
        }
      },
      "Create_blob_(V2)": {
        "type": "ApiConnection",
        "inputs": {
          "host": {
            "connection": {
              "name": "@parameters('$connections')['azureblob']['connectionId']"
            }
          },
          "method": "post",
          "body": "@body('Create_CSV_table')",
          "headers": {
            "ReadFileMetadataFromServer": true
          },
          "path": "/v2/datasets/@{encodeURIComponent(encodeURIComponent('strmodapp01'))}/files",
          "queries": {
            "folderPath": "/content",
            "name": "csvdata.csv",
            "queryParametersSingleEncoded": true
          }
        },
        "runAfter": {
          "Update_blob_(V2)": [
            "Failed"
          ]
        }
      },
      "Create_CSV_table": {
        "type": "Table",
        "inputs": {
          "from": "@variables('csvData')",
          "format": "CSV"
        },
        "runAfter": {
          "csvData": [
            "Succeeded"
          ]
        }
      },
      "csvData": {
        "type": "InitializeVariable",
        "inputs": {
          "variables": [
            {
              "name": "csvData",
              "type": "array",
              "value": "@outputs('Compose')"
            }
          ]
        },
        "runAfter": {
          "Compose": [
            "Succeeded"
          ]
        }
      }
    },
    "outputs": {},
    "parameters": {
      "$connections": {
        "type": "Object",
        "defaultValue": {}
      }
    }
  },
  "parameters": {
    "$connections": {
      "value": {
        "azureblob": {
          "id": "/subscriptions/xxxx/providers/Microsoft.Web/locations/westeurope/managedApis/azureblob",
          "connectionId": "/subscriptions/xxxxxxxxxxx/resourceGroups/rg-modapp/providers/Microsoft.Web/connections/azureblob",
          "connectionName": "azureblob",
          "connectionProperties": {
            "authentication": {
              "type": "ManagedServiceIdentity"
            }
          }
        }
      }
    }
  }
}
And here is the Flow, we can notice it is quite complex to get Custom Metadata from Azure Blob, we need an HTTP Call with specific headers and specific output for the metadata in the format of x-ms-meta: {Custom Key}
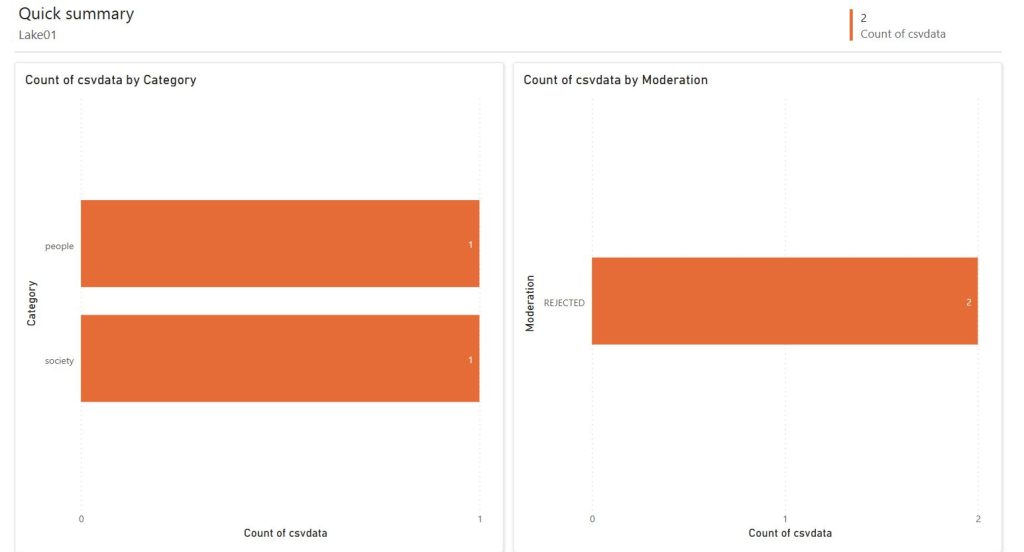
Finally our CSV is stored into a new Container in our Storage Account !
Head over to Microsoft Fabric and create a new Workspace, and a new Copy Task
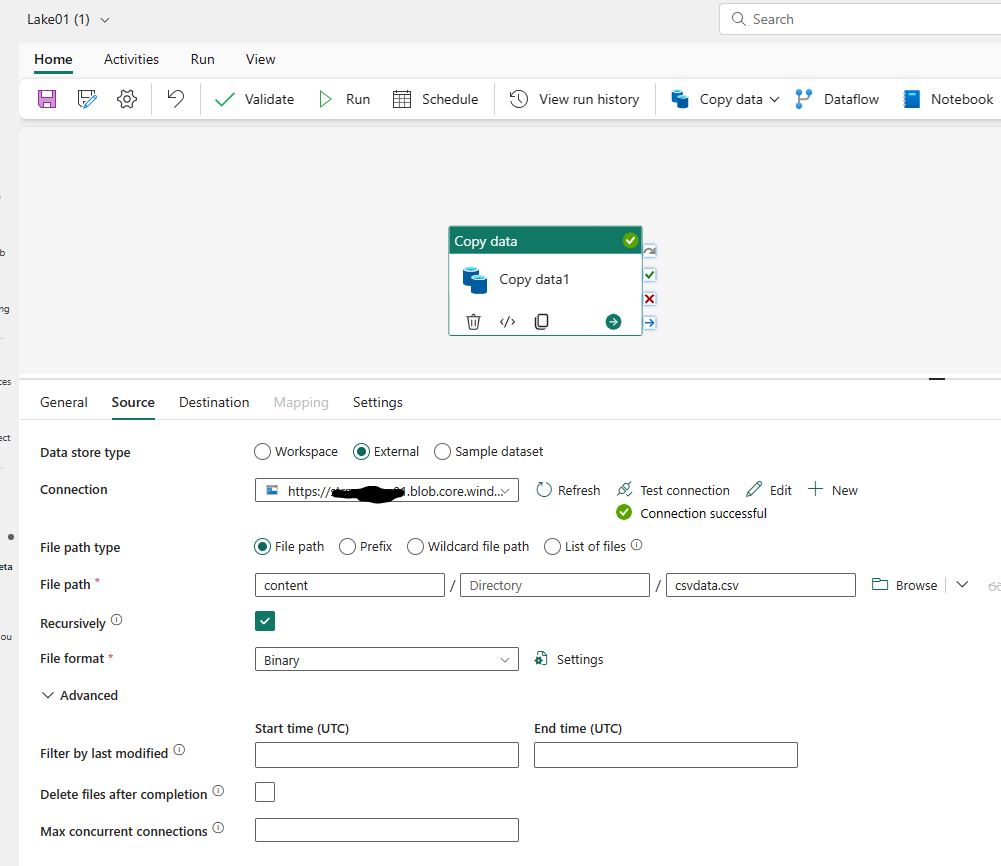
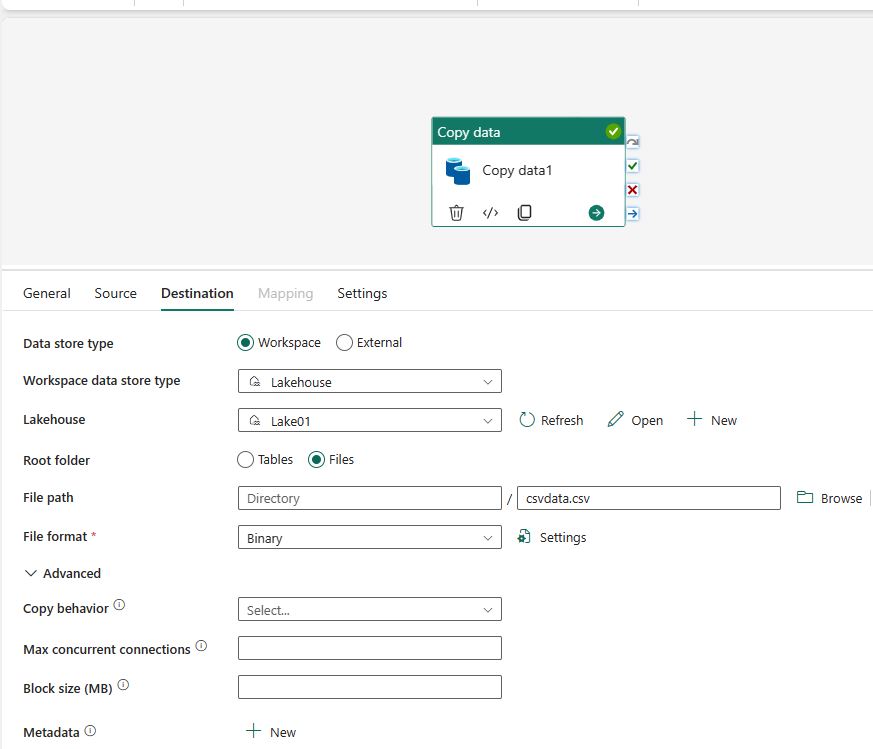
We are moving with this Task our Data directly into the Managed Lakehouse of Fabric Workspace, which we ca run on a schedule or with a Trigger. Next we will create a Semantic Model but first let’s create a Table from our CSV. Find your File into the Lakehouse selection.
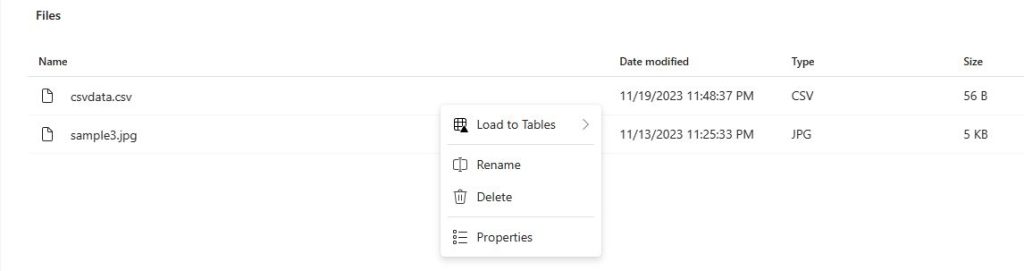
Remember you need to create a new Lakehouse in the Workspace ! Now select the file we inserted with the Pipeline and from the elipsis menu select Load to Tables :
Go to the Tables Folder and create a new Semantic Model for the Table:

On the semantic model editing experience, you are able to define relationships between multiple tables, and also apply data types normalization and DAX transformations to the data if desired.
Select New report on the ribbon.
Use the report builder experience to design a Power BI report.
And there you have it !
A complete Application where we utilized Azure Content Safety, and Microsoft Fabric to moderate and perform analysis on images that our users upload !
Conclusion
In this exploration, we’ve journeyed through the intricate and powerful capabilities of Azure Content Safety and its seamless integration with custom metadata, culminating in robust analysis using Fabric. Our journey demonstrates not only the technical proficiency of Azure’s tools in moderating and analyzing content but also underscores the immense potential of cloud computing in enhancing content safety and insights.
By harnessing the power of Azure’s content moderation features and the analytical prowess of Fabric, we’ve unlocked new frontiers in data management and analysis. This synergy empowers us to make informed decisions, ensuring a safer and more compliant digital environment.
References