Create a custom User Registration and Login System with Azure SQL and Web Apps API

Welcome to CloudBlogger !
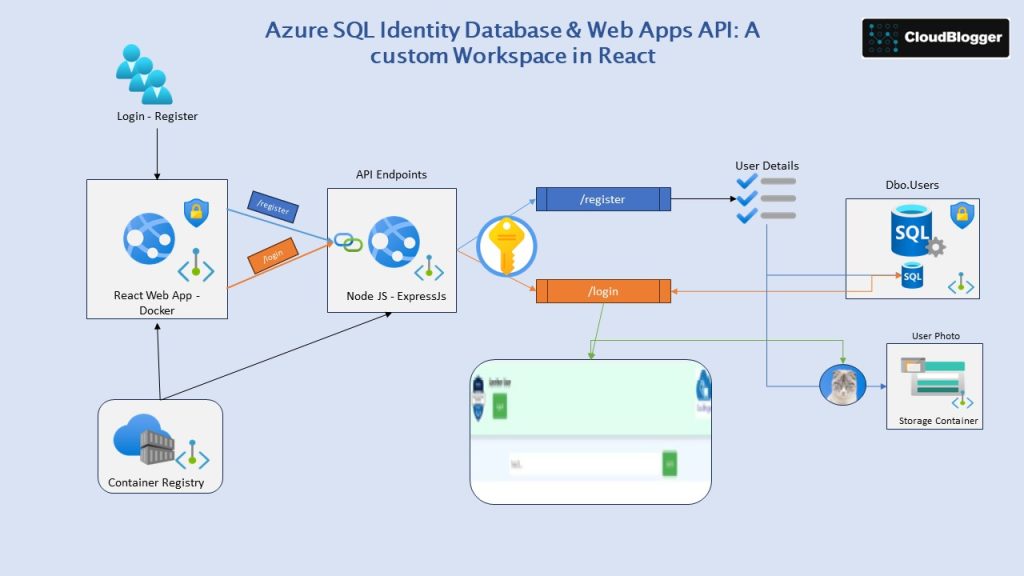
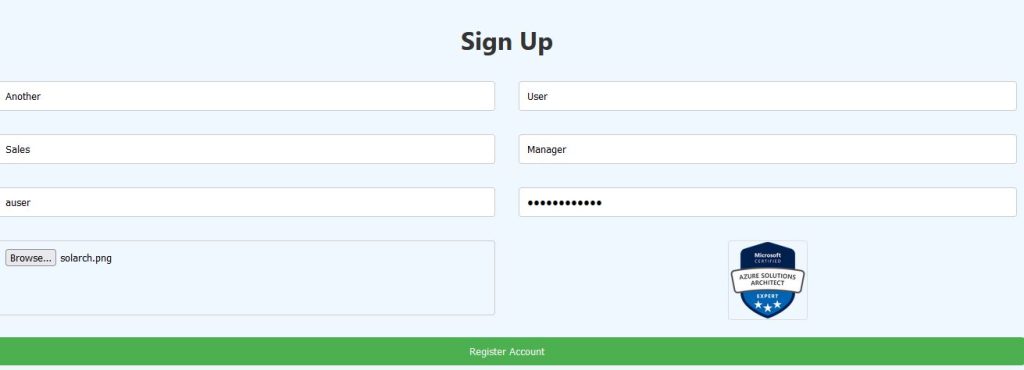
Today we are building our own Identity System, let users enter their registration details with their Photo and login into a Dashboard. The System is based on Azure SQL Database and Azure Web Apps for the Frontend and the Backend functions!
Intro
Azure SQL is a family of managed, secure, and intelligent products that use the SQL Server database engine in the Azure cloud. Azure SQL is built upon the familiar SQL Server engine, so you can migrate applications with ease and continue to use the tools, languages, and resources you’re familiar with.
Azure App Service is a platform-as-a-service (PaaS) offered in Microsoft Azure that enables developers to quickly build, deploy, and scale web, mobile, and API applications. Azure Web Apps is a specific type of Azure App Service that is focused on hosting web applications.
Azure Web Apps provides a fully managed platform for building and hosting web applications using popular programming languages such as .NET, Java, Node.js, Python, and PHP. It includes features like automatic scaling, load balancing, traffic management, continuous deployment, and monitoring.
Azure App Service, on the other hand, is a broader category that includes Azure Web Apps, as well as other App Service offerings such as Azure Functions (for serverless computing), Azure Logic Apps (for workflow automation), and Azure API Management (for managing APIs).
Build
We are building 2 Web Apps , where the frontend consists of a React Web Application with Sign Up and Sign In features and a user Dashboard with a small surprise in it ! The backend is the API endpoint where it handles the Sign Up and the Login process, so our code is connecting with Azure SQL Database to insert data and verify data as well with all relevant queries. Both Web Apps are Docker Images pushed into an Azure Container Registry and pulled from the Web App service.
IAC-Terraform
Starting with the infrastructure elements Terraform will help us create swiftly the basic resources while later on we are going to make additional configurations.
We have explored quite a lot of Terraform how-to, so let’s dive in the Main Configuration file. Observe the resources build, like the resource group , Azure Container Registry and of course Azure SQL and Database. Also, we are incorporating into IaC the required code to create the Table !
resource "azurerm_resource_group" "rgroup" {
  name     = "rg-myapp"
  location = "West Europe"
}
resource "random_string" "str-name" {
  length  = 5
  upper   = false
  numeric = false
  lower   = true
  special = false
}

# Create Log Analytics Workspace
resource "azurerm_log_analytics_workspace" "logs" {
  name                = "Logskp"
  location            = azurerm_resource_group.rgroup.location
  resource_group_name = azurerm_resource_group.rgroup.name
  sku                 = "PerGB2018"
  retention_in_days   = 30
}

# Create Application Insights
resource "azurerm_application_insights" "appinsights" {
  name                = "appin${random_string.str-name.result}"
  location            = azurerm_resource_group.rgroup.location
  resource_group_name = azurerm_resource_group.rgroup.name
  workspace_id        = azurerm_log_analytics_workspace.logs.id
  application_type    = "other"
}

# Azure SQL Server
resource "azurerm_mssql_server" "sqlsrv" {
  name                         = "sql${random_string.str-name.result}"
  resource_group_name          = azurerm_resource_group.rgroup.name
  location                     = azurerm_resource_group.rgroup.location
  version                      = "12.0"
  administrator_login          = var.sql_admin_username
  administrator_login_password = var.sql_admin_password

  azuread_administrator {
    login_username = "xxxxxxxxx"
    object_id      = "xxxxxxxx"
  }
  public_network_access_enabled = true
}

#Create Azure SQL Firewall Rule
resource "azurerm_mssql_firewall_rule" "fwall" {
  name             = "FirewallRule1"
  server_id        = azurerm_mssql_server.sqlsrv.id
  start_ip_address = "0.0.0.0"
  end_ip_address   = "255.255.255.255"
}

# Azure SQL Database
resource "azurerm_mssql_database" "sqldb" {
  name               = "dbusesearch02"
  server_id          = azurerm_mssql_server.sqlsrv.id
  license_type       = "LicenseIncluded"
  sku_name           = "Basic"
  collation          = "SQL_Latin1_General_CP1_CI_AS"
  geo_backup_enabled = false

}

# Create a local provisioner for SQL Table
resource "null_resource" "sql-table" {
  provisioner "local-exec" {
    command = "sqlcmd -S ${azurerm_mssql_server.sqlsrv.fully_qualified_domain_name} -U ${var.sql_admin_username} -P ${var.sql_admin_password} -d ${azurerm_mssql_database.sqldb.name} -i createtable.sql"
  }
  depends_on = [azurerm_mssql_database.sqldb]
}

# Create Storage Account
resource "azurerm_storage_account" "storage" {
  name                     = "st${random_string.str-name.result}"
  resource_group_name      = azurerm_resource_group.rgroup.name
  location                 = azurerm_resource_group.rgroup.location
  account_tier             = "Standard"
  account_replication_type = "LRS"
}
# Create Storage Container
resource "azurerm_storage_container" "container" {
  name                  = "pics"
  storage_account_name  = azurerm_storage_account.storage.name
  container_access_type = "container"
}
# Create Azure Container Registry
resource "azurerm_container_registry" "acr" {
  name                          = "azr${random_string.str-name.result}"
  resource_group_name           = azurerm_resource_group.rgroup.name
  location                      = azurerm_resource_group.rgroup.location
  sku                           = "Premium"
  admin_enabled                 = true
  data_endpoint_enabled         = true
  public_network_access_enabled = true
}
# Create User Assigned Managed Identity
resource "azurerm_user_assigned_identity" "uami" {
  name                = "uami${random_string.str-name.result}"
  location            = azurerm_resource_group.rgroup.location
  resource_group_name = azurerm_resource_group.rgroup.name
}

# Call Key Vault Module
module "keyvault" {
  source                         = "./modules/keyvault"
  sql_admin_username             = var.sql_admin_username
  sql_admin_password             = var.sql_admin_password
  azurerm_resource_group         = azurerm_resource_group.rgroup.name
  storage_account_name           = azurerm_storage_account.storage.name
  sql_database_name              = azurerm_mssql_database.sqldb.name
  sql_server_name                = azurerm_mssql_server.sqlsrv.fully_qualified_domain_name
  azurerm_storage_account        = azurerm_storage_account.storage.name
  azurerm_mssql_database         = azurerm_mssql_database.sqldb.name
  azurerm_user_assigned_identity = azurerm_user_assigned_identity.uami.name
  random_string                  = random_string.str-name.result
  location                       = azurerm_resource_group.rgroup.location
  azurerm_storage_account_string = azurerm_storage_account.storage.primary_connection_string
}
This is our main file where we create the basic structure like SQL Database and Table, Azure Container Registry, Storage Account etc.
We need also to secure our variables like the JWT token and SQL Username & Password and so on !
Lets create a Module and serve it as such into our Terraform (lines 105-120):
# Create Azure Key Vault
data "azurerm_client_config" "current" {}
resource "azurerm_key_vault" "keyvault" {
  name                        = "kv${var.random_string}"
  location                    = var.location
  resource_group_name         = var.azurerm_resource_group
  enabled_for_disk_encryption = true
  tenant_id                   = data.azurerm_client_config.current.tenant_id
  purge_protection_enabled    = false
  sku_name                    = "standard"
  enable_rbac_authorization   = true
  public_network_access_enabled = true
}
resource "azurerm_role_assignment" "role1" {
  scope                = azurerm_key_vault.keyvault.id
  role_definition_name = "Key Vault Secrets Officer"
  principal_id         = data.azurerm_client_config.current.object_id
}
resource "azurerm_role_assignment" "role2" {
  scope                = azurerm_key_vault.keyvault.id
  role_definition_name = "Key Vault Secrets User"
  principal_id         = var.azurerm_user_assigned_identity
}
resource "azurerm_key_vault_secret" "sql_admin_username" {
  name         = "sql-admin-username"
  value        = var.sql_admin_username
  key_vault_id = azurerm_key_vault.keyvault.id
}
resource "azurerm_key_vault_secret" "sql_admin_password" {
  name         = "sql-admin-password"
  value        = var.sql_admin_password
  key_vault_id = azurerm_key_vault.keyvault.id
}
resource "azurerm_key_vault_secret" "sql_server_name" {
  name         = "sql-server-name"
  value        = var.sql_server_name
  key_vault_id = azurerm_key_vault.keyvault.id
}
resource "azurerm_key_vault_secret" "sql_database_name" {
  name         = "sql-database-name"
  value        = var.azurerm_mssql_database
  key_vault_id = azurerm_key_vault.keyvault.id
}
# Create Key Vault Secret for Storage Account
resource "azurerm_key_vault_secret" "storage_account_name" {
  name         = "storage-account-name"
  value        = var.azurerm_storage_account
  key_vault_id = azurerm_key_vault.keyvault.id
}
# Create Key Vault Secret for Storage Account Connection String
resource "azurerm_key_vault_secret" "storage_account_connection_string" {
  name         = "storage-account-connection-string"
  value        = var.azurerm_storage_account_string
  key_vault_id = azurerm_key_vault.keyvault.id
}
# Create Key Vault Random JWT Secret
resource "random_password" "jwt_secret" {
  length           = 32
  special          = false
  override_special = "_%@"
}
# Store JWT Secret in Key Vault
resource "azurerm_key_vault_secret" "jwtsecret" {
name    = "jwt-secret"
value   = random_password.jwt_secret.result
key_vault_id = azurerm_key_vault.keyvault.id
}
Be aware you need two roles ahead , Key Vault Data Access Administrator on the Principal that you use for Terraform , and the new Role Based Access Control Administrator with conditions to allow only these specific roles.
Proceed to create the necessary providers.tf, variables.tf and terraform.tfvars files and run :
terraform fmt # Format your main.tf , nothing changes
terraform validate # checks and informs for errors in config
terraform plan # build the list of resources and changes to be applied
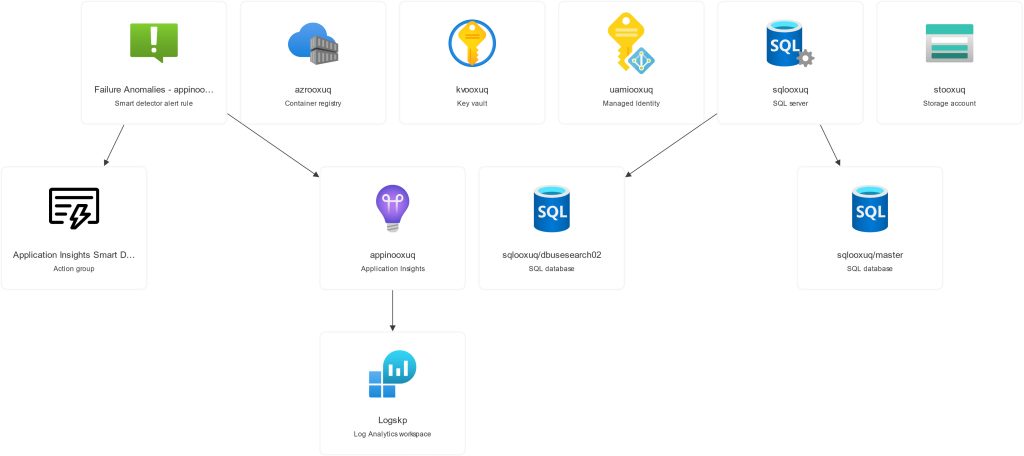
terraform apply # deploy all resourcesThe resource visualizer should look like this:
API
Our main infrastructure is ready! We need the backend first, so can get the endpoint URL for the frontend React Web App. Let’s have a look on our code which is a NodeJS-ExpressJS API serving application. If you choose not to incorporate Key Vault, it is important to update our .env file with the required variables taken form the infrastructure we just build such as :
DB_USER=xxxxxx
DB_PASSWORD=xxxxxx
DB_DATABASE=xxxx
DB_SERVER=xxxxxxx.database.windows.net
STORAGE_ACCOUNT_NAME=xxxxx
AZURE_STORAGE_CONNECTION_STRING=xxxxxxxx
JWT_SECRET=bpnyyyvjgpsajbkgreqyfrdltgiwojnvgscockkizqajnhmnxrvntmeviqwuopie // A multi-character Token
Otherwise we only need the Key Vault Name in the file and this example is using Key Vault.
The server.js file which is the “orchestrator” of our User’s Sign Up and Sign In methods, since it uploads the Photo to the Storage Account, runs the Query against the SQL Db to insert user details upon registration, and looks up the details {username, password} when a user tries to sign in. Observe the password hash procedure, where we never store the Password as Plain Text:
import dotenv from 'dotenv';
import express from 'express';
import sql from 'mssql';
import bcrypt from 'bcrypt';
import jwt from 'jsonwebtoken';
import multer from 'multer';
import azureStorage from 'azure-storage';
import getStream from 'into-stream';
import cors from 'cors';
import { SecretClient } from "@azure/keyvault-secrets";
import { DefaultAzureCredential } from "@azure/identity";

dotenv.config();

const app = express();
app.use(cors({ origin: '*' }));
app.use((req, res, next) => {
    res.setHeader('X-Content-Type-Options', 'nosniff');
    next();
});

app.use(express.json());

const vaultName = process.env.AZURE_KEY_VAULT_NAME;
const vaultUrl = `https://${vaultName}.vault.azure.net`;
const credential = new DefaultAzureCredential();
const secretClient = new SecretClient(vaultUrl, credential);

async function getSecret(secretName) {
    const secret = await secretClient.getSecret(secretName);
    return secret.value;
}

const inMemoryStorage = multer.memoryStorage();
const uploadStrategy = multer({ storage: inMemoryStorage }).single('photo');

let sqlConfig;
let storageAccountName;
let azureStorageConnectionString;
let jwtSecret;

async function initializeApp() {
    sqlConfig = {
        user: await getSecret("sql-admin-username"),
        password: await getSecret("sql-admin-password"),
        database: await getSecret("sql-database-name"),
        server: await getSecret("sql-server-name"),
        options: {
            encrypt: true,
            trustServerCertificate: false
        }
    };

    storageAccountName = await getSecret("storage-account-name");
    azureStorageConnectionString = await getSecret("storage-account-connection-string");
    jwtSecret = await getSecret("jwt-secret");

    app.listen(process.env.PORT || 3001, () => console.log(`Server is running on port ${process.env.PORT || 3001}`));
}

// Upload photo endpoint
app.post('/uploadphoto', uploadStrategy, (req, res) => {
    if (!req.file) {
        return res.status(400).send('No file uploaded.');
    }

    const blobName = `userphotos/${Date.now()}_${req.file.originalname}`;
    const stream = getStream(req.file.buffer);
    const streamLength = req.file.buffer.length;
    const blobService = azureStorage.createBlobService(azureStorageConnectionString);

    blobService.createBlockBlobFromStream('pics', blobName, stream, streamLength, err => {
        if (err) {
            console.error(err);
            res.status(500).send('Error uploading the file');
        } else {
            const photoUrl = `https://${storageAccountName}.blob.core.windows.net/pics/${blobName}`;
            res.status(200).send({ photoUrl });
        }
    });
});

// Register endpoint
app.post('/register', uploadStrategy, async (req, res) => {
    const { firstName, lastName, username, password, department, position } = req.body;
    if (!password) {
        return res.status(400).send({ message: 'Password is required' });
    }

    let photoUrl = '';
    if (req.file) {
        const blobName = `userphotos/${Date.now()}_${req.file.originalname}`;
        const stream = getStream(req.file.buffer);
        const streamLength = req.file.buffer.length;
        const blobService = azureStorage.createBlobService(azureStorageConnectionString);

        await new Promise((resolve, reject) => {
            blobService.createBlockBlobFromStream('pics', blobName, stream, streamLength, err => {
                if (err) {
                    console.error(err);
                    reject(err);
                } else {
                    photoUrl = `https://${storageAccountName}.blob.core.windows.net/pics/${blobName}`;
                    resolve();
                }
            });
        });
    }

    const hashedPassword = await bcrypt.hash(password, 10);

    try {
        let pool = await sql.connect(sqlConfig);
        let result = await pool.request()
            .input('username', sql.NVarChar, username)
            .input('password', sql.NVarChar, hashedPassword)
            .input('firstname', sql.NVarChar, firstName)
            .input('lastname', sql.NVarChar, lastName)
            .input('department', sql.NVarChar, department)
            .input('position', sql.NVarChar, position)
            .input('photoUrl', sql.NVarChar, photoUrl)
            .query(`
                INSERT INTO Users
                (Username, PasswordHash, FirstName, LastName, Department, Position, PhotoUrl)
                VALUES
                (@username, @password, @firstName, @lastName, @department, @position, @photoUrl)
            `);

        res.status(201).send({ message: 'User registered successfully' });
    } catch (error) {
        console.error(error);
        res.status(500).send({ message: 'Error registering user' });
    }
});

// Login endpoint
app.post('/login', async (req, res) => {
    try {
        let pool = await sql.connect(sqlConfig);
        let result = await pool.request()
            .input('username', sql.NVarChar, req.body.username)
            .query('SELECT UserId, PasswordHash FROM Users WHERE Username = @username');

        if (result.recordset.length === 0) {
            return res.status(401).send({ message: 'Invalid username or password' });
        }

        const user = result.recordset[0];
        const validPassword = await bcrypt.compare(req.body.password, user.PasswordHash);

        if (!validPassword) {
            return res.status(401).send({ message: 'Invalid username or password' });
        }

        const token = jwt.sign({ UserId: user.UserId }, jwtSecret, { expiresIn: '1h' });
        res.send({ token: token, UserId: user.UserId });
    } catch (error) {
        console.error(error);
        res.status(500).send({ message: 'Error logging in' });
    }
});

// Get user data endpoint
app.get('/user/:UserId', async (req, res) => {
    try {
        let pool = await sql.connect(sqlConfig);
        let result = await pool.request()
            .input('UserId', sql.Int, req.params.UserId) // Corrected line
            .query('SELECT Username, FirstName, LastName, Department, Position, PhotoUrl FROM Users WHERE UserId = @UserId');

        if (result.recordset.length === 0) {
            return res.status(404).send({ message: 'User not found' });
        }

        const user = result.recordset[0];
        res.send(user);
    } catch (error) {
        console.error(error);
        res.status(500).send({ message: 'Error fetching user data' });
    }
});

initializeApp().catch(error => {
    console.error("Error initializing application:", error);
});
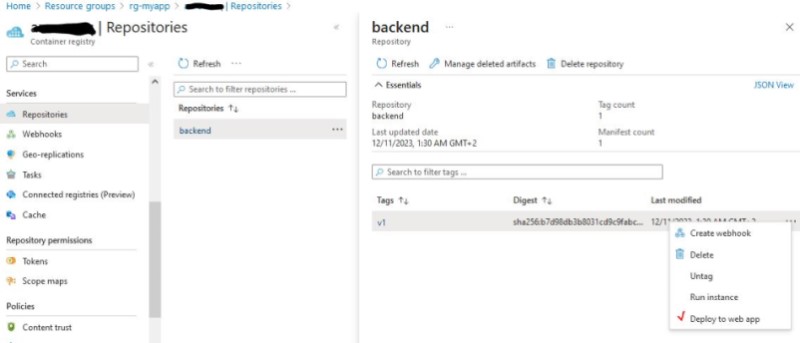
Let’s build with [ docker build -t backend . ] , and tag and push: [ docker tag backend {acrname}.azurecr.io/backend:v1 ] , [ docker push {acrname}.azurecr.io/backend:v1 ]. We will be able to see our new Repo on Azure Container Registry and deploy our new Web App :
Now we have to build our React App . To save space and time i wont post the code here. Please be patient and a complete Git repo with all React Apps will be soon available ! So assuming we have 2 Azure Web Apps lets make final adjustments.
- Cors Settings : Allow * or set the URLs, same for the Storage Account
- Add SQL DB Contributor role to the backend app. It is needed. You can just assign the User Managed Identity we created earlier to the App and add the role.
- Make sure that the Docker Images are deployed correctly. I have seen the Container Registry not activating the artifcact streaming option, so check everything.
- Be patient, new changes take some time!
So, we have the Web Apps ready ! Let’s go ahead and hit the URL.
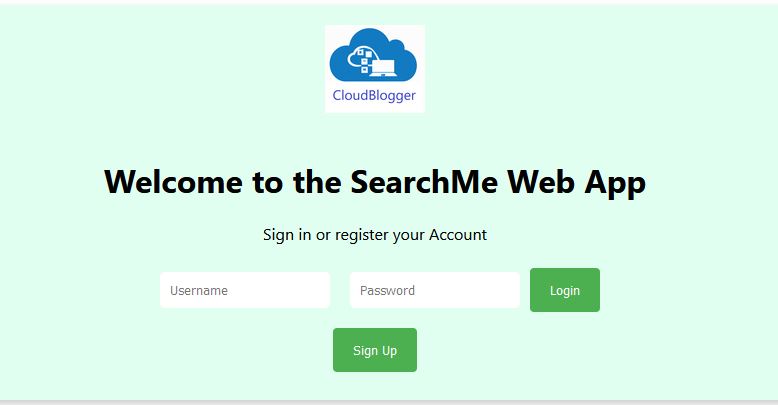
Try to register and then head over to the SQL DB. See the new record and all new records each time you Sign Up. Observe the Password hash and the Photo URL of our Photo.
Login once you are registered and you are taken to the Dashboard:

The search bar is the surprise for Part 2 !
Closing
We used the power of Azure Web Apps along with the immersive excellence of Azure SQL and integrated quite a number of different applications and Frameworks seamlessly, to build our own Identity System.
A step further we can add advanced security and lock dows access, as well as incorporate Azure API to hold our endoints with additonal security features.
Stay tuned for Part 2 for the Search Application to take it’s final form and also add some more features as the ones we mentioned ! Cheers !