How to create a CoPilot and use it in your Blog with your blog’s Data

Intro
Welcome to a new CloudBlogger exciting post! Today, we’re going to embark on an exciting journey of creating our very own AI assistant, or ‘Copilot’, using the powerful Copilot Studio. But that’s not all! We’ll also learn how to seamlessly integrate this Copilot into our WordPress site, transforming it into a dynamic, interactive platform. Our WordPress site will serve as the primary data source, enabling our Copilot to provide personalized and context-aware responses. Whether you’re a seasoned developer or a tech enthusiast, this guide will offer a step-by-step approach to leverage AI capabilities for your WordPress site. So, let’s dive in and start our AI adventure!
Preparation
Luckily we can try the Copilot Studio with a trial license. So head on to https://learn.microsoft.com/en-us/microsoft-copilot-studio/sign-up-individual and find all the details. You will have to sign in with a Microsoft 365 user email. You need a Microsoft 365 Tenant as you understand!
This Trial license is NOT the Microsoft 365 Copilot that adds AI and Copilots to your Microsoft 365 Apps. This is the previously known as Power Virtual Agents Application, that was eventually renamed to Copilot Studio.
https://learn.microsoft.com/en-us/microsoft-copilot-studio/fundamentals-what-is-copilot-studio
For those who are actively using Power Apps i suggest to have a god look at https://learn.microsoft.com/en-us/microsoft-copilot-studio/environments-first-run-experience, so you can grasp the details regarding Environments.
Creation
Once we are ready, head over to https://copilotstudio.microsoft.com and you can start working with new Copilots!
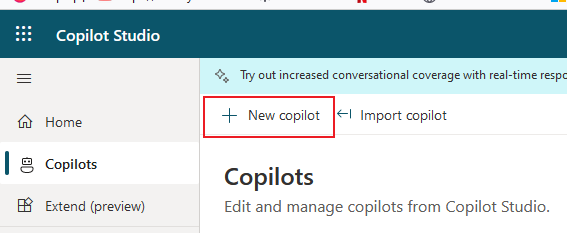
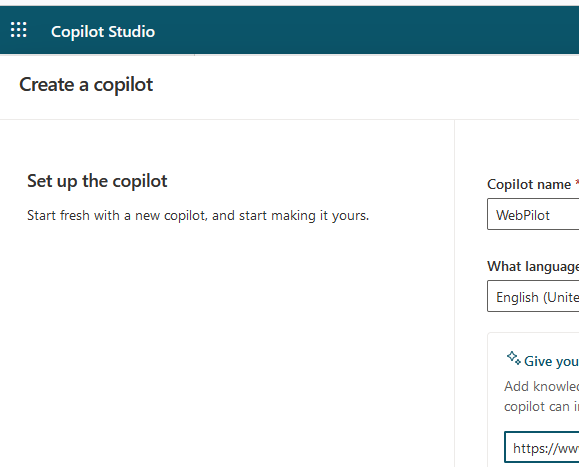
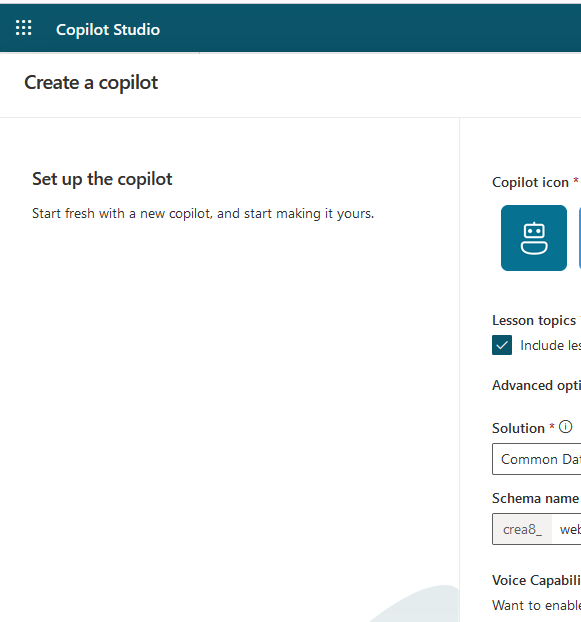
Let’s create one shall we ? Select the upper left Copilots menu, and New Copilot. Add the name you want and add your Blog\Site where the Copilot will get it’s data. Go to the bottom and select Edit Advanced Options and check the “Include lesson topics…”, select a icon and leave the default “Common Data Services Default Solution”.
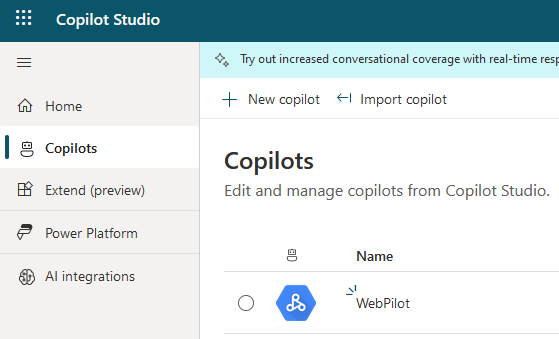
Once you create the Copilot you will find it in the left menu on the Copilots section:
Configure
The first thing we are going to do is to change the Copilot message for salutation. There is a default one which we can change once we click on the Copilot and inside the chat box of the Copilot message. We will find on the left designer area the predefined message which we will change to our preference.
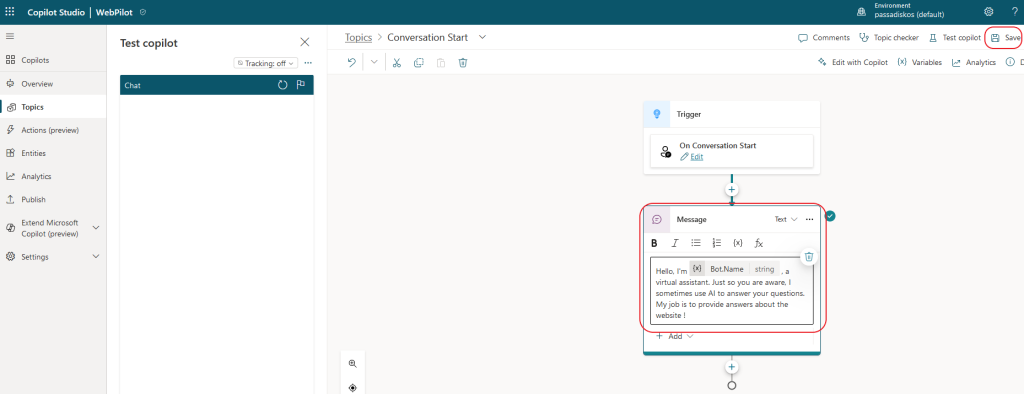
Remember to Save your changes!
Topics
The most important element of our Copilot are the Topics. Topics are the core building blocks of a chatbot. Topics can be seen as the bot competencies: they define how a conversation dialog plays out. Topics are discrete conversation paths that, when used together, allow for users to have a conversation with a bot that feels natural and flows appropriately.
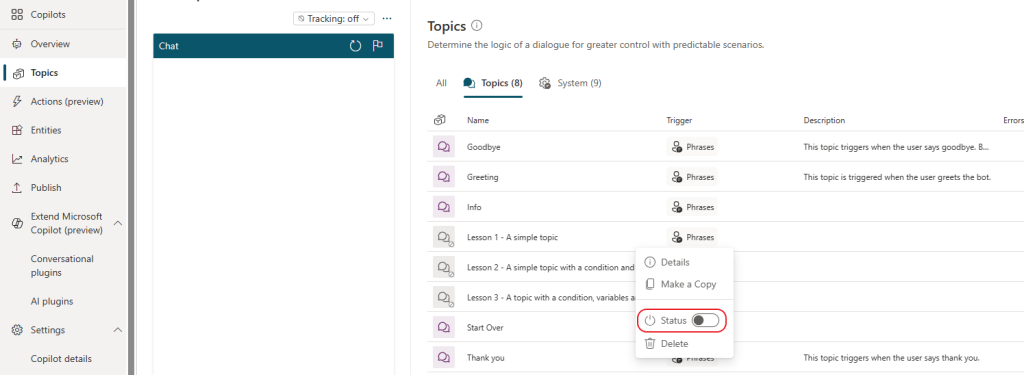
In our Copilot we have 3 Topics that we do not need, so from the Topics menu, select each Lesson Topic, from the dotted selection and disable it. You can also delete completely these three unneeded Topics.
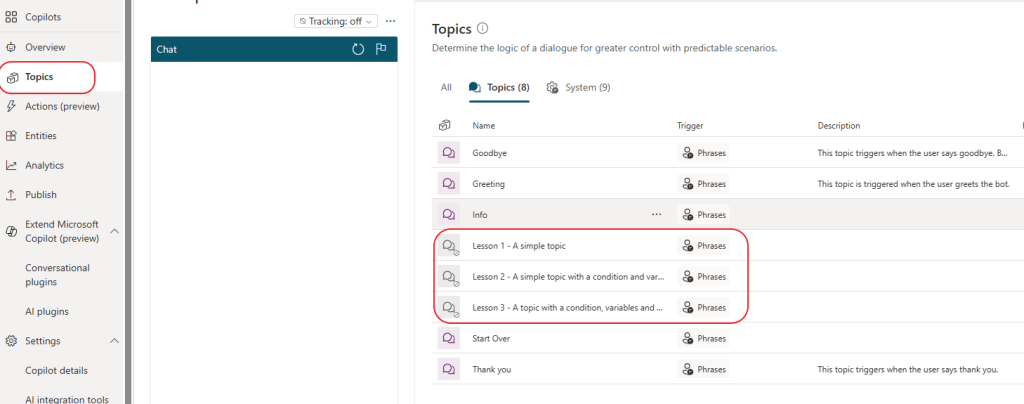
It is also important to disable Topics that we don’t need otherwise we have to resolve any errors on the existing Topics, since we are making changes. The Topics we need to disable are in grey :
Before starting deep we also changed a standard Topic named “Goodbye”. You will understand that we may need to make it simpler so here is a proposed version:
As you can see we just changed the end of the Chat with a simple “Thanks for using …”
We also propose to change the Greeting to Redirect to the Conversation Start for a unified experience !
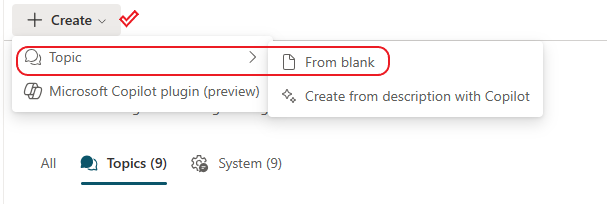
Let’s create a simple Topic, where the Copilot responds to specific questions. You can add your own phrases as well. From the Topics menu select “Create” – “Topic” – “From Blank”
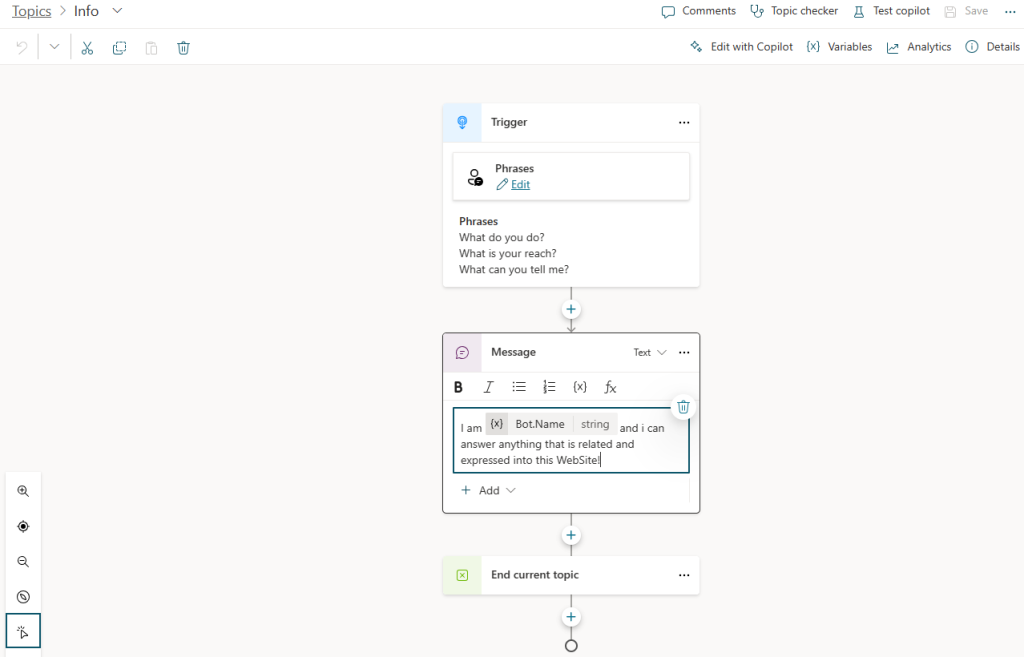
Add the Trigger phrases you wish. We have selected the following :
What do you do?, What is your reach?, What can you tell me?
Add a node with the Message property and add the text which the Copilot will use to answer. You can add the name of the Copilot by selecting the variable icon inside the node. Add a final node that ends this topic:
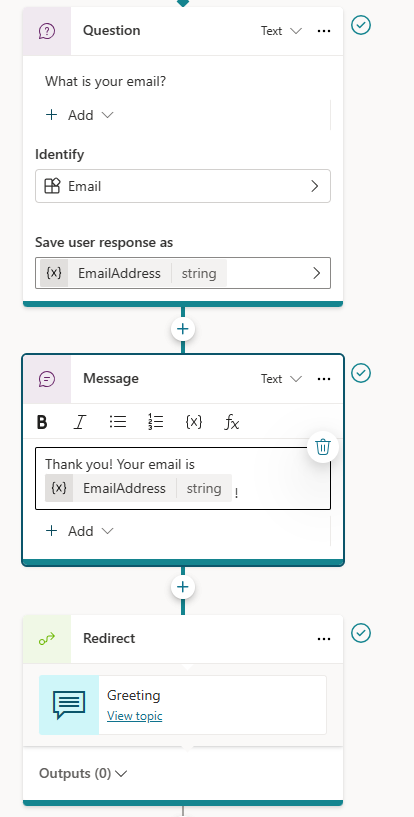
You can edit the name of your Topic in the upper left corner, and save it ! Before anything you can always test it on the left chat box! Now let’s do something more creative ! Let’s ask the user if they would provide their email so we can send a summary of the conversation ! The Copilot should make it clear that it is optional and should not interrupt the conversation. So the first thing we need to do is to add a new Topic where we can get the user’s email address and store it as a variable. Since the user can request to provide the email later, we can offer this option as well, with the trigger. Here is our Topic:
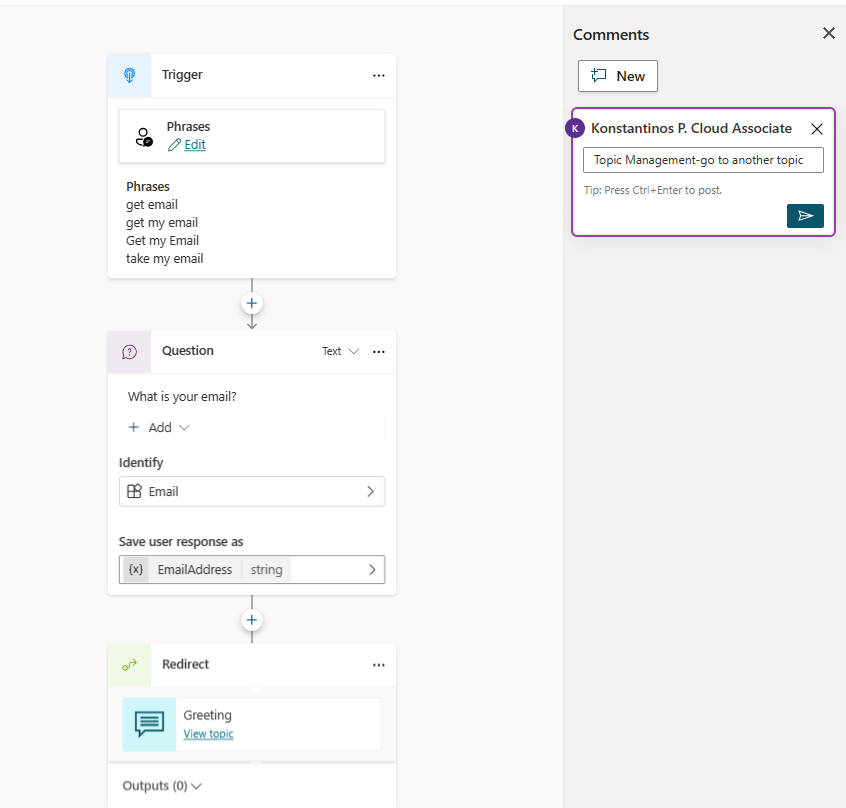
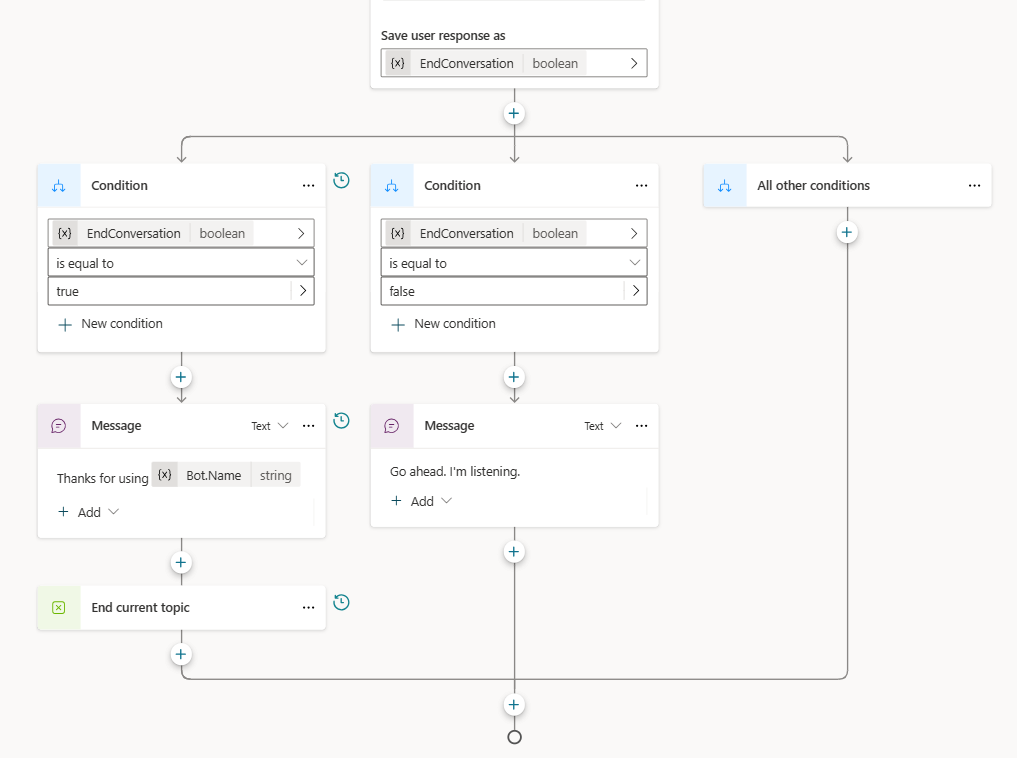
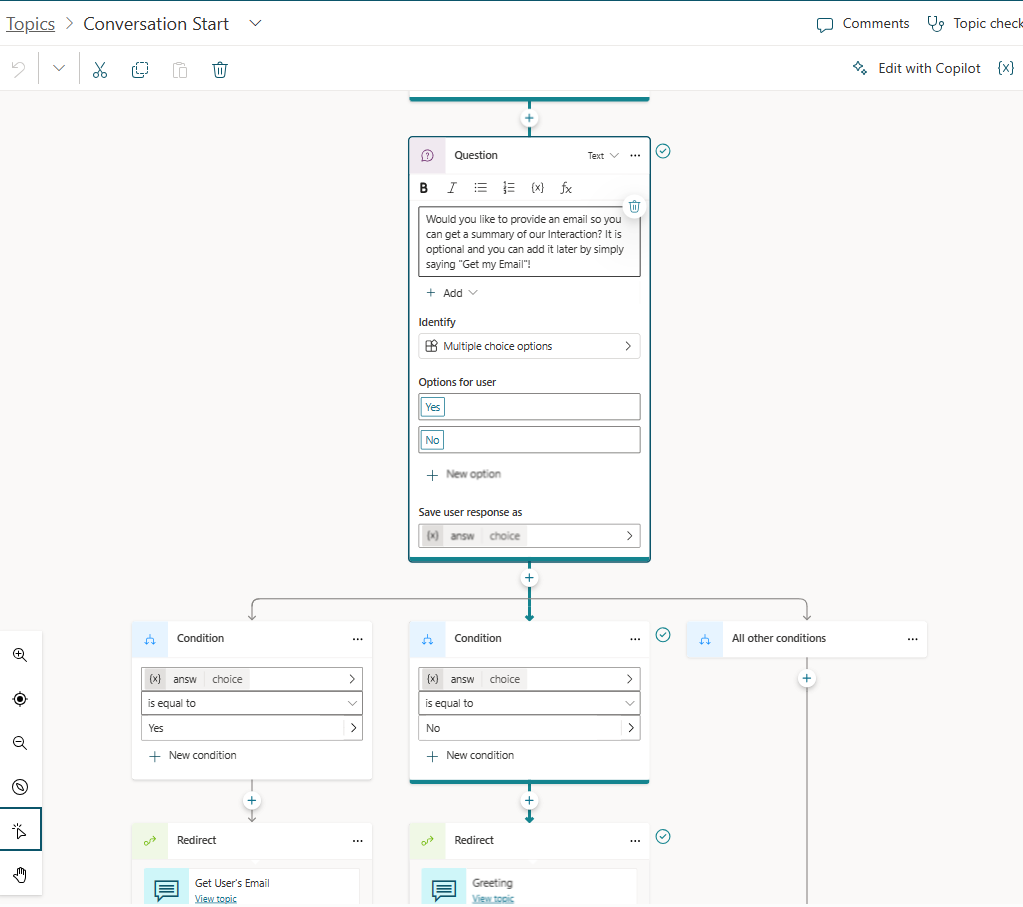
Pay attention to the closing node and the comment. We have added a Redirect to the Greeting Topic, so we can avoid falling in the Loop of the Start Conversation. To do that we add a new node, Topic Management – Go to another Topic. Now let’s build the the request with a condition, by editing the Conversation Start Topic ( the one we edited at the beginning ). From the Topics menu select All and find the Conversation Start Topic. Add a new Node after the Message with a question. We have this text so the user is aware about the options they have:
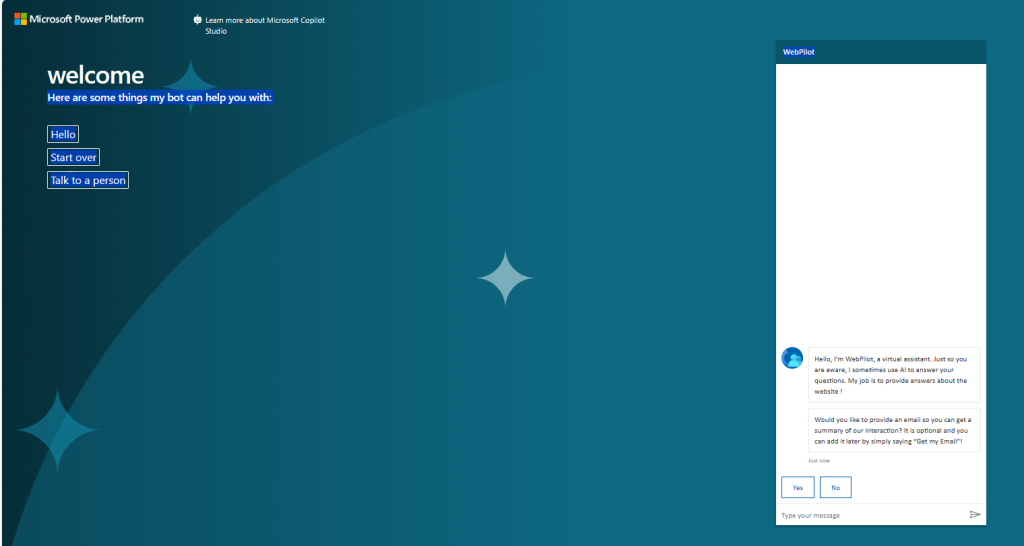
Would you like to provide an email so you can get a summary of our Interaction? It is optional and you can add it later by simply saying “Get my Email”!
In this Question Node, select the Multiple Choice options and add the YES and NO possible answers, while saving the answer on a variable. You can rename the variable if you want to. The next node is an “Add a Condition” node and when the answer is YES we send the conversation to the Get User’s Email Topic, while the opposite we send it to the Greeting. Here is our design for the Topic:
Save the Topic, and you can test your Copilot on the left Chat box. You will notice that we can’t redirect the user without a validation message. So we can edit the Get User’s Email Topic with a Message Node like this:
Now we have the basic idea of the Topics ! Play around and create your paths ! Be careful not to fall under loops and always try the Copilot !
We can expand to Power Apps for Data operations , like storing the Email to a Table or creating a Flow in Power automate but that’s not our focus.
Authentication-Channels
Once we are happy with our Copilot we need to make it available to our Channels, specifically to Web Sites. If we select Channels from the left menu we will get a message about Authentication:
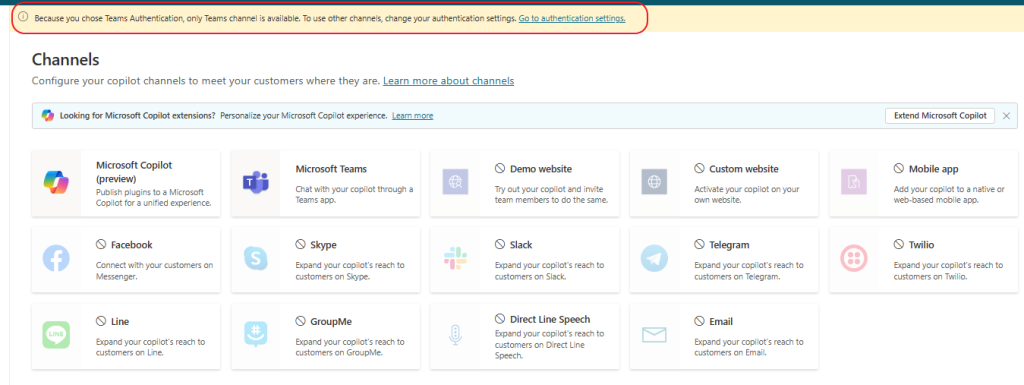
So we have to follow a straight forward process to configure Authentication for our Copilot to be available in all Channels. Unless we want users to Sign in we won’t activate that option but you can always change that option. We will enable Entra ID as our Service Provider.
The following part is from Microsoft Documentation
Source:
Configure user authentication with Microsoft Entra ID – Microsoft Copilot Studio | Microsoft Learn
Create an app registration
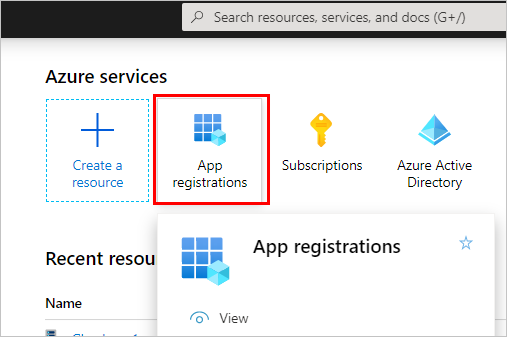
- Sign in to the Azure portal, using an admin account in the same tenant as your copilot.
- Go to App registrations, either by selecting the icon or searching in the top search bar.
- Select New registration and enter a name for the registration.It can be helpful later to use the name of your copilot. For example, if your copilot is called “Contoso sales help,” you might name the app registration “ContosoSalesReg.”
- Under Supported account types, select Accounts in any organizational directory (Any Microsoft Entra ID directory – Multitenant) and personal Microsoft accounts (e.g. Skype, Xbox).
- Leave the Redirect URI section blank for now. Enter that information in the next steps.
- Select Register.
- After the registration is complete, go to Overview.
- Copy the Application (client) ID and paste it in a temporary file. You need it in later steps.
Add the redirect URL
- Go to Authentication, and then select Add a platform.
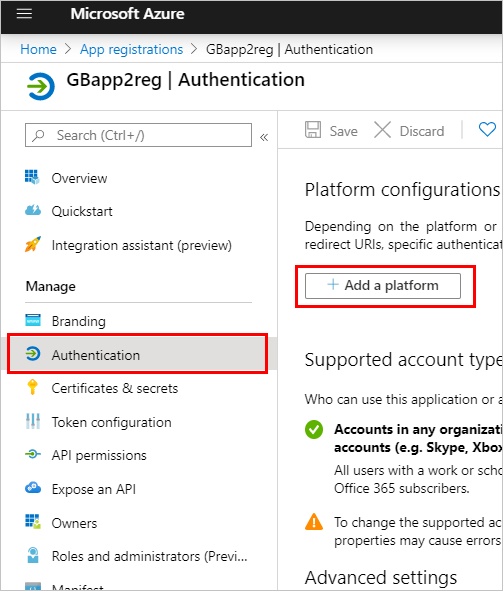
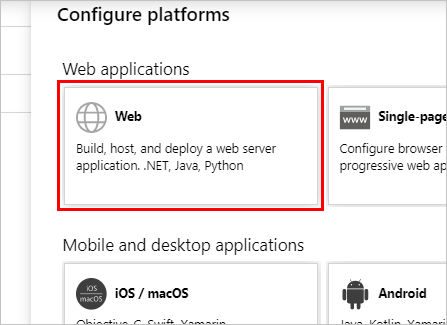
- Under Platform configurations, select Add a platform, and then select Web.
- Under Redirect URIs, enter
https://token.botframework.com/.auth/web/redirectandhttps://europe.token.botframework.com/.auth/web/redirect.
Note
The authentication configuration pane in Copilot Studio might show the following redirect URL: https://unitedstates.token.botframework.com/.auth/web/redirect. Using that URL makes the authentication fail; use the URI instead.
- In the Implicit grant and hybrid flows section, turn on both Access tokens (used for implicit flows) and ID tokens (used for implicit and hybrid flows).
- Select Configure.
Generate a client secret
- Go to Certificates & secrets.
- In the Client secrets section, select New client secret.
- (Optional) Enter a description. One is provided if left blank.
- Select the expiry period. Select the shortest period that’s relevant for the life of your copilot.
- Select Add to create the secret.
- Store the secret’s Value in a secure temporary file. You need it when you configure your copilot’s authentication later on.
Tip
Don’t leave the page before you copy the value of the client secret. If you do, the value is obfuscated and you must generate a new client secret.
Configure manual authentication
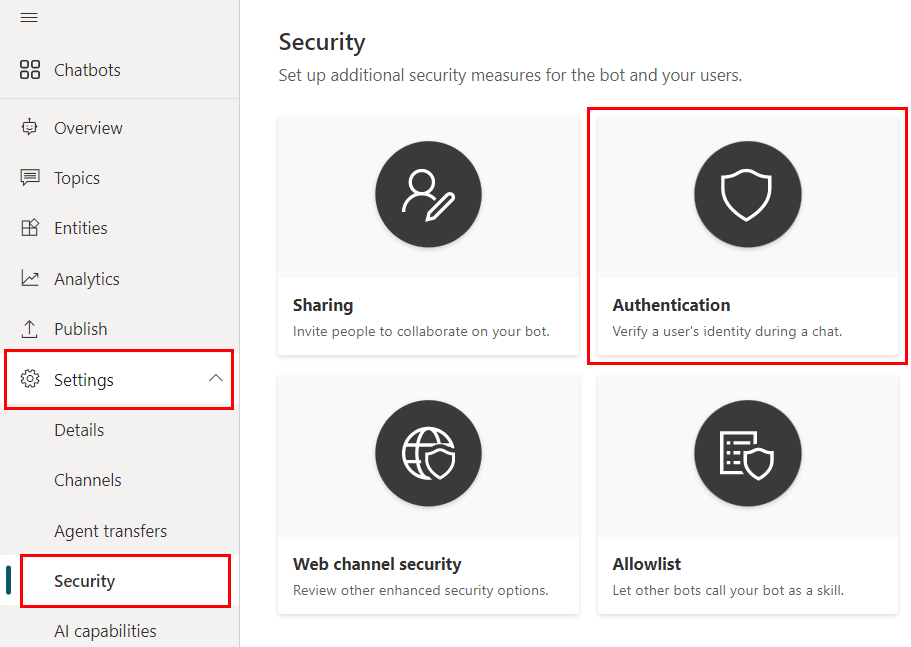
- In Copilot Studio, in the navigation menu under Settings, select Security. Then select the Authentication card.
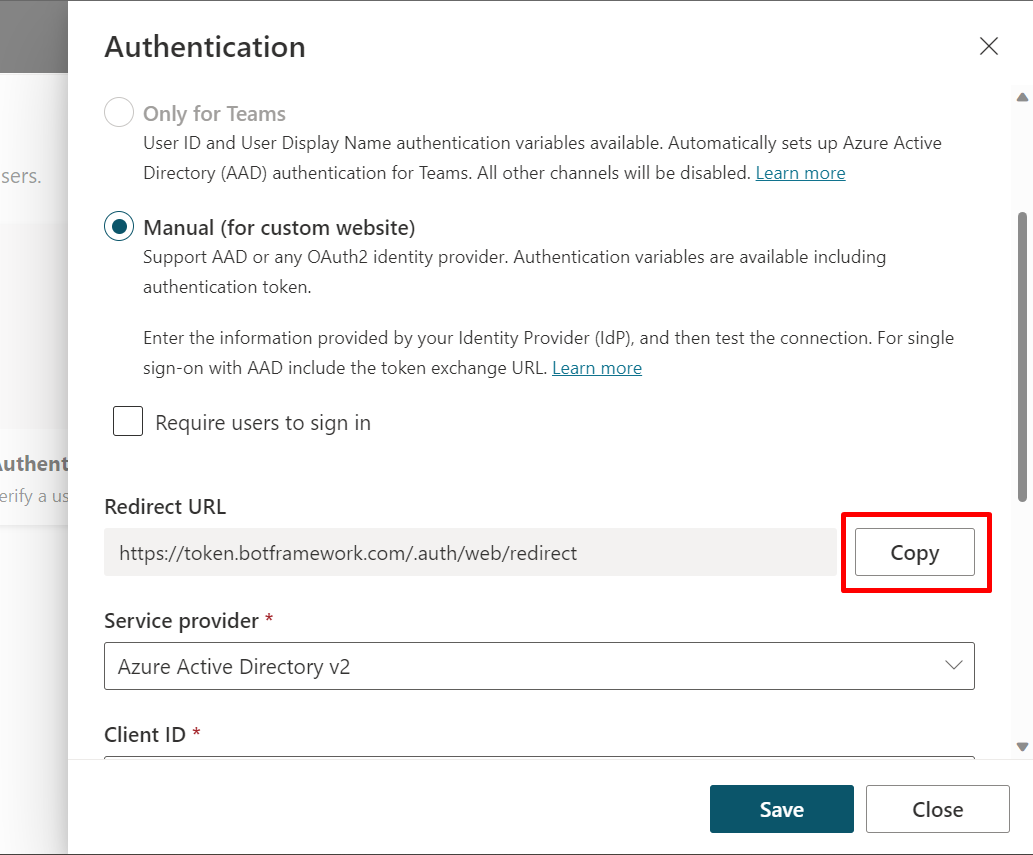
- Select Manual (for any channel including Teams) then turn on Require users to sign in.
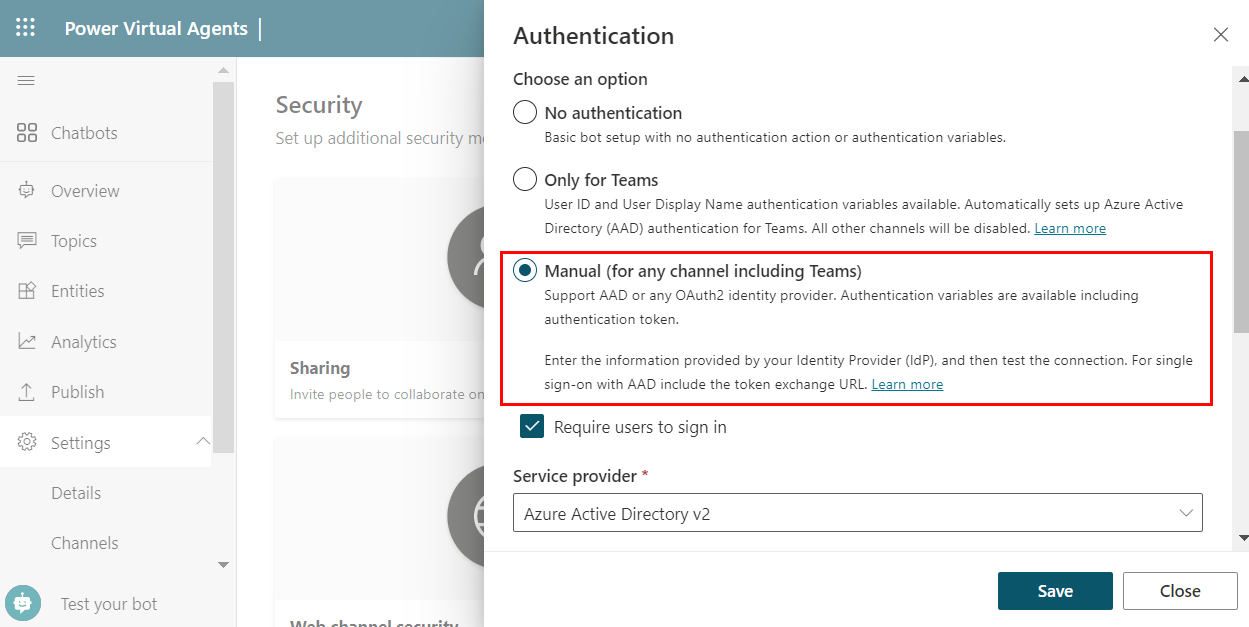
- Enter the following values for the properties:
- Service provider: Select Microsoft Entra ID.
- Client ID: Enter the application (client) ID that you copied earlier from the Azure portal.
- Client secret: Enter the client secret you generated earlier from the Azure portal.
- Scopes: Enter
profile openid.
- Select Save to finish the configuration.
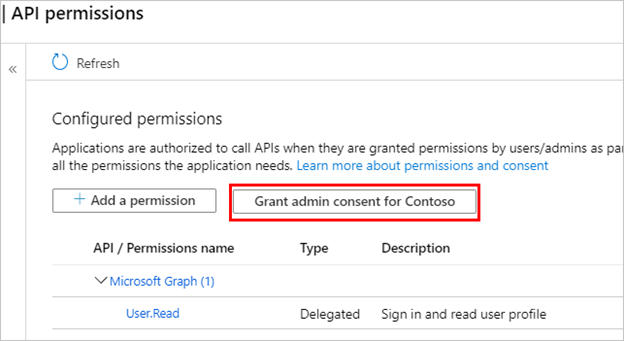
Configure API permissions
- Go to API permissions.
- Select Grant admin consent for <your tenant name>, and then select Yes. If the button isn’t available, you may need to ask a tenant administrator to do enter it for you.
 NoteTo avoid users from having to consent to each application, a Global Administrator, Application Administrator, or Cloud Application Administrator can grant tenant-wide consent to your app registrations.
 - Select Add a permission, and then select Microsoft Graph.
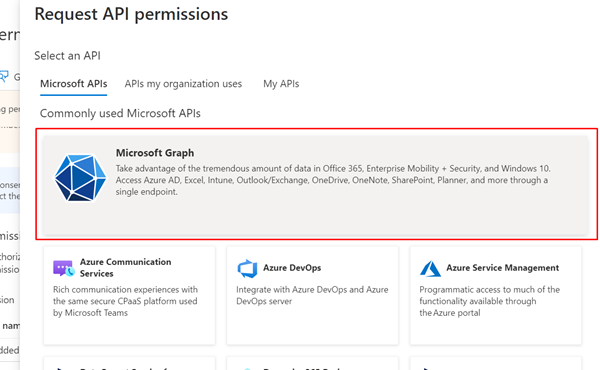
- Select Delegated permissions.

- Expand OpenId permissions and turn on openid and profile.

- Select Add permissions.
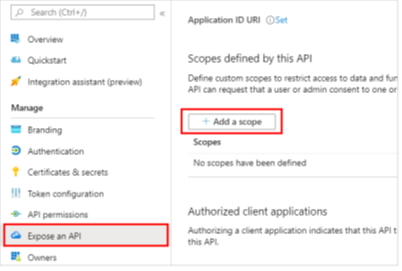
Define a custom scope for your copilot
Scopes allow you to determine user and admin roles and access rights. You create a custom scope for the canvas app registration that you create in a later step.
- Go to Expose an API and select Add a scope.
- Set the following properties. You can leave the other properties blank.Expand tablePropertyValueScope nameEnter a name that makes sense in your environment, such as
Test.ReadWho can consent?Select Admins and usersAdmin consent display nameEnter a name that makes sense in your environment, such asTest.ReadAdmin consent descriptionEnterAllows the app to sign the user in.StateSelect Enabled - Select Add scope.
Source: Configure user authentication with Microsoft Entra ID – Microsoft Copilot Studio | Microsoft Learn
You can always make the Copilot more secure by adding required Authentication and SSO. Read the Documentation to see how you can also add scopes on the Copilot.
Now it’s time to Publish ! Hit the Publish from the menu and publish your Copilot. If any errors occur it will mostly be a Topic. Read carefully our instructions and of course you can make your own routes since you got the concept ! Once Publishing is done, the Channels menu will activate all channels and from the Custom Website you can grab the embedding code and add it in a Post on your WordPress or your Webpage !
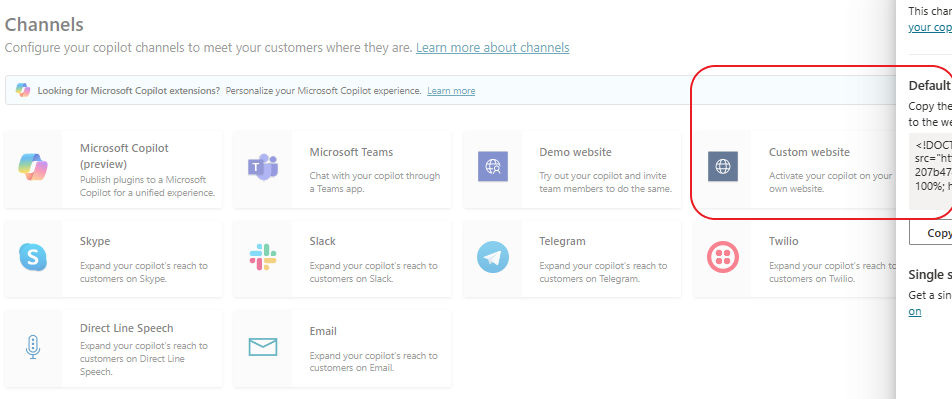
You can also see it in the Demo Website if you have not enabled “require secure access”.
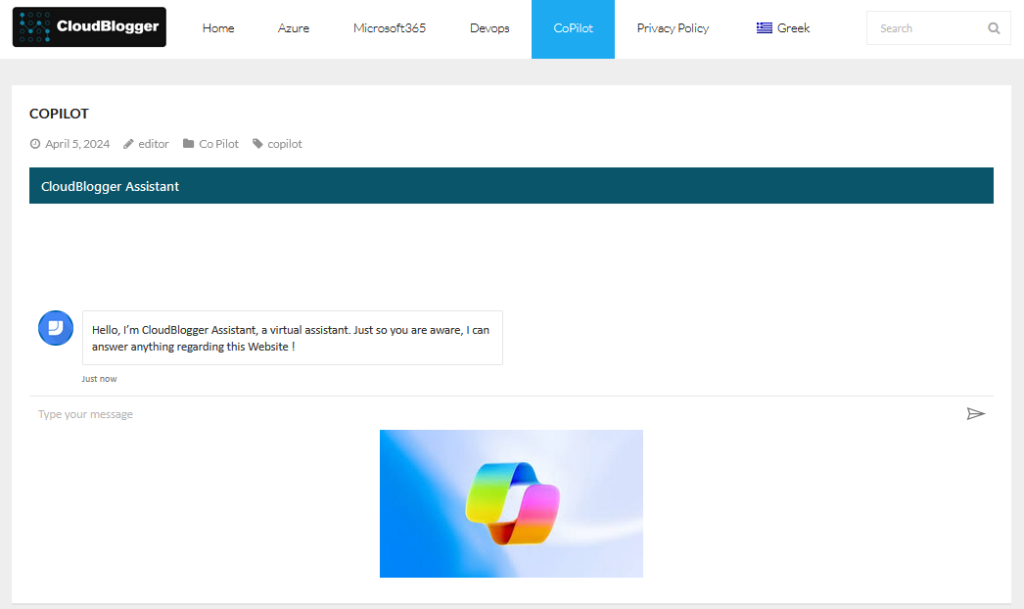
Here it is in the actual WordPress using the embedded code:
Closing
With Copilot Studio, building a custom AI assistant and seamlessly integrating it into your WordPress site is simpler than you might have imagined. It empowers you to create a more dynamic and personalized user experience. Whether you’re looking to automate tasks, provide intelligent insights, or offer a more conversational interface on your site, Copilot Studio provides the tools and straightforward process to get you there. Remember, the possibilities are endless. Experiment, refine, and watch as your WordPress site becomes a hub of unparalleled AI-powered engagement!