Synapse with Terraform Cloud (part 1)
Working with Organizational Data can be quite a challenging task for Administrators, and Operators. The Compliance Policies are mandatory and as we dig deeper into Data we realize that we need a mechanism to protect Personal Identification Information.
So let’s take an example of an Organization archiving Documents or user information into Storage Account. Once a week , or day or in a schedule set by the company policy we have to look at the Data for Security reasons or there is an audit and we have to produce this information, or even there is an incident and we must search into the data. Here comes Synapse Analytics ! Synapse Analytics ( and Data Factory ) provide many templates to manipulate Data, therefore we can relax and do our job! We are going to deploy the Synapse Analytics Workspace with the assistance of Terraform Cloud ( Free tier) and create the solution. So let’s start !
We are going to need :
- VSCode or your favorite Code Editor
- An Azure Subscription
- A Cognitive Services Multi-Service Account
- Terraform installed and configured for Terraform Cloud (Look Here and Here on how to connect with Terraform Cloud workspaces, a free account is available from HashiCorp)
Suppose we have nothing yet configured, besides the Azure AD which is active and users sign-in. We will deploy with one Terraform run the Synapse Analytics fully configured with Data Lake v2, and the Storage Account to store files.
From Azure Cloud Shell run the ad sp command and keep the results:
az ad sp create-for-rbac --display-name "terra" --name terra --role Contributor --scopes /subscriptions/yoursubid-xxxxx-xxxxxxOpen Terraform Cloud select your Organization, and create a new workspace.
Select your Organization and go to Settings – Variable Sets and create a new Variable Set as follows.
Give a name and an optional description and select the Workspace where this set will be applied:
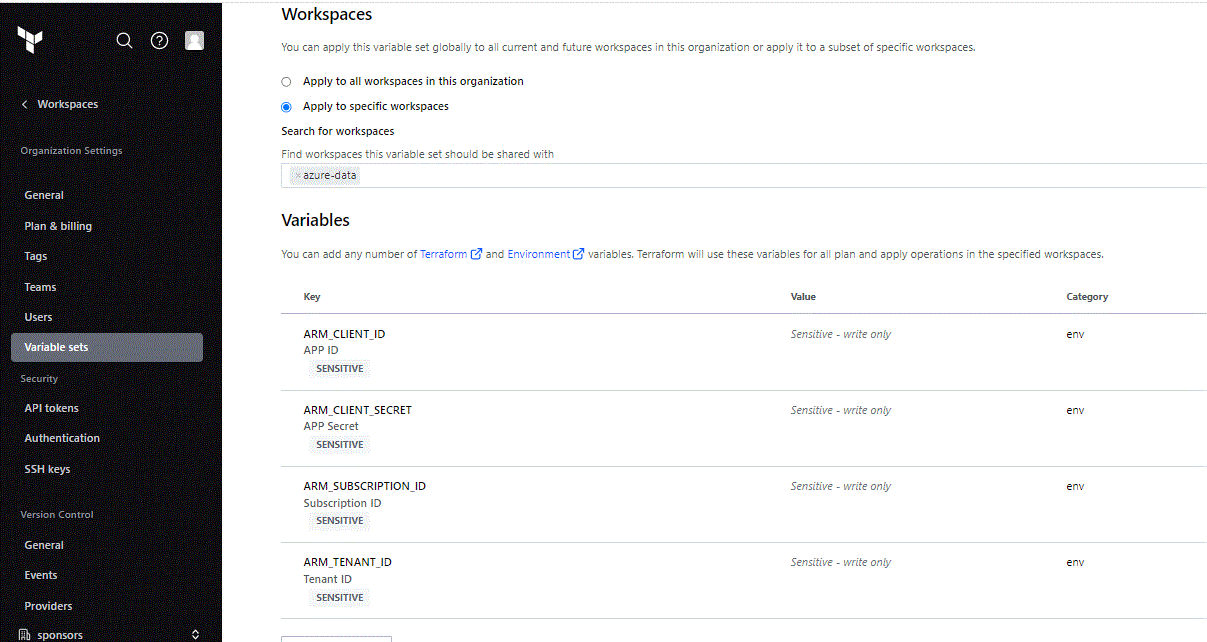
Set the variables as Environment and Sensitive with all the info from the ad sp command we run earlier.
| ARM_CLIENT_ID | appId |
| ARM_CLIENT_SECRET | password |
| ARM_SUBSCRIPTION_ID | yourxxxx-subscriptionxxx-idxxxxx |
| ARM_TENANT_ID | yourxxxx-tenantxxx-idxxxxx |
Now let’s create two more sensitive Variables this time directly on the Workspace. Go to your Workspace and select Variables. Create two Variables with Terraform as category and of course Sensitive. These ae the Credentials for our Synapse SQL built-in Pool:

It is time to build our files! Start with an empty folder and create your tree. For example C:\terraworks\azure-1\synapse and open the folder from VSCode.
First of all we need a providers.tf file to declare Azure as our Provider, which also includes the info to connect to Terraform Cloud and use it as the backend:
terraform {
  required_providers {
    azurerm = {
      version = "= 3.0.0"
    }
  }
  cloud {
    organization = "sponsors"

    workspaces {
      name = "azure-data"
    }
  }
}

provider "azurerm" {
  features {}
}
Create the variables.tf file so we can declare our variables and also be able to read the variables set on the Terraform Cloud organization:
 variable "sql_login" {
  description = "Database administrator username"
  type        = string
}

variable "sql_pass" {
  description = "Database administrator password"
  type        = string
}
And finally the main.tf file which contains the building blocks of our Infrastructure :
resource "azurerm_resource_group" "rgdemodata" {
  name     = "rg-demodata"
  location = "West Europe"
}
resource "random_string" "str-name" {
  length  = 5
  upper   = false
  numeric = false
  lower   = true
  special = false
}

resource "azurerm_storage_account" "strdata" {
  name                     = "str${random_string.str-name.result}02"
  resource_group_name      = azurerm_resource_group.rgdemodata.name
  location                 = azurerm_resource_group.rgdemodata.location
  account_tier             = "Standard"
  account_replication_type = "GRS"
  account_kind             = "StorageV2"
  is_hns_enabled           = "true"
}

resource "azurerm_storage_data_lake_gen2_filesystem" "dlake" {
  name               = "fsys"
  storage_account_id = azurerm_storage_account.strdata.id
}

resource "azurerm_synapse_workspace" "synapse" {
  name                                 = "kp${random_string.str-name.result}01"
  resource_group_name                  = azurerm_resource_group.rgdemodata.name
  location                             = azurerm_resource_group.rgdemodata.location
  storage_data_lake_gen2_filesystem_id = azurerm_storage_data_lake_gen2_filesystem.dlake.id
  sql_administrator_login              = var.sql_login
  sql_administrator_login_password     = var.sql_pass
  managed_resource_group_name          = "mysynapse"


  aad_admin {
    login     = "xxxxx@xxxxxx.xx"
    object_id = "xxxxxxx"
    tenant_id = "xxxxxxxxx"

  }

  identity {
    type = "SystemAssigned"
  }

}

resource "azurerm_synapse_firewall_rule" "fwall" {
  name                 = "AllowAllWindowsAzureIps"
  synapse_workspace_id = azurerm_synapse_workspace.synapse.id
  start_ip_address     = "0.0.0.0"
  end_ip_address       = "0.0.0.0"
}
resource "azurerm_synapse_firewall_rule" "fwall2" {
  name                 = "AllowAll"
  synapse_workspace_id = azurerm_synapse_workspace.synapse.id
  start_ip_address     = "0.0.0.0"
  end_ip_address       = "255.255.255.255"
}


resource "azurerm_storage_account" "logger" {
  name                     = "str${random_string.str-name.result}01"
  resource_group_name      = azurerm_resource_group.rgdemodata.name
  location                 = azurerm_resource_group.rgdemodata.location
  account_tier             = "Standard"
  account_replication_type = "GRS"

}
With this configuration we are creating the Synapse Workspace with the Firewall rules to allow Azure Services and allow Public Access. take notice the name of the rule “AllowAllWindowsAzureIps”, it is mandatory to be written as the example. Also we are attaching a Data Lake v2 on the Workspace and we create another Storage Account to store the Azure AD Logs.
We are ready! On the VSCode open a Terminal on the folder, and run from Git Bash :
terraform init – This is the first command that should be run after writing a new Terraform configuration or cloning an existing one from version control. It is safe to run this command multiple times.
terraform plan – The plan command creates an execution plan, which lets you preview the changes that Terraform plans to make to your infrastructure.
terraform apply – This command creates the execution plan and build the Infrastructure.
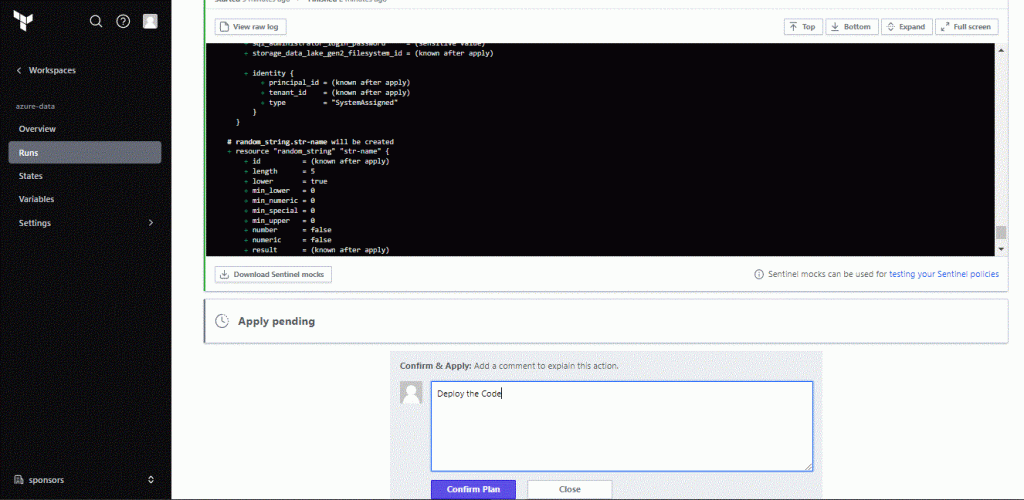
When you run terraform apply you can see the Run in the Terraform Cloud Console. Go to the workspace and select Runs. You are watching real time each command you issue from VSCode, and also you have the ability to Confirm the apply command from this Console:


Now when everything is deployed we can see the Cloud Console in real time displaying the results:
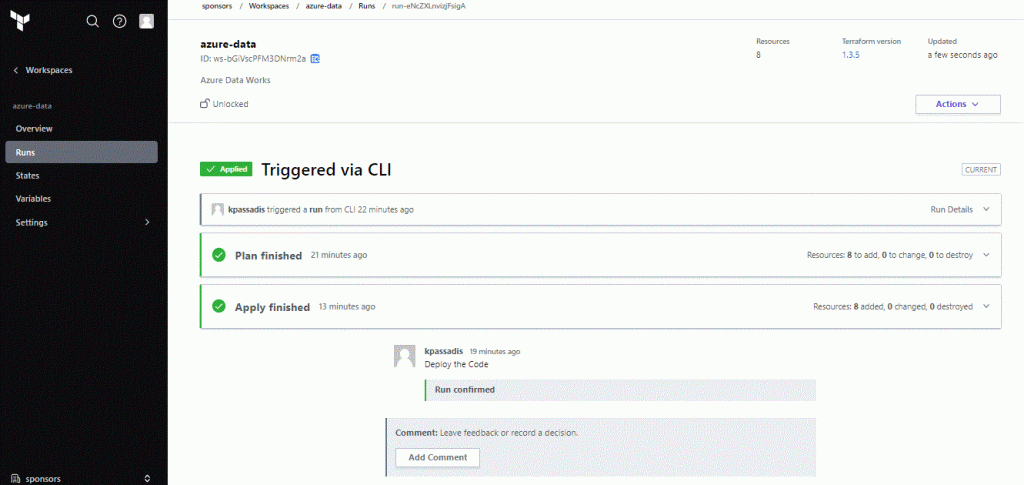
Alright ! Now we have our resources.
We could use just the Data Lake Storage, but we will display also the use of Pipeline Data Copy to transfer between Storage endpoints. Leave the Storage Account as GRS, otherwise it will not be available for Logging.
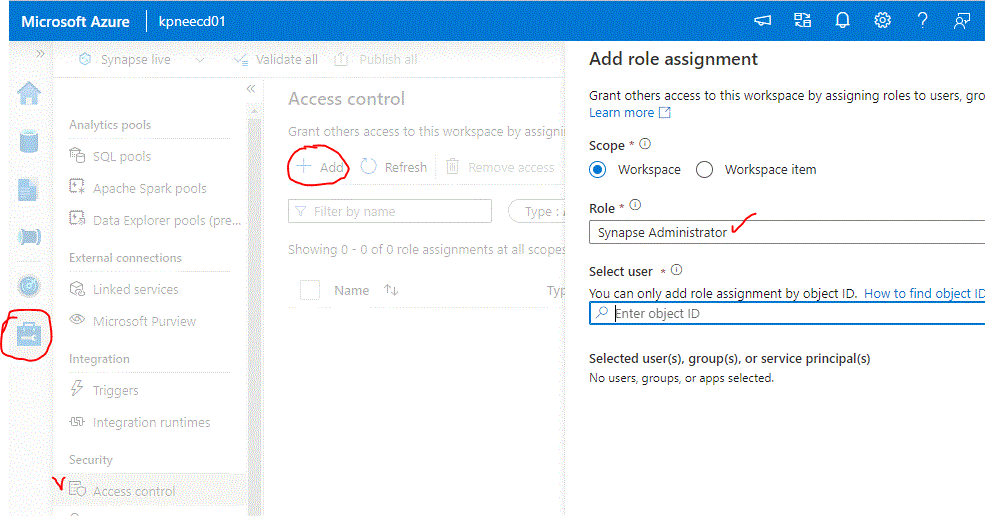
It is important to perform the next step. From the Azure Portal, find the Synapse Web Url from the resource. When you click to login you may see an error. Ignore it and proceed as follows: Select Manage from the left vertical menu, Access Control and Add the Synapse Administrator role to your User. Find your object ID from Azure AD Users menu.
Now we are ready to start Building our Pipelines , Data Flows and anything we want! Stay tuned for Part 2 to start using Azure Synapse Pipelines!
