Synapse & Cognitive Services (part 2)
Welcome to the second Part of Synapse Analytics deployment with Terraform Cloud and Data Masking, where here we will perform Data Masking with the use of Cognitive Services Language Service.
Let’s start !
We have build our Synapse Workspace with Terraform Cloud and now we want to use the abilities of Synapse Analytics to manipulate some data. The scenario is this:
Suppose we are exporting, quite often our users from Office 365 \ Azure AD into a Json file, which is Stored in a Storage Account. When it is time to look at the Data, we need a mechanism to identify the Personal Identification Information and mask it before someone downloads the file(s).
For the Data Identification we need an Azure Cognitive Services account. It is so easy to just update the previous Terraform configuration with just one addition, and then deploy!
SOS : In case there is not another Cognitive Service on your subscription ignore the following Terrafrom Deployment. Deploy the Service from Azure Portal. This is because we have to Accept the Responsible Use of AI Terms & Conditions. In that case use the Azure Portal to create a Multi service Cognitive Services Account, but pay attention to the Rest API Endpoint on Synapse. The Endpoint is NOT working with the provided one!
The new main.tf file looks like this :
resource "azurerm_resource_group" "rgdemodata" {
  name     = "rg-demodata"
  location = "West Europe"
}
resource "random_string" "str-name" {
  length  = 5
  upper   = false
  numeric = false
  lower   = true
  special = false
}

resource "azurerm_storage_account" "strdata" {
  name                     = "str${random_string.str-name.result}02"
  resource_group_name      = azurerm_resource_group.rgdemodata.name
  location                 = azurerm_resource_group.rgdemodata.location
  account_tier             = "Standard"
  account_replication_type = "GRS"
  account_kind             = "StorageV2"
  is_hns_enabled           = "true"
}

resource "azurerm_storage_data_lake_gen2_filesystem" "dlake" {
  name               = "fsys"
  storage_account_id = azurerm_storage_account.strdata.id
}

resource "azurerm_synapse_workspace" "synapse" {
  name                                 = "kp${random_string.str-name.result}01"
  resource_group_name                  = azurerm_resource_group.rgdemodata.name
  location                             = azurerm_resource_group.rgdemodata.location
  storage_data_lake_gen2_filesystem_id = azurerm_storage_data_lake_gen2_filesystem.dlake.id
  sql_administrator_login              = var.sql_login
  sql_administrator_login_password     = var.sql_pass
  managed_resource_group_name          = "mysynapse"


  aad_admin {
    login     = "xxxxxxxx@xxxxx.xx"
    object_id = "xxxxxx-xxxx-xxxx-xxx-xxxxx"
    tenant_id = "xxxxxxxxxxx"

  }

  identity {
    type = "SystemAssigned"
  }

}

resource "azurerm_synapse_firewall_rule" "fwall" {
  name                 = "AllowAllWindowsAzureIps"
  synapse_workspace_id = azurerm_synapse_workspace.synapse.id
  start_ip_address     = "0.0.0.0"
  end_ip_address       = "0.0.0.0"
}
resource "azurerm_synapse_firewall_rule" "fwall2" {
  name                 = "AllowAll"
  synapse_workspace_id = azurerm_synapse_workspace.synapse.id
  start_ip_address     = "0.0.0.0"
  end_ip_address       = "255.255.255.255"
}


resource "azurerm_storage_account" "logger" {
  name                     = "str${random_string.str-name.result}01"
  resource_group_name      = azurerm_resource_group.rgdemodata.name
  location                 = azurerm_resource_group.rgdemodata.location
  account_tier             = "Standard"
  account_replication_type = "GRS"

}


resource "azurerm_cognitive_account" "cai" {
  name                = "myai${random_string.str-name.result}"
  location            = azurerm_resource_group.demoaz.location
  resource_group_name = azurerm_resource_group.demoaz.name
  kind                = "CognitiveServices"

  sku_name = "S0"
}
The highlighted part is the addition to our code. We just need to run terraform plan and terraform apply. We can use either the Cloud Console or do everything from VSCode.
Run terraform plan & terraform apply, wait until everything is in place. You can watch what is happening either on the Terminal of VSCode or on the Cloud Console.
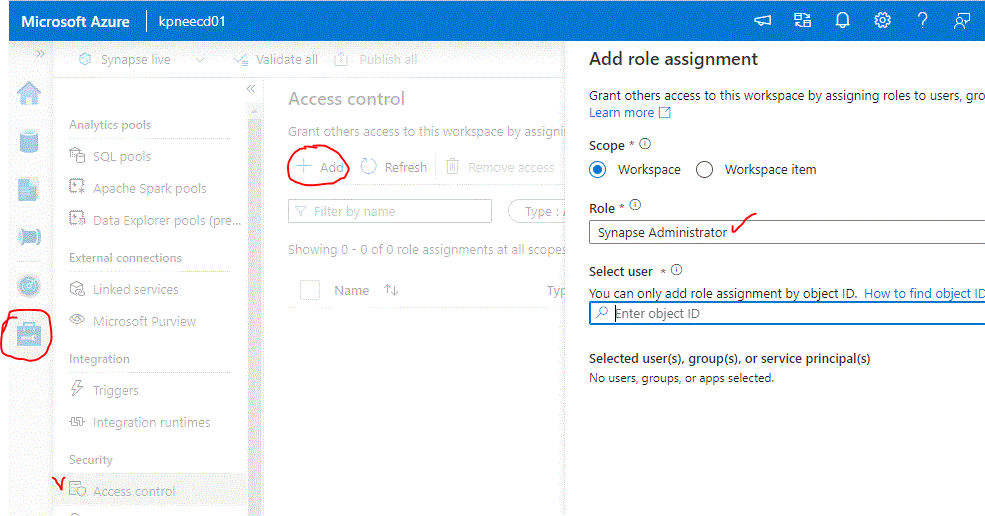
Now we will enter Synapse Analytics Workspace where most of the work will be done. Login to the Synapse workspace. As we already did on Part 1, ignore the error and add your user as a Synapse Administrator. You can find the User Object ID from Azure AD.
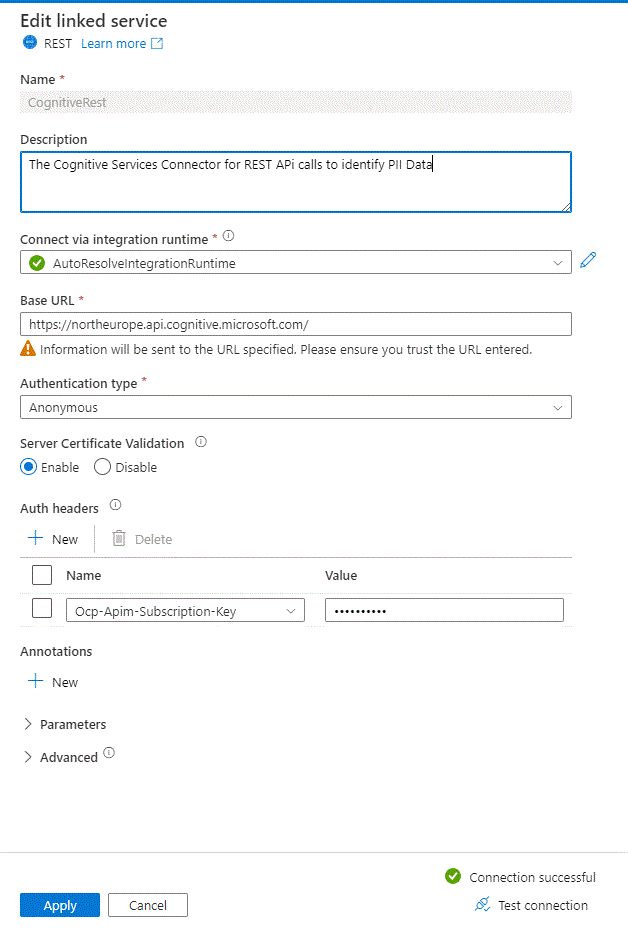
Let’s create the first linked service aka Connector. Select Manage , External Connections-Linked Services and Add. Search for REST and supply the information. Again, select the correct Base URL (Endpoint) as of https://[region].api.cognitive.microsoft.com/, Anonymous Authentication and add an authorization Header : Ocp-Apim-Subscription-Key with the value of one of the Cognitive Services Keys you can find from the Azure Portal. (Keys & Endpoint).
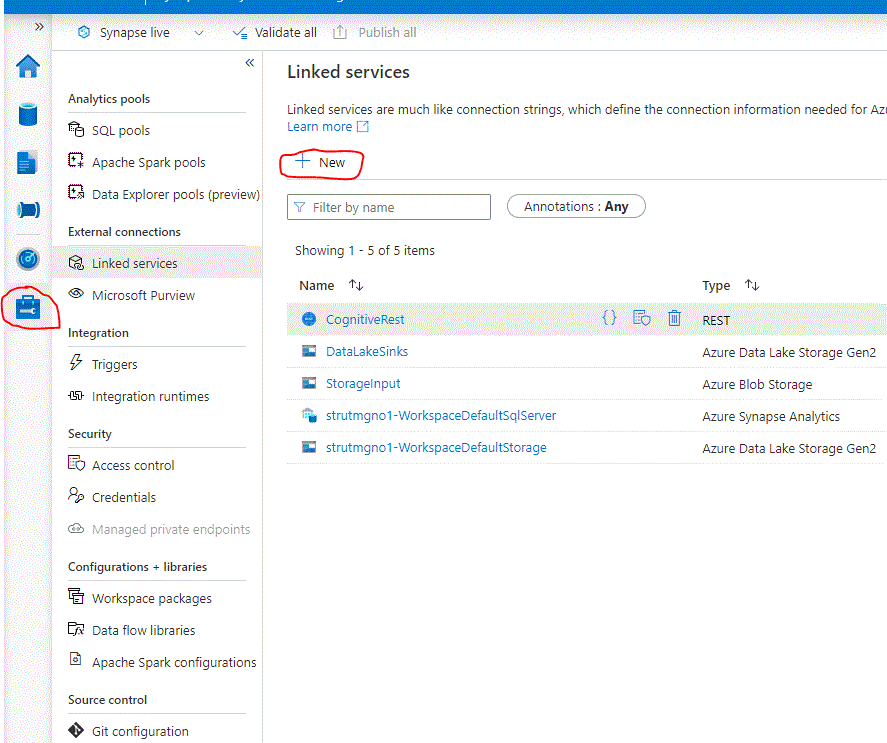
Proceed to create two more Linked services, one Storage Blob used as the Source and another Data Lake v2 which will ingest the transformed Data. The source is where a JSON file with User data is stored and the Destination will store the transformed file to CSV, and later, into another directory the Masked Output after the PII identification and masking magic!


Now to make your life easier i can provide the JSON to upload to the first Storage Account, and for the adventurous we will display the Powershell which connects to Office 365, downloads specific details into a JSON file. We need to display the capabilities of Synapse that is why we prefer JSON in this stage.
## Powershell
## We need the MSOnline module installed
Connect-MSOLService
## A simple one-liner to export users with specific Columns
Get-MSOLUser | Where-Object { $_.isLicensed -eq "True"} | Select-Object Displayname, FirstName, LastName, Country, City, userPrincipalName, WhenCreated  | ConvertTo-Json | Add-Content -Path "C:\works\ADusers.json"
A sample file is available here : https://1drv.ms/u/s!Ap3rsk6xDCjnrXfDBJWMu2PhzijP?e=qR22Od
Return to the VSCode and add this to the main.tf:
// Add a Blob named "adusersdata" to the first storage account
resource "azurerm_storage_container" "blob" {
  name                  = "adusersdata"
  storage_account_name  = azurerm_storage_account.logger.name
  container_access_type = "private"
}

// Add a directory to the Data Lake v2 storage account

resource "azurerm_storage_data_lake_gen2_path" "dir" {
  path               = "outfiles"
  filesystem_name    = azurerm_storage_data_lake_gen2_filesystem.dlake.name
  storage_account_id = azurerm_storage_account.strdata.id
  resource           = "directory"
}
The flexibility of Terraform is exceptional, and we can quickly add and remove resources ! So once again run terraform plan , terraform apply , and wait until the Blob and the Directory are created for us to upload our file.
HINT: Since we are expanding with multiple resources, we can validate the Terraform config with terraform validate. This command searches for inconsistencies and faulty code and informs accordingly.
Upload the JSON file to the Blob Storage Account into the “adusersdata” Container and return to the Synapse Studio to create the first Pipeline.
A quick way to copy the file is using the AzCopy tool or Storage Explorer, whatever fits. Even Azure Management Portal can be used ! Below is an example of the azcopy used for this example.
c:\temp>.\azcopy.exe copy 'C:\Works\usersad.json' 'https://strutmgno01.blob.core.windows.net/adusersdata/?sp=racw&st=2022-11-30T00:30:11Z&se=2022-12-01T08:30:11Z&spr=https&sv=2021-06-08&sr=c&sixxxxxxxxxxxxxxxxxxxxxxxxxxxxxxxxxxxxxxxxxx' Great ! We have the input Data ready. In the Synapse Portal we will create our first Pipeline. It will connect to the first Storage account , copy the JSON file , transform it to a CSV and store it into the Data Lake Storage for our next steps.
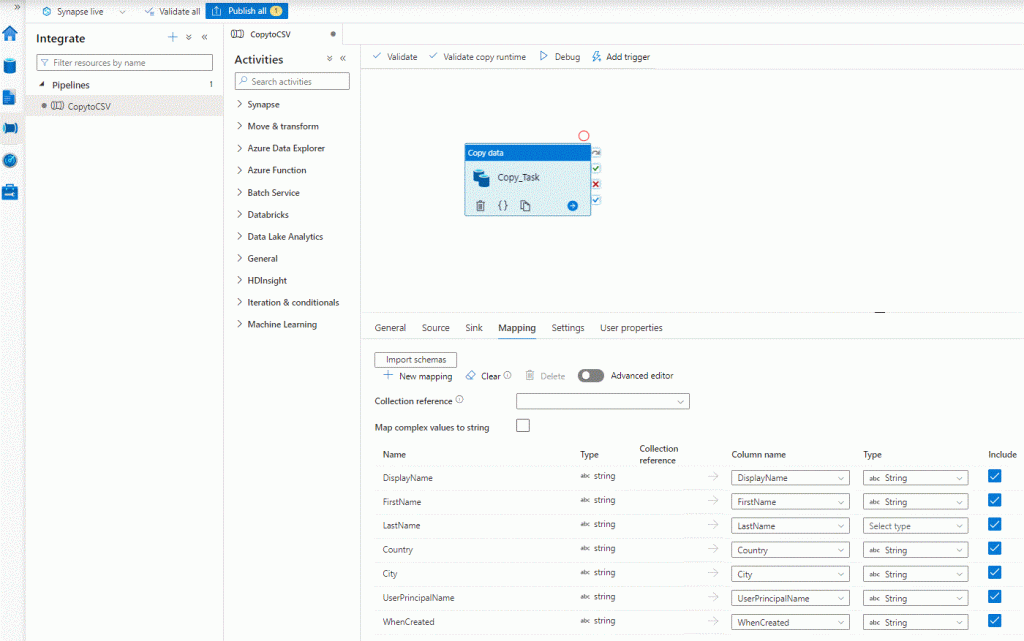
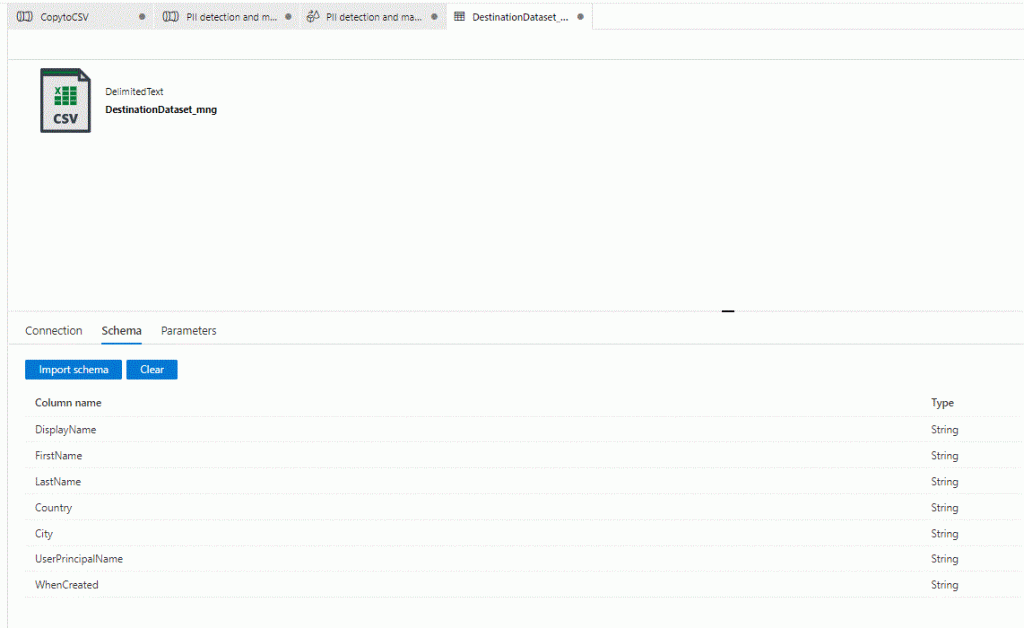
From the Home screen select Ingest – Built-in copy task – Run once now and click next. Here we select Azure Blob Storage as source type and the Storage Input linked service we created earlier. Select browse and you will find the JSON file to select. Leave defaults and click next. You can see the format is recognized and we can preview our data. Leave default and move to the next task, where we sink the data. Select Azure Data Lake Storage Gen2, and the destination linked service we have already ceated. Browse to the directory and give a file name usersdata.csv for example, but prefer to keep the same name as the source (except the extension of course!). Move to the next task and select Delimited Text , Comma(,), and Default row delimiter. Click “Add header to file” , so the first row is recognized as headers. In the next task, in case you gave a different file name you will see that the Columns in the destination need to be matched and set the data type. Give the same names and select all data types as string. If you gave the same filename just select string as data type, as all the column names are already created for you. Moving on you will get to the Settings screen, name the Task CopytoCSV or anything you prefer and optionally give a description. Proceed to the Deployement and in a minute you are ready to press Finish! If you open the Data Lake Storage account you should find the file in CSV format.
In the left Vertical Menu select Integrate and thee you will find our Pipeline. Select the Pipeline and observe the dashboard. Here are the activities we can assign and build our services. Browse and see the possbilities. Select the Task and rename it as you like. Go through the properties at the bottom and observe the settings we set before. Go to mapping and verify everything is matched and the Data types on the Destination are string,otherwise set as string and click Publish. every new change has to be published to take effect.
I know you cannot resist exploring ….so explore ! Just do not change something if not sure, or at least create another Pipeline to play around. You can also see now that we have two new Datasets, when you click Integration you will find the Datasets we created in the Copy Task configuration process. We can also preview our Data and make any new adjustments if needed.
Before we proceed to the final stage of our lab, let’s take a step back and review our deployment. We have an Input Dataset (JSON File) in a Blob Storage, which we transfromed into CSV and sink it into Data Lake Gen2. Since the file contains user data from Azure AD, we want whenever someone asks for this file to have all Personal Identification Info masked. Therefore we have a Cognitive Services Multiservice account ready to make the identification and through a new Synapse Pipeline we will mask the data accordingly. It is time to proceed !
We will deploy a Template from Synapse Gallery. In the left vertical menu select Integrate and hit the Plus (+) icon and Browse Gallery. We are taken into the Templates Gallery where Microsoft and users have ready made solutions to deploy. Our template is from noelleli@microsoft.com on the Pipleines Tab, PII Detection and Masking, so select it and click continue. The screen we are taken, is for us to select the initial Services which will support the Pipleline. Be aware we have to make quite a few adjustments to fit our case.
For the first Linked Service (dataFlow) we will select the CognitiveRest linked service and for the masking/dataSource we will select the DataLakeSinks, this is where the output file will be created. It is OK to create the file in the same Directory where is the initial file.
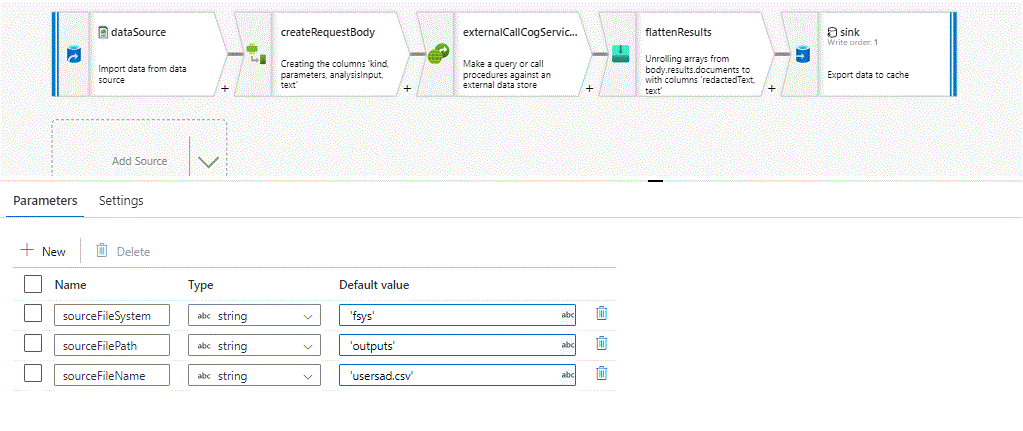
So far so good ! Now we will make all the configurations to make this Template work with our own data! When you double click the Task (DataFlow-PII DataFlow) we are getting into the detailed steps that make real magic. You can see we have a source, the request Body transformation, the call to the Cognitive API, the final touch of flattening and the output – Sink.
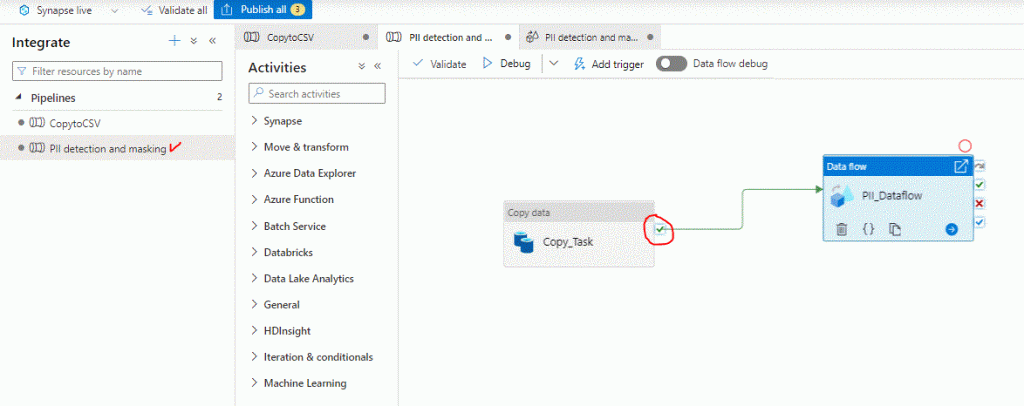
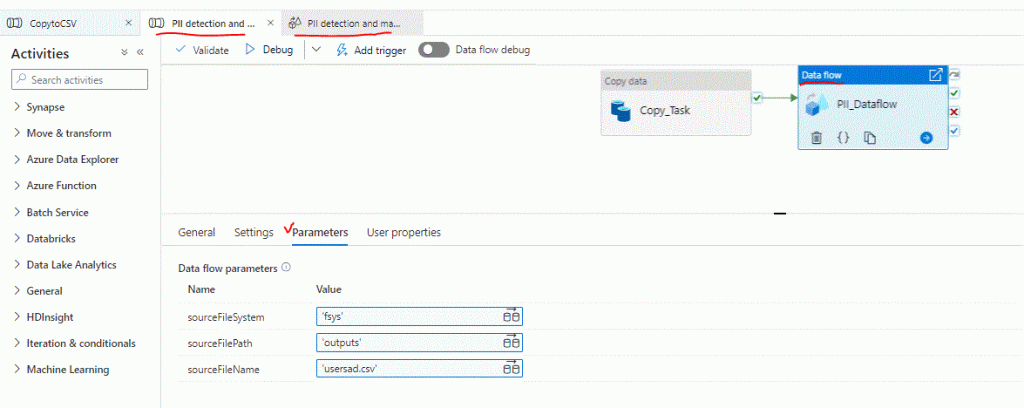
The Source is refering to data we don’t have, so let’s provide our own source sample. Watch the newly opened tab with the detailed steps and return to our CopytoCSV pipeline. Into the canvas right click on our Task and click Copy. Go to the PII Detection pipeline and paste into the canvas. Watch carefully that these tasks-activities have small icons on the right, where we provide next action depending on result. So on our newly copied task, click the “on success” and draw a line by holding left click to the PII_Dataflow task. We are creating a small trigger, if our task succeeds the next one runs. For safety we can clone our CopytoCSV Pipeline and bring the PII detection activities inside or clone both of them. Let’s keep our pace though.
Explore the Canvas-Designer, by moving around. Understand the Pipelines are on the left ,are composed with activities which are designed and configured on the Canvas. Different activities-tasks exist and can be activated with triggers and schedules. Also we can copy activities between pipelines and clone Pipelines as well.

Now we must select the DataFlow Tab for the PII detection and masking Pipleine, which is already open on the canvas. You can also right click on the PII_Dataflow activity inside the canvas. Here we make the following changes ( It is a good point to also publish the moves so click on the yellow publish button on the upper left corner) :
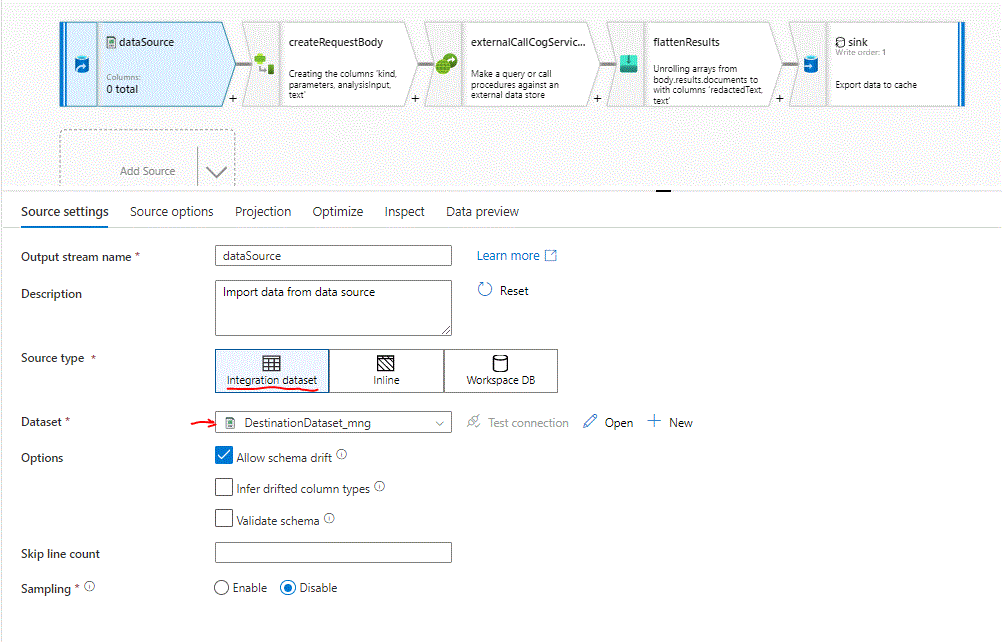
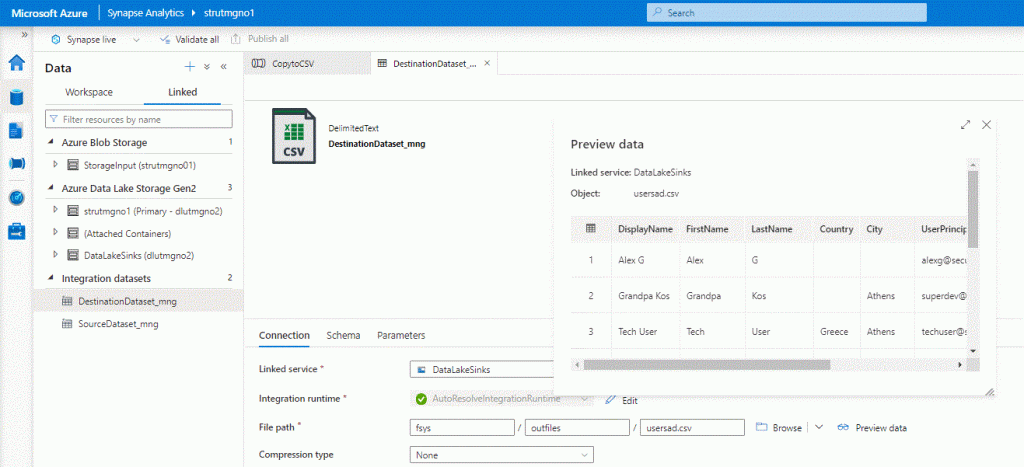
On the dataSource stream select as source type “Integration Dataset” and select our own DestinationDataset. Do not publish as we need to make addtional changes to make the Flow working. Before you make the change yu will notice that the dataSource show 22 columns, and afterthat 0 which when fixed will change to 7 as our own dataset columns number.
Select the second step, createRequestBody and open the expression builder of the 2 last Columns. Observe that the references are from other data the creator used to work with. We will write our own,basically all we have to do is change the column names to our own. Copy and paste the following lines, one for the analysisInput and the other for the text Column.
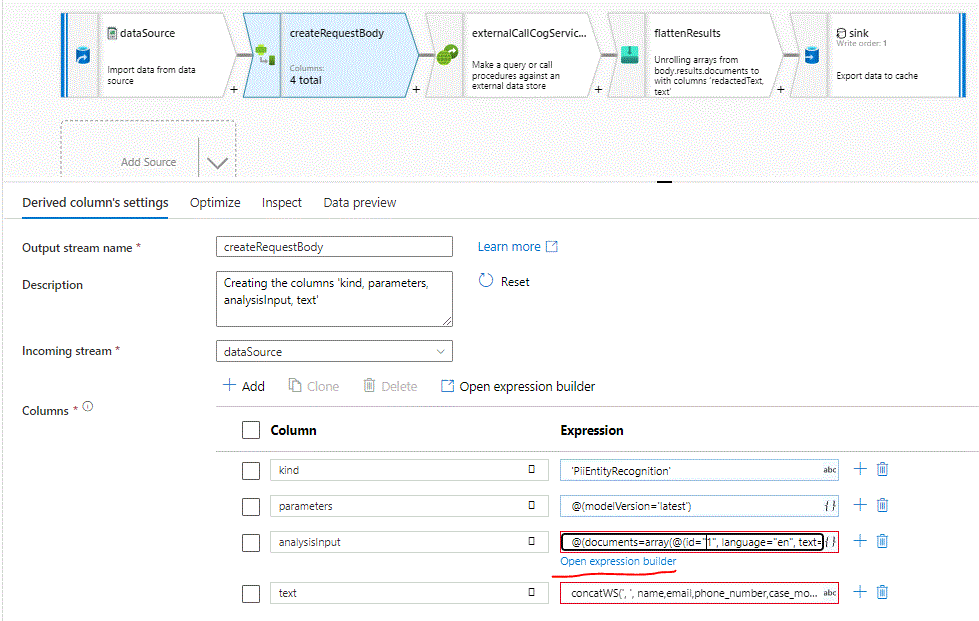
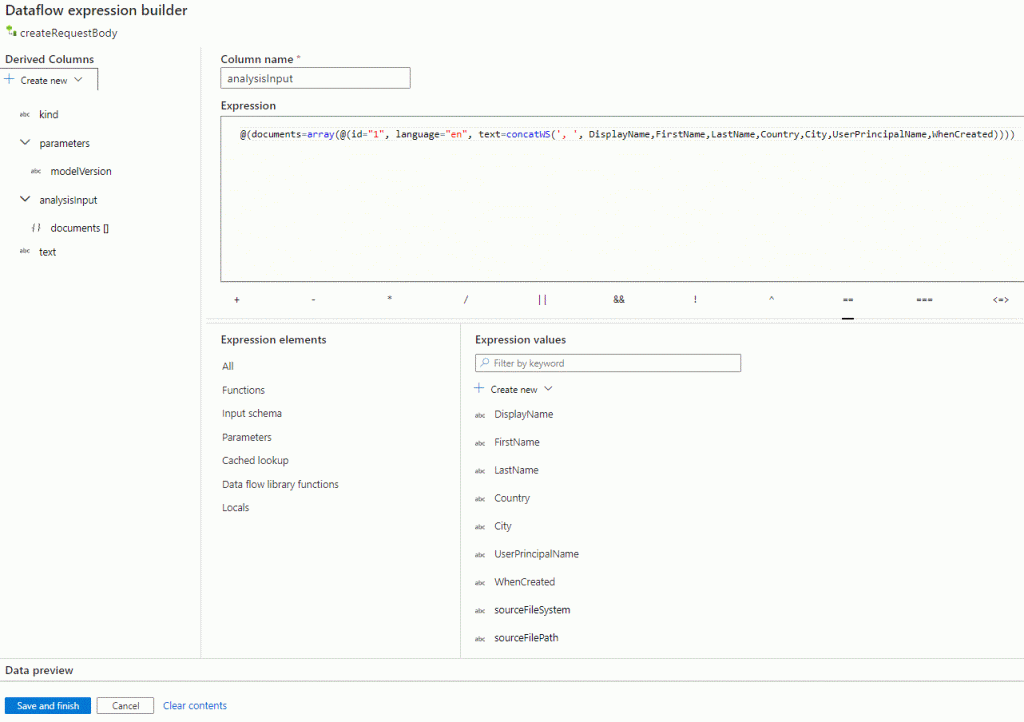
@(documents=array(@(id="1", language="en", text=concatWS(', ', DisplayName,FirstName,LastName,Country,City,UserPrincipalName,WhenCreated))))concatWS(', ', DisplayName,FirstName,LastName,Country,City,UserPrincipalName,WhenCreated)Now select the first step, (dataSource) and on the Destination Dataset select Open. Keep the file paths in mind or write them down, and go to Schema and then Import Schema. On the canvas return to the PII detection and masking Tab and see that the Columns in the first step are known to be 7 and the expression in the second step is not complaining. We did this to see how the pipeline structure works and the importance of the schema from the Input dataset.
Click anywhere outside of the tasks chain into the canvas and change the info to our own source details, should be sourceFileSystem = ‘fsys’, sourceFilePath = ‘outputs’, sourceFileName = ‘usersad.csv’. Keep the quotes and verify the data type remains as string. Remember this was the ouput CSV, now it is the Input dataset. Do the same in the Canvas section where our two activities are connected, by selecting PII_Dataflow and below the Canvas there are the parameters declaring the same info.
We can safely Publish our changes, and walk through the other steps to observe the procedure configurations. You are noticing that the Data Preview selection can only produce data if the Data Flow Debug Switch is turned to On. This provides us insights into the data transformation and as we can understand it is quite usefull for debugging and pre checks, especially when we have comlplex multi step pipelines with loads of data.
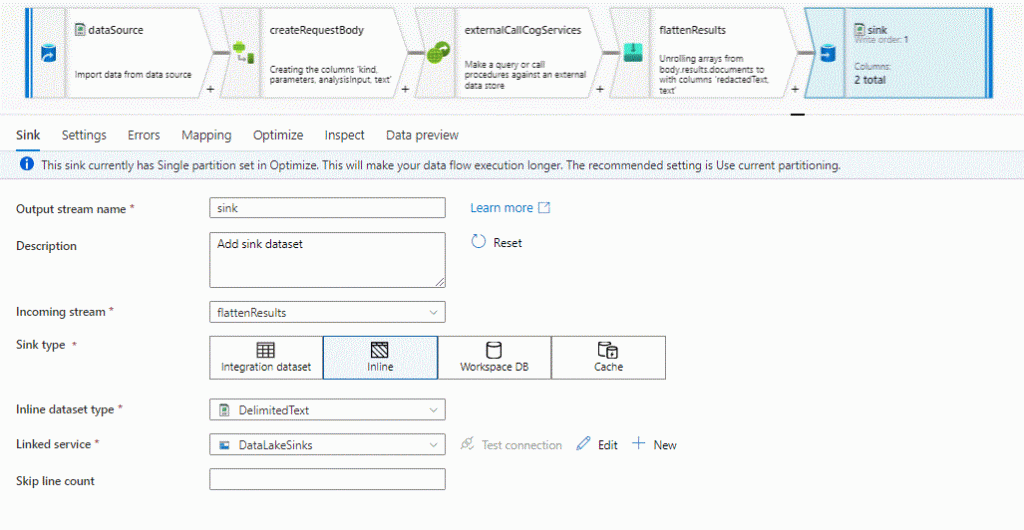
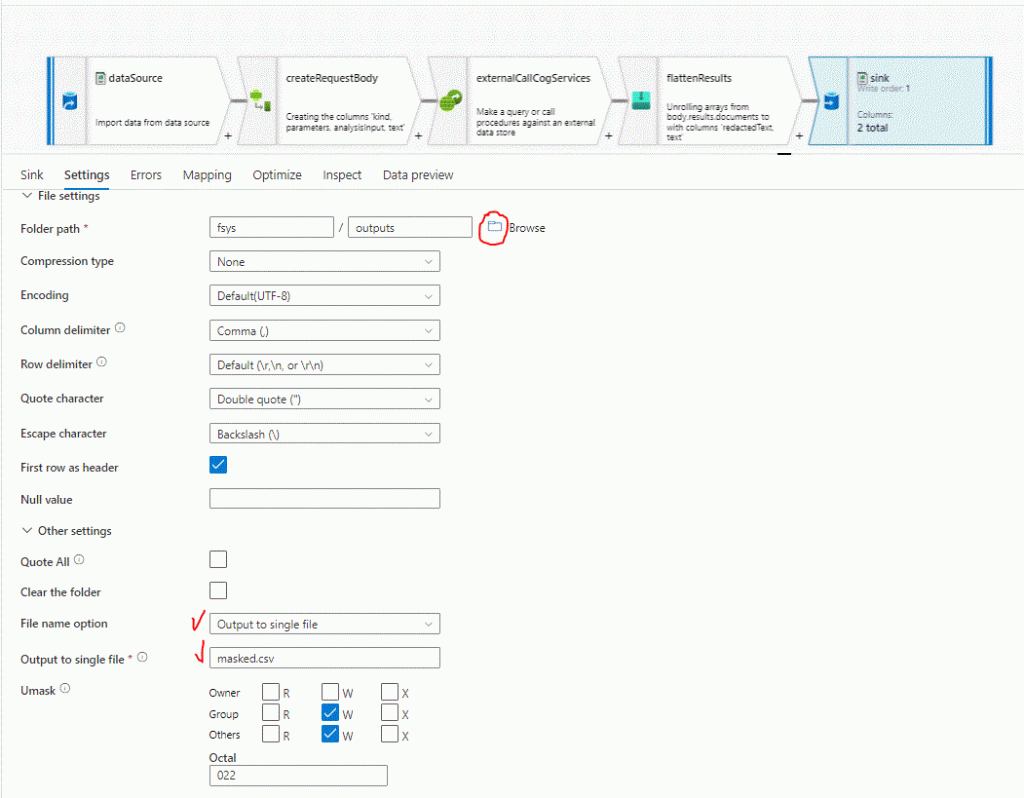
Our final step is to get the transformed data into a new file for us to examine. So at the last sink step, in the sink type, change to Inline, select the dataset type as DelimitedText, and for this final step select the DataLakeSinks Linked Service, which is the Data Lake Gen2 we initialized for the CSV input & output operations. We can select of course any other type, create another linked service as well, but as it is already there for us to use, let’s use it. In Settings provide a path [fsys/piidata], if the dir does not exist it will be created, leave defaults and select output to single file and provide the file name i.e. masked.csv. Apply the warning to Single partitioning since we are dealing with just a couple of files. Publish our new settings and we are ready to go!
Select the Pii Detetion and Masking tab in the Canvas, and make sure you are using the one with the CopytoCSV connection to the Pii Data Flow.
**For us to be absolutely sure everything is done as it should we clear any files from the Azure Storage Accounts ( if any are created ) for example tests etc, we only leave the usersad.json, or we can start over by copying it with Az Copy. The point is to have the Data Lake Storage Account empty without files but only the directory structure [fsys/outputs].
Select the first activity CopytoCSV and from the horizontal bar, Add Trigger – Trigger Now.

We can watch as the Pipeline executes from the Notification Bell in the upper right corner. The window has all the information and you can dig deeper into the steps by clicking on the icons next to each activity name :

Lets go to the Stoage Account, either from the Portal or from Storage Explorer , and we can see that we have 3 direcories. The synapse is used by the Workspace and the 2 others are the directories we configured, outputs to receive the transformed JSON to CSV and piidata the new CSV with the Pii data masked. Lets see, is it masked indeed ?

Of course it is! The CSV has two columns redactedText and text , where we can see which type of Information has been masked with the help of the Cognitive Services API. Let’s have a better look by downloading the file:
[table id=1 /]
Now we have a good view into the how-to of Terraform Cloud with Azure , the exceptional Services of Synapse Analytics and the powerfull Pipleines that we can build. Starting with the Gallery where we can find a lot of Templates, we can adjust to our own versions of Data and benefit from Data Analytics in Microsoft Azure.
I hope that you can find this lab usefull and be able to complete it without trouble, but due to the fact that it is so extended, do not hesitate to contact me !
References, Links;
- Azure Synapse Analytics – Get started wih pipelines
- Whats is Azure Synapse
- Terraform Cloud
- Azure Data Factory
- What is Personally Identifiable Information (PII) detection in Azure Cognitive Service
- Azure Rest API
