
How to create a QnA Prompt Flow using your own Data with Azure AI Studio and Azure Machine Learning

Intro
Welcome to the exciting world of Azure AI Studio, a powerful platform that empowers you to create, manage, and deploy AI models with ease. In the realm of artificial intelligence, the ability to craft effective prompt flows is becoming increasingly important. Whether you’re a data scientist, an AI enthusiast, or a developer, understanding how to build and integrate these flows is crucial in leveraging AI’s full potential.
In this post, we’ll guide you through the process of creating a prompt flow using Azure AI Studio. From setting up your workspace to integrating AI models, and finally testing your flow, we’ll cover all the essential steps. By the end of this tutorial, you’ll have the knowledge and confidence to build your own prompt flows, enhancing your AI projects with sophisticated and intelligent interactions.
Preparation
For this example we need an Azure Subscription with OpenAI enabled. For more information on how to get access look here:
How do I get access to Azure OpenAI?
Access is currently limited as we navigate high demand, upcoming product improvements, and Microsoft’s commitment to responsible AI. For now, we’re working with customers with an existing partnership with Microsoft, lower risk use cases, and those committed to incorporating mitigations.
More specific information is included in the application form. We appreciate your patience as we work to responsibly enable broader access to Azure OpenAI.
Apply here for access:
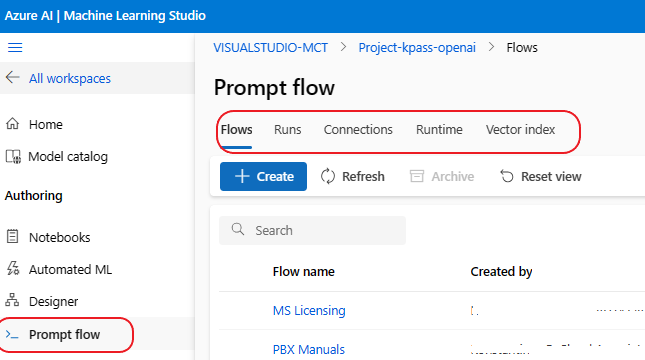
Configuration and Azure AI Studio
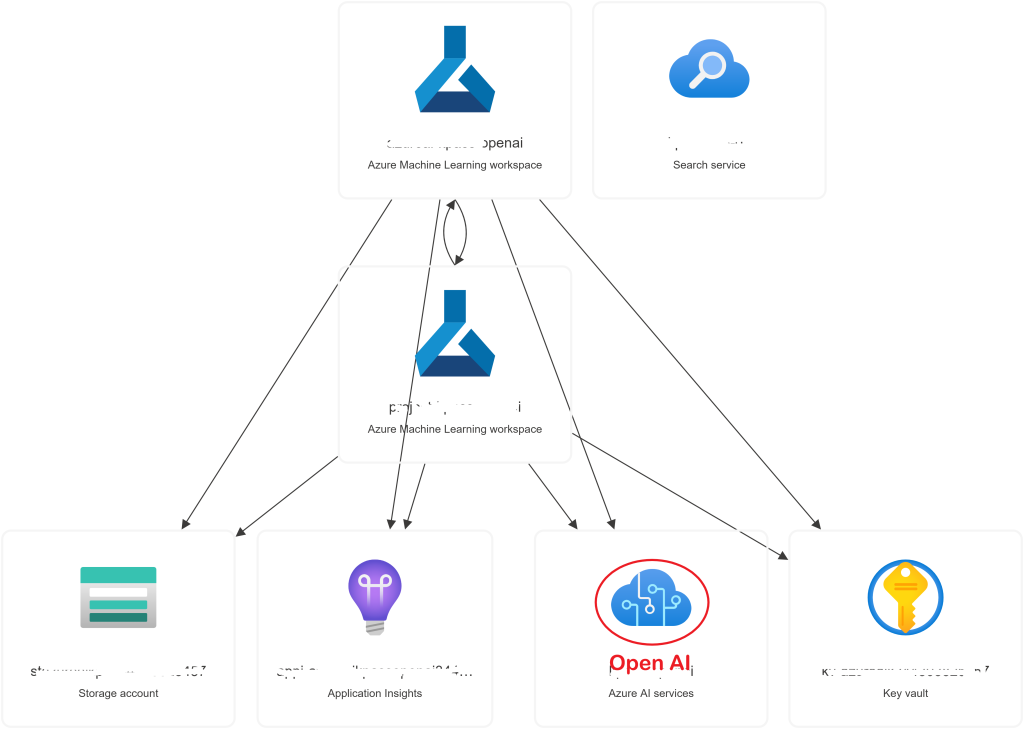
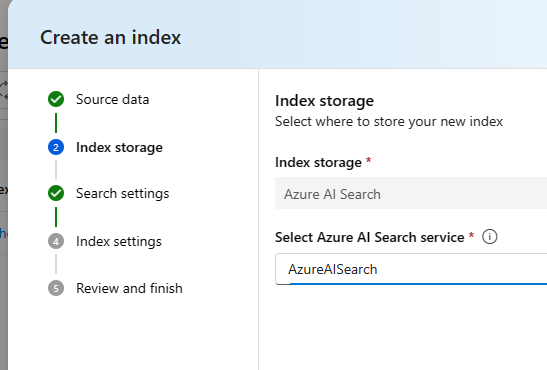
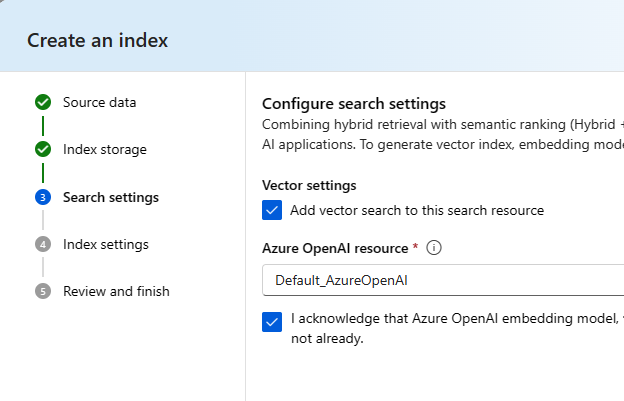
I suggest to look at the Documentation and select a region that supports the GPT4 models. In our case we have created a new Azure Open AI resource and we also need a new Azure AI Search resource with the Free SKU, which is more than enough for our example.Remember to consult the Documentation once you need more data to be indexed. Navigate to Azure OpenAI studio, click on the open Azure AI Studio button, and you will get the message to move your OpenAI under a new Hub which will provide access to the Azure AI Studio. Accept the proposition and continue to create the resources. It is important to understand that once you do that you get a complete Solution for all your AI needs since you will provided with Machine Learning capabilities, access to numerous models and all the capabilities that Azure AI has to offer, through a single portal. Here is what you will get once you make the transition:
Indexing
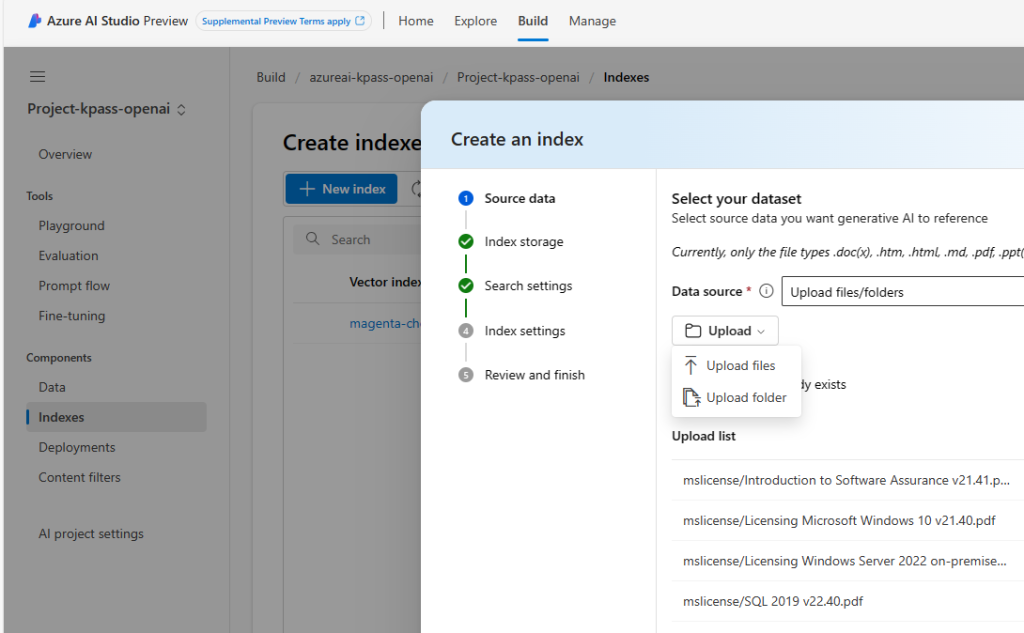
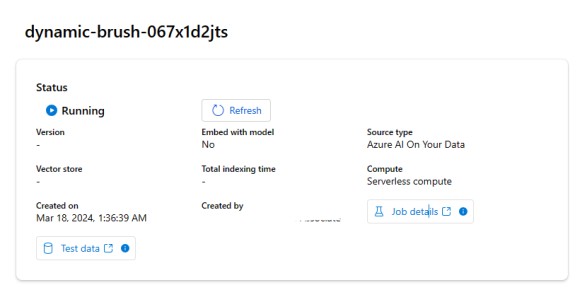
Our example is using PDF documents from Microsoft that deal with various licensing details regarding Software Assurance, SQL and Windows Server and we are going to create a vector index so we can make questions from our Prompt Flow once the data is indexed. From Azure AI Studio select build, select your project and then from Indexes – New Index.
The final step will ask for a Compute Instance which we can leave to auto-select and the Service will create an instance for us, unless we want to use our own Compute. For this example the serverless auto-select is just fine.
Azure AI Studio ML
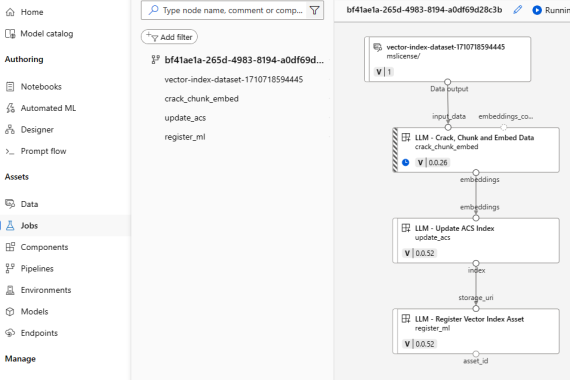
When we click on the Job Details icon we will be taken into Azure ML Studio where we can see details of our Job Status, and the all other info; for example the Prompt Flow, the Connections with other services and in general we have more control over our deployment.
The process of indexing may take a while, as it depends on both the quantity and size of the documents involved. Once indexing is complete, the next step is to choose a runtime environment for our flow. This is where we decide how our Prompt Flow will be executed. You have the option to go with a default runtime setting, or delve into more tailored configurations by selecting or creating your own compute environment.
This choice is crucial because it lets you fine-tune your environment, allowing you to pick specific applications and packages that best suit your flow. To do this, stay within the ML Studio and navigate to the ‘Prompt Flow’ section from the left menu. There, use the ‘runtime’ dropdown to set up a new, automatic runtime. After configuring your runtime, don’t forget to save your flow by clicking the ‘save’ button located on the right side.

In prompt flow, runtimes serve as computing resources that enable customers to execute their flows seamlessly. A runtime is equipped with a prebuilt Docker image that includes our built-in tools, ensuring that all necessary tools are readily available for execution. Within the Azure Machine Learning workspace, users have the option to create a runtime using the predefined default environment. This default environment is set up to reference the prebuilt Docker image, providing users with a convenient and efficient way to get started. We regularly update the default environment to ensure it aligns with the latest version of the Docker image.
Microsoft Documentation-Runtimes in Prompt Flow
The Prompt Flow
Let’s start configuring our Prompt Flow.
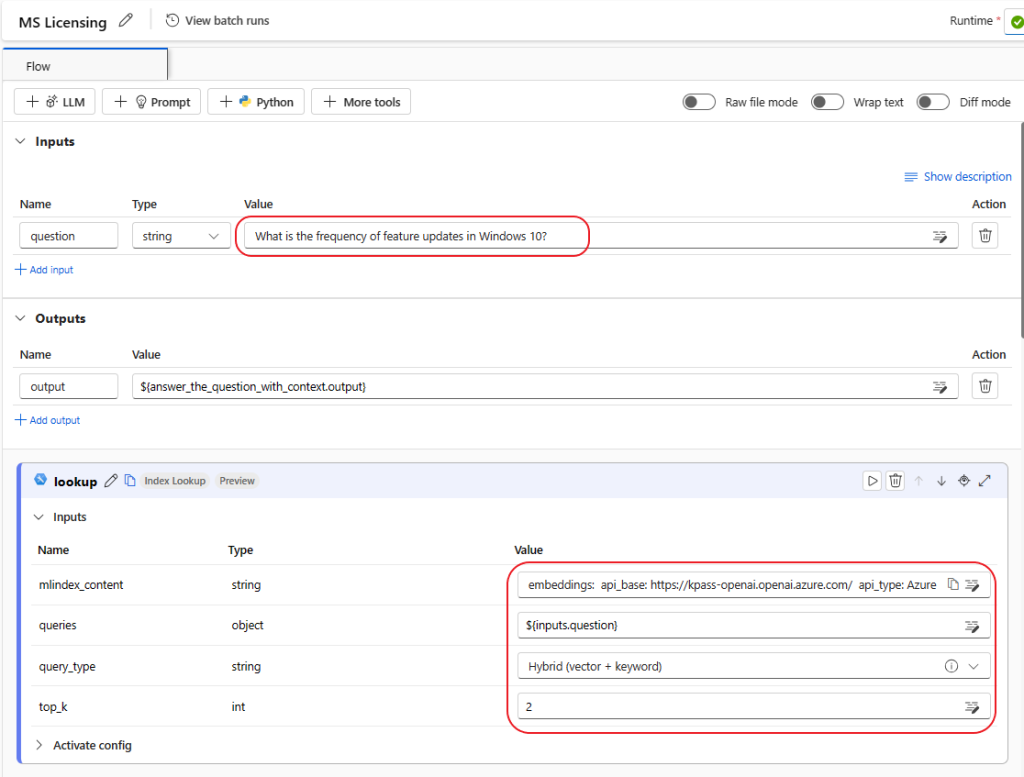
So lets add for the Question: “What is the frequency of feature updates in Windows 10?” ( You can ask something from your own PDF data).
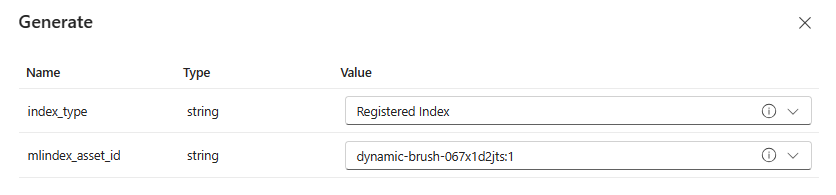
And for the lookup step select the mlindex_content setting and select the ‘Registered Index” with the name of your index, and for query_type add “Hybrid (vector + keyword)”:
The next configuration settings are the variants where as you can see, we have three variants to work with. We can add more, delete and change the Prompts to our preferences, so we can actually see with different prompts what type of output we get.
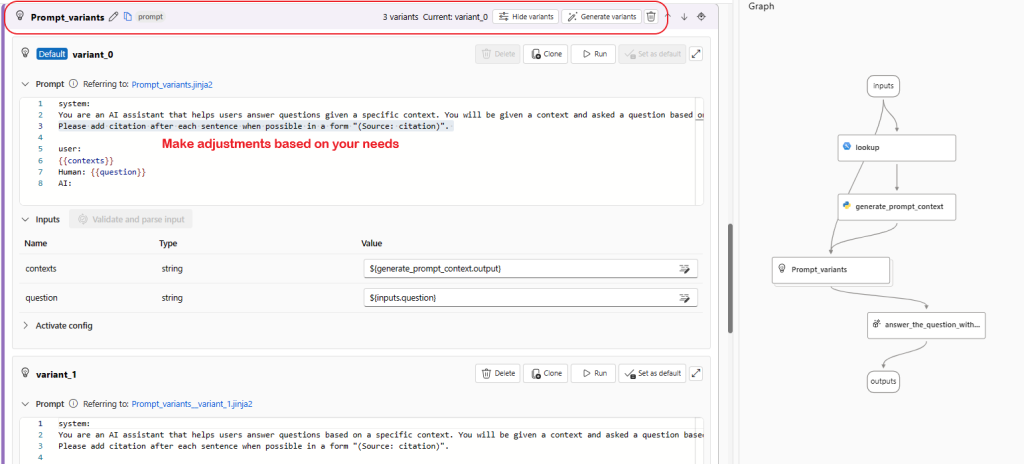
A variant refers to a specific version of a tool node that has distinct settings. Currently, variants are supported only in the LLM tool. For example, in the LLM tool, a new variant can represent either a different prompt content or different connection settings.
Suppose you want to generate a summary of a news article. You can set different variants of prompts and settings like this:
| Variants | Prompt | Connection settings |
|---|---|---|
| Variant 0 | Summary: {{input sentences}} | Temperature = 1 |
| Variant 1 | Summary: {{input sentences}} | Temperature = 0.7 |
| Variant 2 | What is the main point of this article? {{input sentences}} | Temperature = 1 |
| Variant 2 | What is the main point of this article? {{input sentences}} | Temperature = 0.7 |
By utilizing different variants of prompts and settings, you can explore how the model responds to various inputs and outputs, enabling you to discover the most suitable combination for your requirements.
As we arrive at the final stage of our flow, it’s important to pay close attention to some critical details and settings that need to be accurately configured. This final part, aptly named ‘answer_the_question_with_context’, involves several key steps. Here, you’ll find options to set up Connection Settings, choose the API type, and make various other configurations for your implementation. Additionally, you have the flexibility to adjust the input to include extra elements, or you can opt to use the output variants that the flow generates. You can access and manage these details easily from the ML Studio menu. For instance, it’s possible to establish a new connection, add a new vector index, or even create a custom runtime tailored to your specific needs.
Execute
Before saving or making any changes to our flow, it’s crucial to ensure that the runtime is active. Keep an eye on the runtime’s idle shutdown period and refresh the page to check its status. If the runtime isn’t active, you might need to extend the idle period or restart the runtime. Once everything is set up and ready, you can run the flow. At this point, you’ll be given a choice: either allow all variants to run as separate entities or use the default variant you’ve selected.
As the Prompt executes each step or node, you can watch the results unfold in the user interface. Don’t just focus on the output; take a moment to examine the input as well. Here, you can see the execution of all variants and the context provided to each step. This visibility is key, as it shows how you have the power to control what is fed into each node and shape the output accordingly. Remember, there are additional settings that offer further customization of your flows, like the ‘Activate Config’ setting. This particular feature provides a conditional approach to determine whether each node should execute or not.
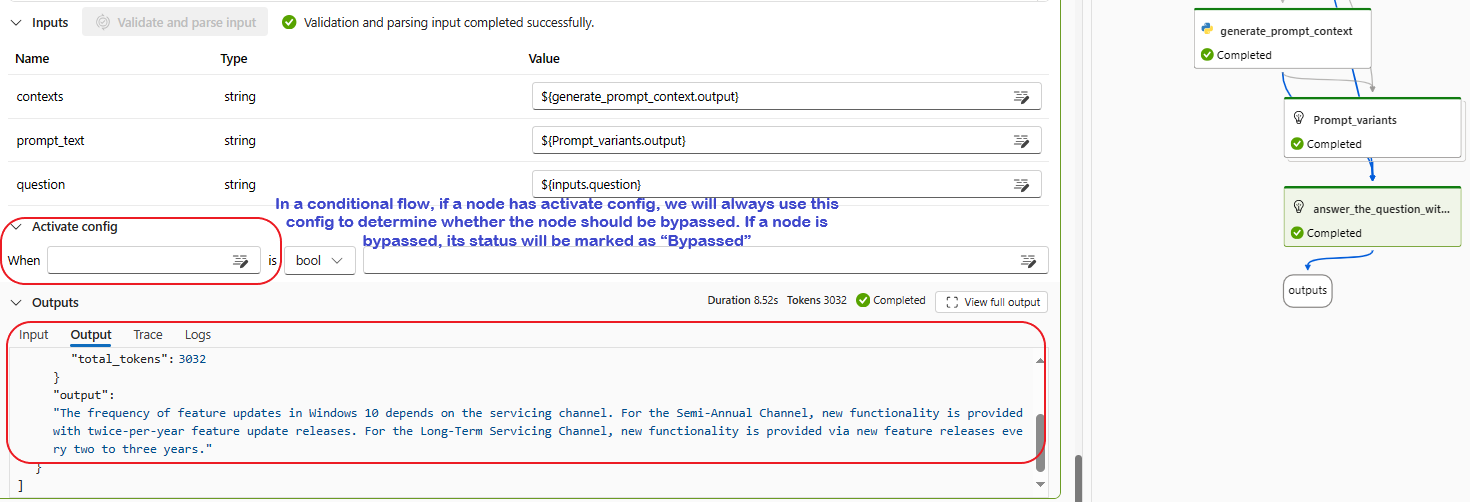
In our example, the answer provided aligns perfectly with the documentation, demonstrating both precision and thoughtful construction. What’s particularly intriguing is examining the Input field in the node’s output. This view lets us understand the structure of our Prompt and the elements it incorporates. Experimenting with this feature is highly beneficial. By trying out different variants or even creating new ones, we can observe how the model reacts to various prompt types. I encourage you to experiment: adjust the Prompt in the last node, test out different variants, and explore a range of scenarios and use cases!
Looking ahead, our next venture involves publishing our Prompt Flow and integrating it with an Online Endpoint. This exciting next step will be covered in an upcoming post, where we’ll delve deeper into more possibilities and get hands-on with the operational aspects of Azure AI and Machine Learning. Stay tuned for more insights as we continue our journey into the intricacies of Azure AI!
Closing
Prompt Flow in Azure AI Studio stands as a testament to the evolving capabilities of AI and machine learning. It’s not just about automating responses; it’s about crafting intelligent, context-aware interactions that can significantly enhance user experience and decision-making processes in a variety of scenarios. From customer service to data analysis, the applications are as diverse as they are impactful.
Looking ahead, the next exciting phase is the publication of our Prompt Flow and its integration into real-world applications through an online endpoint. This will be the focus of our upcoming post, where we’ll delve into the operational aspects of Azure AI and Machine Learning, further expanding our toolkit for innovative AI solutions. Stay tuned as we continue our journey, unlocking more advanced features and practical insights in the dynamic world of Azure AI!