Multi Agent Web App with Container Apps & Azure Speech SDK
Intro
Get ready for an exciting journey through our latest blog post where we delve into the fascinating world of Azure AI Speech Service, Python SDK, and Azure Container Apps.
We’re thrilled to share our adventure in crafting a cutting-edge multi-agent web application. Imagine interacting with not just one, but three distinct speaking agents, each bringing their unique flair to life right through your React web UI. Whether it’s getting the latest weather updates, catching up on breaking news, or staying on top of the Stock Exchange, our agents have got you covered.
We’ve seamlessly integrated the Azure Speech SDK with a modular architecture and dynamic external API calls, creating an experience that’s as efficient as it is enjoyable.
What sets this application apart is its versatility. Choose your preferred agent, like the News Agent, and watch as it transforms data fetched from a news API into speech, courtesy of the Azure Speech Service. The result? Crisp, clear audio that you can either savor live on the UI or download as an MP3 file for on-the-go convenience.
But that’s not all. We’ve infused the application with a range of Python modules, each offering different voices, adding layers of personality and depth to the user experience. A testament to the power of AI Speech capabilities and modern web development, making it an exciting project for any IT professional to explore and build upon.
Requirements
Our Project is build with the help of VSCode, Azure CLI, React and Python. We need an Azure Subscription to create Azure Container Apps and an Azure Speech service resource. We will build our Docker images directly to Azure Container Registry and create the relevant ingress configurations. Additional security should be taken in account like Private Endpoints and Front Door in case you want this as a production application.
Build
We are building a simple React Web UI and containerizing it, while the interesting part of our code lays into the modular design of the Python backend. It is also a Docker container Image with a main application and three different python modules each one responsible for it’s respective agent. Visual elements make the UI quite friendly and simple to understand and use. The user selects the agent and presses the ‘TALK” button. The backend fetches data from the selected API ( GNEWS, OpenMeteo and Alphavantage) interacts the text with Azure Speech Service and returns the audio to be played on the UI with a small player, providing also a Download link for the MP3. Each time we select and activate a different agent the file is updated with the new audio.
Let’s have a look on the React build, the UI and the Docker file:
import React, { useState } from 'react';
import './App.css';
import logo from './logo.png';
import avatarRita from './assets/rita.png';
import avatarMark from './assets/mark.png';
import avatarMary from './assets/mary.png';

function App() {
  const [activeAgent, setActiveAgent] = useState(null);
  const [audioUrl, setAudioUrl] = useState(null);  // Add this line to define audioUrl and setAudioUrl
  const [audioStream, setAudioStream] = useState(null);  // Add this line to define audioStream and setAudioStream
  const [stockSymbol, setStockSymbol] = useState('');

  const handleAgentClick = (agent) => {
    setActiveAgent(agent);
  };

  const handleCommand = async (command) => {
   if (command === 'TALK') {
            let endpoint = '';
            let bodyData = {};
            if (activeAgent === 'rita') {
              endpoint = '/talk-to-rita';
              bodyData = { text: "Good Morning to everyone" };// Add any specific data or parameters for RITA if required
            } else if (activeAgent === 'mark') {
              endpoint = '/talk-to-mark';
              // Add any specific data or parameters for MARK if required
            } else if (activeAgent === 'mary' && stockSymbol) {
              endpoint = '/talk-to-mary';
              bodyData = { symbol: stockSymbol };
            } else {
              console.error('Agent not selected or stock symbol not provided');
              return;
            }

            try {
              const response = await fetch(`${process.env.REACT_APP_API_BASE_URL}${endpoint}`, {
                method: 'POST',
                headers: {
                  'Content-Type': 'application/json',
                },
                body: JSON.stringify(bodyData),// Add body data if needed for the specific agent
              });
              const data = await response.json();

        if (response.ok) {
          const audioContent = base64ToArrayBuffer(data.audioContent); // Convert base64 to ArrayBuffer
          const blob = new Blob([audioContent], { type: 'audio/mp3' });
          const url = URL.createObjectURL(blob);
          setAudioUrl(url);  // Update state
          setAudioStream(url);
        } else {
          console.error('Response error:', data);
        }
      } catch (error) {
        console.error('Error:', error);
      }
    }
  };
    // Function to convert base64 to ArrayBuffer
    function base64ToArrayBuffer(base64) {
      const binaryString = window.atob(base64);
      const len = binaryString.length;
      const bytes = new Uint8Array(len);
      for (let i = 0; i < len; i++) {
        bytes[i] = binaryString.charCodeAt(i);
      }
      return bytes.buffer;
    }


  return (
    <div className="App">
      <header className="navbar">
        <span>DATE: {new Date().toLocaleDateString()}</span>
        <span>   </span>
      </header>
      <h1>Welcome to MultiChat!</h1>
      <h2>Choose an agent to start the conversation</h2>
      <h3>Select Rita for Weather, Mark for Headlines and Mary for Stocks</h3>
      <img src={logo} className="logo" alt="logo" />
      <div className="avatar-container">
        <div className={`avatar ${activeAgent === 'rita' ? 'active' : ''}`} onClick={() => handleAgentClick('rita')}>
          <img src={avatarRita} alt="Rita" />
          <p>RITA</p>
        </div>
        <div className={`avatar ${activeAgent === 'mark' ? 'active' : ''}`} onClick={() => handleAgentClick('mark')}>
          <img src={avatarMark} alt="Mark" />
          <p>MARK</p>
        </div>
        <div className={`avatar ${activeAgent === 'mary' ? 'active' : ''}`} onClick={() => handleAgentClick('mary')}>
          <img src={avatarMary} alt="Mary" />
          <p>MARY</p>
        </div>
      </div>
      <div>
        {activeAgent === 'mary' && (
          <input
            type="text"
            placeholder="Enter Stock Symbol"
            value={stockSymbol}
            onChange={(e) => setStockSymbol(e.target.value)}
            className="stock-input"
          />
        )}
      </div>
      <div className="controls">
        <button onClick={() => handleCommand('TALK')}>TALK</button>
      </div>
      <div className="audio-container">
        {audioStream && <audio src={audioStream} controls autoPlay />}
        {audioUrl && (
          <a href={audioUrl} download="speech.mp3" className="download-link">
            Download MP3
          </a>
        )}
      </div>
    </div>
  );
}

export default App;
# Build stage
FROM node:18 AS build

# Set the working directory
WORKDIR /app

# Copy the frontend directory contents into the container at /app
COPY . /app

# Copy the environment file
COPY .env /app/.env

# Install dependencies and build the app
RUN npm install
RUN npm run build

# Serve stage
FROM nginx:alpine

# Copy the custom Nginx config into the image
# COPY custom_nginx.conf /etc/nginx/conf.d/default.conf

# Copy the build files from the build stage to the Nginx web root directory
COPY --from=build /app/build /usr/share/nginx/html

# Expose port 80 for the app
EXPOSE 80

# Start Nginx
CMD ["nginx", "-g", "daemon off;"]
The CSS is available on GitHub and this is the final result:
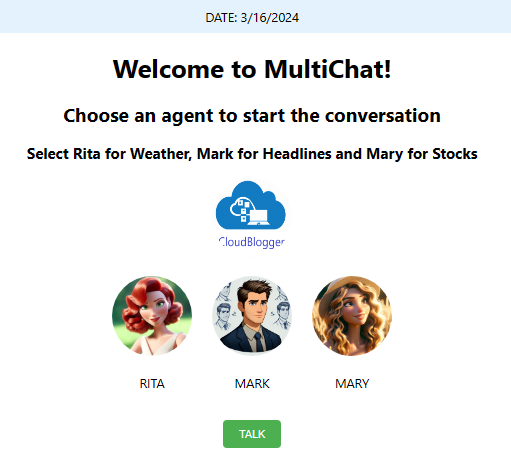
Now the Python backend is the force that makes this Web App a real Application ! Let’s have a look on our app.py , and the 3 different modules of weather_service.py, news_service.py and stock_service.py. Keep in mind that the external APIs used here are free and we can adjust our calls to our needs, based on the documentation of each API and its capabilities. For example the Stock agent brings up a text box to write the Stock symbol which you want information from.
import os
import base64
from flask import Flask, request, jsonify
import azure.cognitiveservices.speech as speechsdk
import weather_service
import news_service
import stock_service
from flask_cors import CORS

app = Flask(__name__)
CORS(app)

# Azure Speech Service configuration using environment variables
speech_key = os.getenv('SPEECH_KEY')
speech_region = os.getenv('SPEECH_REGION')
speech_config = speechsdk.SpeechConfig(subscription=speech_key, region=speech_region)

# Set the voice name (optional, remove if you want to use the default voice)
speech_config.speech_synthesis_voice_name='en-US-JennyNeural'

def text_to_speech(text, voice_name='en-US-JennyNeural'):
    try:
        # Set the synthesis output format to MP3
        speech_config.set_speech_synthesis_output_format(speechsdk.SpeechSynthesisOutputFormat.Audio16Khz32KBitRateMonoMp3)

        # Set the voice name dynamically
        speech_config.speech_synthesis_voice_name = voice_name

        # Create a synthesizer with no audio output (null output)
        synthesizer = speechsdk.SpeechSynthesizer(speech_config=speech_config, audio_config=None)
        result = synthesizer.speak_text_async(text).get()

        # Check result
        if result.reason == speechsdk.ResultReason.SynthesizingAudioCompleted:
            print("Speech synthesized for text [{}]".format(text))
            return result.audio_data  # This is in MP3 format
        elif result.reason == speechsdk.ResultReason.Canceled:
            cancellation_details = result.cancellation_details
            print("Speech synthesis canceled: {}".format(cancellation_details.reason))
            print("Error details: {}".format(cancellation_details.error_details))
            return None
    except Exception as e:
        print(f"Error in text_to_speech: {e}")
        return None

@app.route('/talk-to-rita', methods=['POST'])
def talk_to_rita():
    try:
        # Use default coordinates or get them from request
        latitude = 37.98  # Default latitude
        longitude = 23.72  # Default longitude
        data = request.json
        if data:
            latitude = data.get('latitude', latitude)
            longitude = data.get('longitude', longitude)

        # Get weather description using the weather service
        descriptive_text = weather_service.get_weather_description(latitude, longitude)

        if descriptive_text:

            audio_content = text_to_speech(descriptive_text, 'en-US-JennyNeural')  # Use the US voice
            #audio_content = text_to_speech(descriptive_text)
            if audio_content:
                # Convert audio_content to base64 for JSON response
                audio_base64 = base64.b64encode(audio_content).decode('utf-8')
                return jsonify({"audioContent": audio_base64}), 200
            else:
                return jsonify({"error": "Failed to synthesize speech"}), 500
        else:
            return jsonify({"error": "Failed to get weather description"}), 500
    except Exception as e:
        return jsonify({"error": str(e)}), 500

@app.route('/talk-to-mark', methods=['POST'])
def talk_to_mark():
    try:
        gnews_api_key = os.getenv('GNEWS_API_KEY')
        news_headlines = news_service.fetch_greek_news(gnews_api_key)

        # Set the language to Greek for MARK
        # speech_config.speech_synthesis_voice_name = 'el-GR-AthinaNeural'  # Example Greek voice

        audio_content = text_to_speech(news_headlines, 'el-GR-NestorasNeural')  # Use the Greek voice

        if audio_content:
            audio_base64 = base64.b64encode(audio_content).decode('utf-8')
            return jsonify({"audioContent": audio_base64}), 200
        else:
            return jsonify({"error": "Failed to synthesize speech"}), 500
    except Exception as e:
        return jsonify({"error": str(e)}), 500

@app.route('/talk-to-mary', methods=['POST'])
def talk_to_mary():
    try:
        data = request.json
        stock_symbol = data.get('symbol')  # Extract the stock symbol from the request

        if not stock_symbol:
            return jsonify({"error": "No stock symbol provided"}), 400

        api_key = os.getenv('ALPHAVANTAGE_API_KEY')  # Get your Alpha Vantage API key from the environment variable
        stock_info = stock_service.fetch_stock_quote(api_key, stock_symbol)

        audio_content = text_to_speech(stock_info, 'en-US-JennyNeural')  # Use an English voice for Mary
        if audio_content:
            audio_base64 = base64.b64encode(audio_content).decode('utf-8')
            return jsonify({"audioContent": audio_base64}), 200
        else:
            return jsonify({"error": "Failed to synthesize speech"}), 500
    except Exception as e:
        print(f"Error in /talk-to-mary: {e}")
        return jsonify({"error": str(e)}), 500

if __name__ == '__main__':
    app.run(debug=True)
Watch the highlighted parts where we import our modules, and the different routes we have. Just in case we have a default voice set, but each module can make it’s own configuration regarding the voice selection. We even have Mark speaking Greek for the news audio announcements!
import requests_cache
import pandas as pd
from retry_requests import retry
import openmeteo_requests

# Function to create descriptive text for each day's weather
def create_weather_descriptions(df):
    descriptions = []
    for index, row in df.iterrows():
        description = (f"On {row['date'].strftime('%Y-%m-%d')}, the maximum temperature is {row['temperature_2m_max']}°C, "
                      f"the minimum temperature is {row['temperature_2m_min']}°C, "
                      f"and the total rainfall is {row['rain_sum']}mm.")
        descriptions.append(description)
    return descriptions

# Setup the Open-Meteo API client with cache and retry on error
cache_session = requests_cache.CachedSession('.cache', expire_after=3600)
retry_session = retry(cache_session, retries=5, backoff_factor=0.2)
openmeteo = openmeteo_requests.Client(session=retry_session)

def fetch_weather_data(latitude=37.98, longitude=23.72): # Default coordinates for Athens, Greece
    # Define the API request parameters
    params = {
        "latitude": latitude,
        "longitude": longitude,
        "daily": ["weather_code", "temperature_2m_max", "temperature_2m_min", "rain_sum"],
        "timezone": "auto"
    }

    # Make the API call
    url = "https://api.open-meteo.com/v1/forecast"
    responses = openmeteo.weather_api(url, params=params)

    # Process the response and return daily data as a DataFrame
    response = responses[0]
    daily = response.Daily()
    daily_dataframe = pd.DataFrame({
        "date": pd.date_range(
            start=pd.to_datetime(daily.Time(), unit="s", utc=True),
            end=pd.to_datetime(daily.TimeEnd(), unit="s", utc=True),
            freq=pd.Timedelta(seconds=daily.Interval()),
            inclusive="left"
        ),
        "weather_code": daily.Variables(0).ValuesAsNumpy(),
        "temperature_2m_max": daily.Variables(1).ValuesAsNumpy(),
        "temperature_2m_min": daily.Variables(2).ValuesAsNumpy(),
        "rain_sum": daily.Variables(3).ValuesAsNumpy()
    })

    return daily_dataframe

def get_weather_description(latitude, longitude):
    # Fetch the weather data
    weather_data = fetch_weather_data(latitude, longitude)

    # Create weather descriptions from the data
    weather_descriptions = create_weather_descriptions(weather_data)
    return ' '.join(weather_descriptions)
import json
import urllib.request

def fetch_greek_news(api_key, max_articles=5, category='nation'):
    url = f"https://gnews.io/api/v4/top-headlines?country=gr&lang=el&category={category}&max={max_articles}&token={api_key}"

    try:
        with urllib.request.urlopen(url) as response:
            data = json.loads(response.read().decode("utf-8"))
            articles = data.get("articles", [])
            headlines = [article["title"] for article in articles]
            return " ".join(headlines)
    except Exception as e:
        print(f"Error fetching news: {e}")
        return "Error fetching news."
import requests

def fetch_stock_quote(api_key, symbol):
    url = f'https://www.alphavantage.co/query?function=GLOBAL_QUOTE&symbol={symbol}&apikey={api_key}'
    try:
        response = requests.get(url)
        response.raise_for_status()  # Raises an HTTPError if the HTTP request returned an unsuccessful status code
        data = response.json()

        quote = data.get("Global Quote", {})
        if not quote:
            return "Stock information not available."

        # Parsing relevant information
        stock_symbol = quote.get("01. symbol", "N/A")
        open_price = quote.get("02. open", "N/A")
        high_price = quote.get("03. high", "N/A")
        low_price = quote.get("04. low", "N/A")
        current_price = quote.get("05. price", "N/A")
        volume = quote.get("06. volume", "N/A")
        latest_trading_day = quote.get("07. latest trading day", "N/A")
        previous_close = quote.get("08. previous close", "N/A")
        change = quote.get("09. change", "N/A")
        change_percent = quote.get("10. change percent", "N/A")

        # Constructing descriptive text
        descriptive_text = (
            f"Here is the latest stock information for {stock_symbol}. "
            f"On the latest trading day, {latest_trading_day}, "
            f"the stock opened at {open_price}, "
            f"with a high of {high_price} and a low of {low_price}. "
            f"The closing price was {current_price}. "
            f"The stock saw a change of {change}, which is {change_percent}. "
            f"The volume of shares traded was {volume}."
        )
        return descriptive_text
    except requests.RequestException as e:
        print(f"Error fetching stock data: {e}")
        return "Error fetching stock information."
We need a Dockerfile for our Flask app:
# Use an official Python runtime as a parent image
FROM python:3.11-bullseye

# Set the working directory in the container
WORKDIR /usr/src/app

# Copy the current directory contents into the container at /usr/src/app
COPY . .

# Install any needed packages specified in requirements.txt
# Ensure you have a requirements.txt file in your project directory
RUN pip install --no-cache-dir -r requirements.txt

# Make port 5000 available to the world outside this container
EXPOSE 5000

# Define environment variable for Azure
ENV FLASK_APP=app.py
ENV FLASK_RUN_HOST=0.0.0.0
# Run app.py when the container launches
CMD ["flask", "run"]
You can always use a docker compose to test locally the Application.
Now here is the Azure Cli scripts that we need to execute in order to build, tag and push our Images to Container Registry and pull them as Container Apps to our Environment on Azure:
## Run these before anything ! :
az login
az extension add --name containerapp --upgrade
az provider register --namespace Microsoft.App
az provider register --namespace Microsoft.OperationalInsights

## Load your resources to variables
$RESOURCE_GROUP="rg-demo24"
$LOCATION="northeurope"
$ENVIRONMENT="env-web-x24"
$FRONTEND="frontend"
$BACKEND="backend"
$ACR="acrx2024"

## Create a Resource Group, a Container Registry and a Container Apps Environment:
az group create --name $RESOURCE_GROUP --location "$LOCATION"
az acr create --resource-group $RESOURCE_GROUP --name $ACR --sku Basic --admin-enabled true
az containerapp env create --name $ENVIRONMENT -g $RESOURCE_GROUP --location "$LOCATION"

## Login from your Terminal to ACR:
az acr login --name $(az acr list -g rg-demo24 --query "[].{name: name}" -o tsv)

## Build your backend:
az acr build --registry $ACR --image backendtts .

## Create your Backend Container App:
az containerapp create \
 --name backendtts \
 --resource-group $RESOURCE_GROUP \
 --environment $ENVIRONMENT \
 --image "$ACR.azurecr.io/backendtts:latest" \
 --target-port 5000 \
 --env-vars SPEECH_KEY=xxxxxxxxxx SPEECH_REGION=northeurope \
 --ingress 'external' \
 --registry-server "$ACR.azurecr.io" \
 --query properties.configuration.ingress.fqdn

## Make sure to cd into the React Frontend directory where your Dockerfile is:
az acr build --registry $ACR --image frontendtts .

## Create your Frontend:
az containerapp create --name frontendtts --resource-group $RESOURCE_GROUP \
 --environment $ENVIRONMENT \
 --image "$ACR.azurecr.io/frontendtts:latest" \
 --target-port 80 --ingress 'external' \
 --registry-server "$ACR.azurecr.io" \
 --query properties.configuration.ingress.fqdn
Now we usually need to have the Web UI up and running so what we do is to set the scaling on each Container App to minimum 1 instance, but this is up to you !
That’s it ! Select your agents and make calls. Hear the audio, download the MP3 and make any changes to your App, just remember to rebuild your image and restart the revision !
Closing
As we wrap up this exciting project showcasing the seamless integration of Azure Speech Service with React, Python, and Azure Container Apps, we hope it has sparked your imagination and inspired you to explore the endless possibilities of modern cloud technologies. It’s been an exciting journey combining these powerful tools to create an application that truly speaks to its users. We eagerly look forward to seeing how you, our innovative community, will use these insights to build your own extraordinary projects. Until then, happy coding, and stay tuned for more adventures in technology!
References