Multi Agent Web App with Container Apps & Azure Speech SDK
Εισαγωγή
Ετοιμαστείτε για ένα συναρπαστικό ταξίδι μέσω της τελευταίας μας ανάρτησης ιστολογίου, όπου εμβαθύνουμε στον συναρπαστικό κόσμο της υπηρεσίας ομιλίας Azure AI, του Python SDK και των εφαρμογών Azure Container.
Είμαστε ενθουσιασμένοι που μοιραζόμαστε την περιπέτειά μας στη δημιουργία μιας πρωτοποριακής εφαρμογής web πολλαπλών πρακτόρων. Φανταστείτε ότι αλληλεπιδράτε όχι μόνο με έναν, αλλά με τρεις ξεχωριστούς ομιλητές, ο καθένας από τους οποίους ζωντανεύει τη μοναδική του ιδιότητα μέσω του React web UI σας. Είτε λαμβάνετε τις πιο πρόσφατες ενημερώσεις για τον καιρό, ενημερώνεστε για έκτακτες ειδήσεις είτε παραμένετε στην κορυφή του Χρηματιστηρίου, οι αντιπρόσωποί μας σας έχουν καλύψει.
Έχουμε ενσωματώσει απρόσκοπτα το Azure Speech SDK με αρθρωτή αρχιτεκτονική και δυναμικές εξωτερικές κλήσεις API, δημιουργώντας μια εμπειρία τόσο αποτελεσματική όσο και ευχάριστη.
Αυτό που ξεχωρίζει αυτή την εφαρμογή είναι η ευελιξία της. Επιλέξτε τον αντιπρόσωπο που προτιμάτε, όπως τον Πράκτορα Ειδήσεων, και παρακολουθήστε καθώς μετατρέπει τα δεδομένα που λαμβάνονται από ένα API ειδήσεων σε ομιλία, χάρη στην υπηρεσία Azure Speech Service. Το αποτέλεσμα? Καθαρός, καθαρός ήχος που μπορείτε είτε να απολαύσετε ζωντανά στο UI είτε να τον κατεβάσετε ως αρχείο MP3 για ευκολία εν κινήσει.
Αλλά αυτό δεν είναι όλο. Έχουμε εμποτίσει την εφαρμογή με μια σειρά από λειτουργικές μονάδες Python, καθεμία από τις οποίες προσφέρει διαφορετικές φωνές, προσθέτοντας επίπεδα προσωπικότητας και βάθους στην εμπειρία του χρήστη. Μια απόδειξη της δύναμης των δυνατοτήτων του AI Speech και της σύγχρονης ανάπτυξης ιστού, καθιστώντας το ένα συναρπαστικό έργο για κάθε επαγγελματία πληροφορικής να εξερευνήσει και να αξιοποιήσει.
Απαιτήσεις
Το έργο μας κατασκευάζεται με τη βοήθεια του VSCode, Azure CLI, React και Python. We need an Συνδρομής Azure to create Azure Container Apps και ενα Azure Speech πόρος υπηρεσίας. Θα δημιουργήσουμε τις εικόνες Docker απευθείας στο Μητρώο κοντέινερ του Azure και θα δημιουργήσουμε τις σχετικές διαμορφώσεις εισόδου. Θα πρέπει να ληφθεί υπόψη πρόσθετη ασφάλεια, όπως τα Private Endpoints και η Front Door σε περίπτωση που το θέλετε ως εφαρμογή παραγωγής.
Κτίζοντας
Κατασκευάζουμε ένα απλό React Web UI και το τοποθετούμε σε κοντέινερ, ενώ το ενδιαφέρον μέρος του κώδικά μας έγκειται στον αρθρωτό σχεδιασμό του backend της Python. Είναι επίσης μια εικόνα κοντέινερ Docker με μια κύρια εφαρμογή και τρεις διαφορετικές μονάδες python η καθεμία υπεύθυνη για τον αντίστοιχο πράκτορά της. Τα οπτικά στοιχεία κάνουν τη διεπαφή χρήστη αρκετά φιλική και απλή στην κατανόηση και χρήση. Ο χρήστης επιλέγει τον πράκτορα και πατά το κουμπί «TALK». Το backend ανακτά δεδομένα από το επιλεγμένο API (GNEWS, OpenMeteo και Alphavantage) αλληλεπιδρά με το κείμενο με την υπηρεσία Azure Speech Service και επιστρέφει τον ήχο που πρόκειται να αναπαραχθεί στο UI με ένα μικρό πρόγραμμα αναπαραγωγής, παρέχοντας επίσης έναν σύνδεσμο λήψης για το MP3. Κάθε φορά που επιλέγουμε και ενεργοποιούμε διαφορετικό πράκτορα, το αρχείο ενημερώνεται με τον νέο ήχο.
Ας ρίξουμε μια ματιά στην έκδοση του React, τη διεπαφή χρήστη και το αρχείο Docker:
import React, { useState } from 'react';
import './App.css';
import logo from './logo.png';
import avatarRita from './assets/rita.png';
import avatarMark from './assets/mark.png';
import avatarMary from './assets/mary.png';

function App() {
  const [activeAgent, setActiveAgent] = useState(null);
  const [audioUrl, setAudioUrl] = useState(null);  // Add this line to define audioUrl and setAudioUrl
  const [audioStream, setAudioStream] = useState(null);  // Add this line to define audioStream and setAudioStream
  const [stockSymbol, setStockSymbol] = useState('');

  const handleAgentClick = (agent) => {
    setActiveAgent(agent);
  };

  const handleCommand = async (command) => {
   if (command === 'TALK') {
            let endpoint = '';
            let bodyData = {};
            if (activeAgent === 'rita') {
              endpoint = '/talk-to-rita';
              bodyData = { text: "Good Morning to everyone" };// Add any specific data or parameters for RITA if required
            } else if (activeAgent === 'mark') {
              endpoint = '/talk-to-mark';
              // Add any specific data or parameters for MARK if required
            } else if (activeAgent === 'mary' && stockSymbol) {
              endpoint = '/talk-to-mary';
              bodyData = { symbol: stockSymbol };
            } else {
              console.error('Agent not selected or stock symbol not provided');
              return;
            }

            try {
              const response = await fetch(`${process.env.REACT_APP_API_BASE_URL}${endpoint}`, {
                method: 'POST',
                headers: {
                  'Content-Type': 'application/json',
                },
                body: JSON.stringify(bodyData),// Add body data if needed for the specific agent
              });
              const data = await response.json();

        if (response.ok) {
          const audioContent = base64ToArrayBuffer(data.audioContent); // Convert base64 to ArrayBuffer
          const blob = new Blob([audioContent], { type: 'audio/mp3' });
          const url = URL.createObjectURL(blob);
          setAudioUrl(url);  // Update state
          setAudioStream(url);
        } else {
          console.error('Response error:', data);
        }
      } catch (error) {
        console.error('Error:', error);
      }
    }
  };
    // Function to convert base64 to ArrayBuffer
    function base64ToArrayBuffer(base64) {
      const binaryString = window.atob(base64);
      const len = binaryString.length;
      const bytes = new Uint8Array(len);
      for (let i = 0; i < len; i++) {
        bytes[i] = binaryString.charCodeAt(i);
      }
      return bytes.buffer;
    }


  return (
    <div className="App">
      <header className="navbar">
        <span>DATE: {new Date().toLocaleDateString()}</span>
        <span>   </span>
      </header>
      <h1>Welcome to MultiChat!</h1>
      <h2>Choose an agent to start the conversation</h2>
      <h3>Select Rita for Weather, Mark for Headlines and Mary for Stocks</h3>
      <img src={logo} className="logo" alt="logo" />
      <div className="avatar-container">
        <div className={`avatar ${activeAgent === 'rita' ? 'active' : ''}`} onClick={() => handleAgentClick('rita')}>
          <img src={avatarRita} alt="Rita" />
          <p>RITA</p>
        </div>
        <div className={`avatar ${activeAgent === 'mark' ? 'active' : ''}`} onClick={() => handleAgentClick('mark')}>
          <img src={avatarMark} alt="Mark" />
          <p>MARK</p>
        </div>
        <div className={`avatar ${activeAgent === 'mary' ? 'active' : ''}`} onClick={() => handleAgentClick('mary')}>
          <img src={avatarMary} alt="Mary" />
          <p>MARY</p>
        </div>
      </div>
      <div>
        {activeAgent === 'mary' && (
          <input
            type="text"
            placeholder="Enter Stock Symbol"
            value={stockSymbol}
            onChange={(e) => setStockSymbol(e.target.value)}
            className="stock-input"
          />
        )}
      </div>
      <div className="controls">
        <button onClick={() => handleCommand('TALK')}>TALK</button>
      </div>
      <div className="audio-container">
        {audioStream && <audio src={audioStream} controls autoPlay />}
        {audioUrl && (
          <a href={audioUrl} download="speech.mp3" className="download-link">
            Download MP3
          </a>
        )}
      </div>
    </div>
  );
}

export default App;
# Build stage
FROM node:18 AS build

# Set the working directory
WORKDIR /app

# Copy the frontend directory contents into the container at /app
COPY . /app

# Copy the environment file
COPY .env /app/.env

# Install dependencies and build the app
RUN npm install
RUN npm run build

# Serve stage
FROM nginx:alpine

# Copy the custom Nginx config into the image
# COPY custom_nginx.conf /etc/nginx/conf.d/default.conf

# Copy the build files from the build stage to the Nginx web root directory
COPY --from=build /app/build /usr/share/nginx/html

# Expose port 80 for the app
EXPOSE 80

# Start Nginx
CMD ["nginx", "-g", "daemon off;"]
Το CSS είναι διαθέσιμο στο GitHub και αυτό είναι το τελικό αποτέλεσμα:
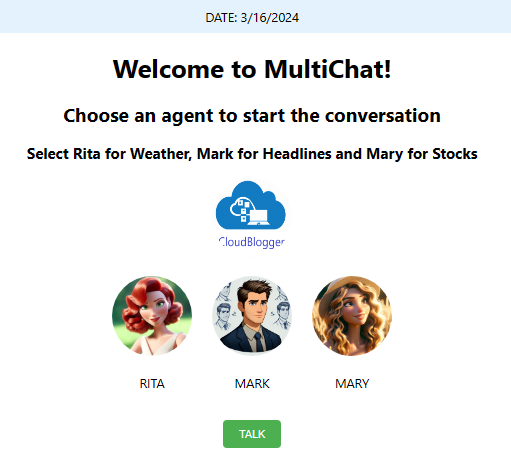
Τώρα το backend της Python είναι η δύναμη που κάνει αυτήν την εφαρμογή Web μια πραγματική εφαρμογή! Ας ρίξουμε μια ματιά στο app.py και στις 3 διαφορετικές ενότητες weather_service.py, news_service.py και stock_service.py. Λάβετε υπόψη ότι τα εξωτερικά API που χρησιμοποιούνται εδώ είναι δωρεάν και μπορούμε να προσαρμόσουμε τις κλήσεις μας στις ανάγκες μας, με βάση την τεκμηρίωση κάθε API και τις δυνατότητές του. Για παράδειγμα, ο πράκτορας Stock εμφανίζει ένα πλαίσιο κειμένου για να γράψει το σύμβολο Stock από το οποίο θέλετε πληροφορίες.
import os
import base64
from flask import Flask, request, jsonify
import azure.cognitiveservices.speech as speechsdk
import weather_service
import news_service
import stock_service
from flask_cors import CORS

app = Flask(__name__)
CORS(app)

# Azure Speech Service configuration using environment variables
speech_key = os.getenv('SPEECH_KEY')
speech_region = os.getenv('SPEECH_REGION')
speech_config = speechsdk.SpeechConfig(subscription=speech_key, region=speech_region)

# Set the voice name (optional, remove if you want to use the default voice)
speech_config.speech_synthesis_voice_name='en-US-JennyNeural'

def text_to_speech(text, voice_name='en-US-JennyNeural'):
    try:
        # Set the synthesis output format to MP3
        speech_config.set_speech_synthesis_output_format(speechsdk.SpeechSynthesisOutputFormat.Audio16Khz32KBitRateMonoMp3)

        # Set the voice name dynamically
        speech_config.speech_synthesis_voice_name = voice_name

        # Create a synthesizer with no audio output (null output)
        synthesizer = speechsdk.SpeechSynthesizer(speech_config=speech_config, audio_config=None)
        result = synthesizer.speak_text_async(text).get()

        # Check result
        if result.reason == speechsdk.ResultReason.SynthesizingAudioCompleted:
            print("Speech synthesized for text [{}]".format(text))
            return result.audio_data  # This is in MP3 format
        elif result.reason == speechsdk.ResultReason.Canceled:
            cancellation_details = result.cancellation_details
            print("Speech synthesis canceled: {}".format(cancellation_details.reason))
            print("Error details: {}".format(cancellation_details.error_details))
            return None
    except Exception as e:
        print(f"Error in text_to_speech: {e}")
        return None

@app.route('/talk-to-rita', methods=['POST'])
def talk_to_rita():
    try:
        # Use default coordinates or get them from request
        latitude = 37.98  # Default latitude
        longitude = 23.72  # Default longitude
        data = request.json
        if data:
            latitude = data.get('latitude', latitude)
            longitude = data.get('longitude', longitude)

        # Get weather description using the weather service
        descriptive_text = weather_service.get_weather_description(latitude, longitude)

        if descriptive_text:

            audio_content = text_to_speech(descriptive_text, 'en-US-JennyNeural')  # Use the US voice
            #audio_content = text_to_speech(descriptive_text)
            if audio_content:
                # Convert audio_content to base64 for JSON response
                audio_base64 = base64.b64encode(audio_content).decode('utf-8')
                return jsonify({"audioContent": audio_base64}), 200
            else:
                return jsonify({"error": "Failed to synthesize speech"}), 500
        else:
            return jsonify({"error": "Failed to get weather description"}), 500
    except Exception as e:
        return jsonify({"error": str(e)}), 500

@app.route('/talk-to-mark', methods=['POST'])
def talk_to_mark():
    try:
        gnews_api_key = os.getenv('GNEWS_API_KEY')
        news_headlines = news_service.fetch_greek_news(gnews_api_key)

        # Set the language to Greek for MARK
        # speech_config.speech_synthesis_voice_name = 'el-GR-AthinaNeural'  # Example Greek voice

        audio_content = text_to_speech(news_headlines, 'el-GR-NestorasNeural')  # Use the Greek voice

        if audio_content:
            audio_base64 = base64.b64encode(audio_content).decode('utf-8')
            return jsonify({"audioContent": audio_base64}), 200
        else:
            return jsonify({"error": "Failed to synthesize speech"}), 500
    except Exception as e:
        return jsonify({"error": str(e)}), 500

@app.route('/talk-to-mary', methods=['POST'])
def talk_to_mary():
    try:
        data = request.json
        stock_symbol = data.get('symbol')  # Extract the stock symbol from the request

        if not stock_symbol:
            return jsonify({"error": "No stock symbol provided"}), 400

        api_key = os.getenv('ALPHAVANTAGE_API_KEY')  # Get your Alpha Vantage API key from the environment variable
        stock_info = stock_service.fetch_stock_quote(api_key, stock_symbol)

        audio_content = text_to_speech(stock_info, 'en-US-JennyNeural')  # Use an English voice for Mary
        if audio_content:
            audio_base64 = base64.b64encode(audio_content).decode('utf-8')
            return jsonify({"audioContent": audio_base64}), 200
        else:
            return jsonify({"error": "Failed to synthesize speech"}), 500
    except Exception as e:
        print(f"Error in /talk-to-mary: {e}")
        return jsonify({"error": str(e)}), 500

if __name__ == '__main__':
    app.run(debug=True)
Παρακολουθήστε τα επισημασμένα μέρη όπου εισάγουμε τις μονάδες μας και τις διαφορετικές διαδρομές που έχουμε. Σε περίπτωση που έχουμε ένα προεπιλεγμένο σύνολο φωνής, αλλά κάθε ενότητα μπορεί να κάνει τη δική της διαμόρφωση σχετικά με την επιλογή φωνής. Έχουμε ακόμη και τον Mark να μιλάει ελληνικά για τις ηχητικές ανακοινώσεις ειδήσεων!
import requests_cache
import pandas as pd
from retry_requests import retry
import openmeteo_requests

# Function to create descriptive text for each day's weather
def create_weather_descriptions(df):
    descriptions = []
    for index, row in df.iterrows():
        description = (f"On {row['date'].strftime('%Y-%m-%d')}, the maximum temperature is {row['temperature_2m_max']}°C, "
                      f"the minimum temperature is {row['temperature_2m_min']}°C, "
                      f"and the total rainfall is {row['rain_sum']}mm.")
        descriptions.append(description)
    return descriptions

# Setup the Open-Meteo API client with cache and retry on error
cache_session = requests_cache.CachedSession('.cache', expire_after=3600)
retry_session = retry(cache_session, retries=5, backoff_factor=0.2)
openmeteo = openmeteo_requests.Client(session=retry_session)

def fetch_weather_data(latitude=37.98, longitude=23.72): # Default coordinates for Athens, Greece
    # Define the API request parameters
    params = {
        "latitude": latitude,
        "longitude": longitude,
        "daily": ["weather_code", "temperature_2m_max", "temperature_2m_min", "rain_sum"],
        "timezone": "auto"
    }

    # Make the API call
    url = "https://api.open-meteo.com/v1/forecast"
    responses = openmeteo.weather_api(url, params=params)

    # Process the response and return daily data as a DataFrame
    response = responses[0]
    daily = response.Daily()
    daily_dataframe = pd.DataFrame({
        "date": pd.date_range(
            start=pd.to_datetime(daily.Time(), unit="s", utc=True),
            end=pd.to_datetime(daily.TimeEnd(), unit="s", utc=True),
            freq=pd.Timedelta(seconds=daily.Interval()),
            inclusive="left"
        ),
        "weather_code": daily.Variables(0).ValuesAsNumpy(),
        "temperature_2m_max": daily.Variables(1).ValuesAsNumpy(),
        "temperature_2m_min": daily.Variables(2).ValuesAsNumpy(),
        "rain_sum": daily.Variables(3).ValuesAsNumpy()
    })

    return daily_dataframe

def get_weather_description(latitude, longitude):
    # Fetch the weather data
    weather_data = fetch_weather_data(latitude, longitude)

    # Create weather descriptions from the data
    weather_descriptions = create_weather_descriptions(weather_data)
    return ' '.join(weather_descriptions)
import json
import urllib.request

def fetch_greek_news(api_key, max_articles=5, category='nation'):
    url = f"https://gnews.io/api/v4/top-headlines?country=gr&lang=el&category={category}&max={max_articles}&token={api_key}"

    try:
        with urllib.request.urlopen(url) as response:
            data = json.loads(response.read().decode("utf-8"))
            articles = data.get("articles", [])
            headlines = [article["title"] for article in articles]
            return " ".join(headlines)
    except Exception as e:
        print(f"Error fetching news: {e}")
        return "Error fetching news."
import requests

def fetch_stock_quote(api_key, symbol):
    url = f'https://www.alphavantage.co/query?function=GLOBAL_QUOTE&symbol={symbol}&apikey={api_key}'
    try:
        response = requests.get(url)
        response.raise_for_status()  # Raises an HTTPError if the HTTP request returned an unsuccessful status code
        data = response.json()

        quote = data.get("Global Quote", {})
        if not quote:
            return "Stock information not available."

        # Parsing relevant information
        stock_symbol = quote.get("01. symbol", "N/A")
        open_price = quote.get("02. open", "N/A")
        high_price = quote.get("03. high", "N/A")
        low_price = quote.get("04. low", "N/A")
        current_price = quote.get("05. price", "N/A")
        volume = quote.get("06. volume", "N/A")
        latest_trading_day = quote.get("07. latest trading day", "N/A")
        previous_close = quote.get("08. previous close", "N/A")
        change = quote.get("09. change", "N/A")
        change_percent = quote.get("10. change percent", "N/A")

        # Constructing descriptive text
        descriptive_text = (
            f"Here is the latest stock information for {stock_symbol}. "
            f"On the latest trading day, {latest_trading_day}, "
            f"the stock opened at {open_price}, "
            f"with a high of {high_price} and a low of {low_price}. "
            f"The closing price was {current_price}. "
            f"The stock saw a change of {change}, which is {change_percent}. "
            f"The volume of shares traded was {volume}."
        )
        return descriptive_text
    except requests.RequestException as e:
        print(f"Error fetching stock data: {e}")
        return "Error fetching stock information."
Χρειαζόμαστε ένα Dockerfile για την εφαρμογή μας Flask:
# Use an official Python runtime as a parent image
FROM python:3.11-bullseye

# Set the working directory in the container
WORKDIR /usr/src/app

# Copy the current directory contents into the container at /usr/src/app
COPY . .

# Install any needed packages specified in requirements.txt
# Ensure you have a requirements.txt file in your project directory
RUN pip install --no-cache-dir -r requirements.txt

# Make port 5000 available to the world outside this container
EXPOSE 5000

# Define environment variable for Azure
ENV FLASK_APP=app.py
ENV FLASK_RUN_HOST=0.0.0.0
# Run app.py when the container launches
CMD ["flask", "run"]
Μπορείτε πάντα να χρησιμοποιήσετε ένα docker compose για να δοκιμάσετε τοπικά την Εφαρμογή.
Εδώ είναι τα σενάρια Azure Cli που πρέπει να εκτελέσουμε για να δημιουργήσουμε, να προσθέσουμε ετικέτες και να προωθήσουμε τις Εικόνες μας στο Μητρώο κοντέινερ και να τις τραβήξουμε ως Εφαρμογές κοντέινερ στο περιβάλλον μας στο Azure:
## Run these before anything ! :
az login
az extension add --name containerapp --upgrade
az provider register --namespace Microsoft.App
az provider register --namespace Microsoft.OperationalInsights

## Load your resources to variables
$RESOURCE_GROUP="rg-demo24"
$LOCATION="northeurope"
$ENVIRONMENT="env-web-x24"
$FRONTEND="frontend"
$BACKEND="backend"
$ACR="acrx2024"

## Create a Resource Group, a Container Registry and a Container Apps Environment:
az group create --name $RESOURCE_GROUP --location "$LOCATION"
az acr create --resource-group $RESOURCE_GROUP --name $ACR --sku Basic --admin-enabled true
az containerapp env create --name $ENVIRONMENT -g $RESOURCE_GROUP --location "$LOCATION"

## Login from your Terminal to ACR:
az acr login --name $(az acr list -g rg-demo24 --query "[].{name: name}" -o tsv)

## Build your backend:
az acr build --registry $ACR --image backendtts .

## Create your Backend Container App:
az containerapp create \
 --name backendtts \
 --resource-group $RESOURCE_GROUP \
 --environment $ENVIRONMENT \
 --image "$ACR.azurecr.io/backendtts:latest" \
 --target-port 5000 \
 --env-vars SPEECH_KEY=xxxxxxxxxx SPEECH_REGION=northeurope \
 --ingress 'external' \
 --registry-server "$ACR.azurecr.io" \
 --query properties.configuration.ingress.fqdn

## Make sure to cd into the React Frontend directory where your Dockerfile is:
az acr build --registry $ACR --image frontendtts .

## Create your Frontend:
az containerapp create --name frontendtts --resource-group $RESOURCE_GROUP \
 --environment $ENVIRONMENT \
 --image "$ACR.azurecr.io/frontendtts:latest" \
 --target-port 80 --ingress 'external' \
 --registry-server "$ACR.azurecr.io" \
 --query properties.configuration.ingress.fqdn
Τώρα συνήθως χρειάζεται να έχουμε τη διεπαφή χρήστη Web σε λειτουργία, οπότε αυτό που κάνουμε είναι να ρυθμίσουμε την κλίμακα σε κάθε εφαρμογή κοντέινερ σε τουλάχιστον 1 παρουσία, αλλά αυτό εξαρτάται από εσάς!
Αυτό είναι ! Επιλέξτε τους αντιπροσώπους σας και πραγματοποιήστε κλήσεις. Ακούστε τον ήχο, κατεβάστε το MP3 και κάντε οποιεσδήποτε αλλαγές στην εφαρμογή σας, απλώς θυμηθείτε να δημιουργήσετε ξανά την εικόνα σας και να επανεκκινήσετε την αναθεώρηση!
Κλείσιμο
Καθώς ολοκληρώνουμε αυτό το συναρπαστικό έργο που παρουσιάζει την απρόσκοπτη ενσωμάτωση της υπηρεσίας ομιλίας Azure με τις εφαρμογές React, Python και Azure Container, ελπίζουμε ότι έχει εξάψει τη φαντασία σας και σας ενέπνευσε να εξερευνήσετε τις ατελείωτες δυνατότητες των σύγχρονων τεχνολογιών cloud. Ήταν ένα συναρπαστικό ταξίδι που συνδυάζει αυτά τα ισχυρά εργαλεία για να δημιουργήσει μια εφαρμογή που μιλάει πραγματικά στους χρήστες της. Ανυπομονούμε να δούμε πώς εσείς, η καινοτόμος κοινότητά μας, θα χρησιμοποιήσετε αυτές τις πληροφορίες για να δημιουργήσετε τα δικά σας εξαιρετικά έργα. Μέχρι τότε, καλή κωδικοποίηση και μείνετε συντονισμένοι για περισσότερες περιπέτειες στην τεχνολογία!
Αναφορές: