Build a Safe AI Translator Web App with Azure AI, Azure Container Apps, Application Gateway and Dapr

Εισαγωγή
Technology and innovation are shaping the way we work, interact and learn from the Corporate Workspace to the Home Office, from the University to the School. Azure AI Services are leading this change. Our featured Safe AI Translator web app integrates tools like Azure AI Translator και Azure Content Safety, users can enjoy seamless text translation and comprehensive content moderation
Safe AI Translator is perfect for Enterprises, Educational institutes, learning platforms, and home users. But there is more!
We’ll walk you through the integration of Entra ID authentication using MSAL v2 and OAuth 2.0, with the latest Authorization Code Flow with Proof Key for Code Exchange (PKCE), in this modern Safe AI Translator Web Application. We’ll also deploy this application on Azure Container Apps, configure an Application Gateway, and integrate Dapr for a seamless micro-services experience. Let’s get into it !
What You’ll Learn
- Build a Safe AI Translator Web App: Create a Vite & React-based front end integrated with Azure AI services for real-time translations.
- Implement Authentication: Set up Entra ID authentication with the MSAL v2 library.
- Build and optimize an ExpressJS Backend for API Endpoints and Authentication Validation.
- Containerize and Deploy: Use Azure Container Apps for scalable deployment in a Custom VNET, with Custom Domains for the Container Apps.
- Configure Application Gateway: Ensure secure and efficient routing for your application.
- Enable Microservices with Dapr: Simplify inter-service communication and observability.
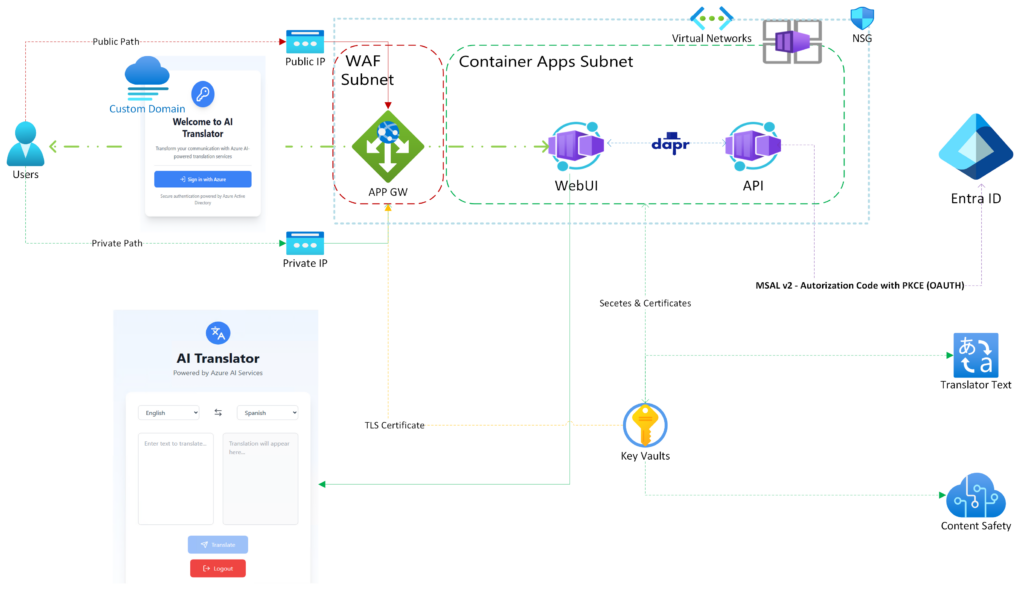
Prerequisites
- Συνδρομής Azure
- Node.js and npm installed
- Basic understanding of Vite\React.js and authentication
- Docker installed
- Azure CLI installed
Clone or Fork the Git Hub Repo to get all the code of this Project
1. Safe AI Translator Core Services
This solution is for everyone to follow and understand, so i have decided to work with simplicity whenever possible. To build our resources all we need is VSCode with Azure CLI Installed. Let’s start by creating a random string to help us name our resources:
# For Bash
$RANDOM_STRING=$(cat /dev/urandom | tr -dc 'a-z' | fold -w 5 | head -n 1)
# For Powershell
$RANDOM_STRING = -join ((97..122) | Get-Random -Count 5 | % {[char]$_})
Continue with the Service Names:
$RESOURCE_GROUP="rg-$RANDOM_STRING"
$LOCATION="northeurope"
$ENVIRONMENT="env-$RANDOM_STRING-01"
$FRONTEND="frontend"
$BACKEND="backend"
$ACR="acr$RANDOM_STRING"
$IDENTITY="usid$RANDOM_STRING"
$APP_GATEWAY="appgw-$RANDOM_STRING"
$KEY_VAULT="kv-$RANDOM_STRING"
$VNET="vnet-$RANDOM_STRING"
SUBNET1="infra-$RANDOM_STRING"
SUBNET2="appgw-$RANDOM_STRING"
Create the Container Apps Virtual Network and Environment:
az network vnet create --name $VNET --resource-group $RESOURCE_GROUP --location $LOCATION --address-prefix 10.0.0.0/16 \
--subnet-name $SUBNET1 --subnet-prefix 10.0.1.0/24


az network vnet subnet create --name $SUBNET2 --resource-group $RESOURCE_GROUP --vnet-name $VNET --address-prefix 10.0.2.0/24Container Apps Environment – Change to Workload Profiles after provisioning
az containerapp env create --name $ENVIRONMENT --resource-group $RESOURCE_GROUP --location $LOCATION --infrastructure-subnet-id "/subscriptions/$(az account show --query 'id' -o tsv)/resourceGroups/$RESOURCE_GROUP/providers/Microsoft.Network/virtualNetworks/$VNET/subnets/$SUBNET"Create Application Gateway:
az network application-gateway create --name $APP_GATEWAY --resource-group $RESOURCE_GROUP --location $LOCATION --sku WAF_v2 --capacity 2 --vnet-name $VNET --subnet $SUBNET2Create Key Vault and upload your custom domain TLS Certificate
az keyvault create --name $KEY_VAULT --resource-group $RESOURCE_GROUP --location $LOCATION --sku standardBind Application Gateway with Key Vault using a User Assigned Managed Identity
# Create Managed Identity
az identity create --name $IDENTITY --resource-group $RESOURCE_GROUP

# Get Identity Object ID
$IDENTITY_ID=(az identity show --name $IDENTITY --resource-group $RESOURCE_GROUP --query 'id' -o tsv)

# Asign Roles
az role assignment create --assignee $IDENTITY_ID --role "Key Vault Secrets User" --scope /subscriptions/$(az account show --query 'id' -o tsv)/resourceGroups/$RESOURCE_GROUP

az role assignment create --assignee $IDENTITY_ID --role "Key Vault Crypto User" --scope /subscriptions/$(az account show --query 'id' -o tsv)/resourceGroups/$RESOURCE_GROUP

# Get APPGW Object ID
$APP_GW_ID=$(az network application-gateway show --name $APP_GATEWAY --resource-group $RESOURCE_GROUP --query id --output tsv)


# Specify the User Assigned Managed Identity
az network application-gateway identity assign --gateway-name $APP_GATEWAY --resource-group $RESOURCE_GROUP --identity $IDENTITY_ID

$SECRET_ID = $(az keyvault secret show --name mytlscert --vault-name $KEY_VAULT --query id --output tsv).Split(';')[0]

# Add the SSL certificate to the Application Gateway
az network application-gateway ssl-cert create --name mytlscert --resource-group $RESOURCE_GROUP --gateway-name $APP_GATEWAY --key-vault-secret-id $SECRET_ID

# Commit the changes to the Application Gateway
az network application-gateway update --name $APP_GATEWAY --resource-group $RESOURCE_GROUP
Proceed to create the Private DNS Zone as described in the Documentation, and complete the Deployment with a Listener (Public or Private or both), in Port 443 (HTTPS), and a Rule to send the Traffic to your backend pool of the Safe AI Translator Web App, changing the Hostname to the name of the Frontend, e.g “webapp.myexample.com“.
Key Vault Secrets
We are using the Regional endpoint for the Content Safety API : https://swedencentral.api.cognitive.microsoft.com
And for the Translator API we are using the Global Endpoint (recommended): https://api.cognitive.microsofttranslator.com
Along with these, we need to add the Entra ID Directory (Tenant) ID, and the Application Registration Client ID. We don’t need to create a Client Secret for the Safe AI Translator App Registration. The PKCE (Proof Key for Code Exchange) flow does not require the use of the app registration secret (also known as a client secret) from Entra ID. PKCE was specifically designed to enhance the security of public clients, such as mobile and web applications, which can’t securely store secrets.
2. Entra ID Application Registration
The cornerstone of a robust Authentication and Authorization flow is the correct registration of a new Entra ID Application. Beyond the classic API permissions, it’s crucial to create a scope to grant Delegated Access, ensuring the PKCE flow operates seamlessly. Additionally, migrating your URIs is essential; once migrated, these URIs will have the authorization code flow enabled.
It’s important to note that the implicit grant is still enabled, provided the relevant settings are checked. Ultimately, even if you have your own APIs, transitioning to a Single Page Application (SPA) architecture is recommended. This approach enhances the security of API access, aligning with the latest best practices and recommendations.
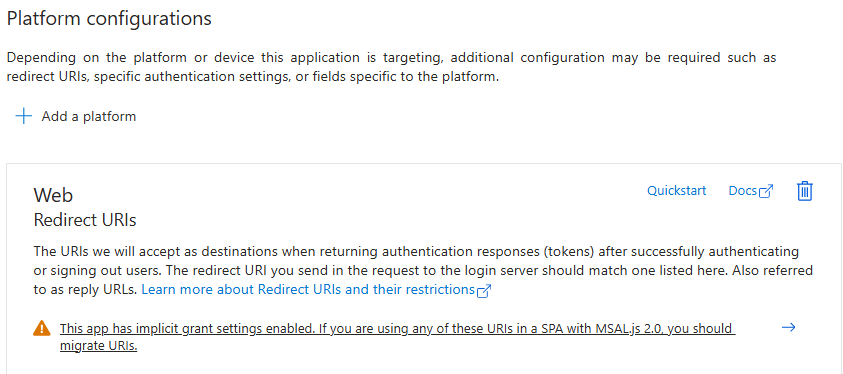
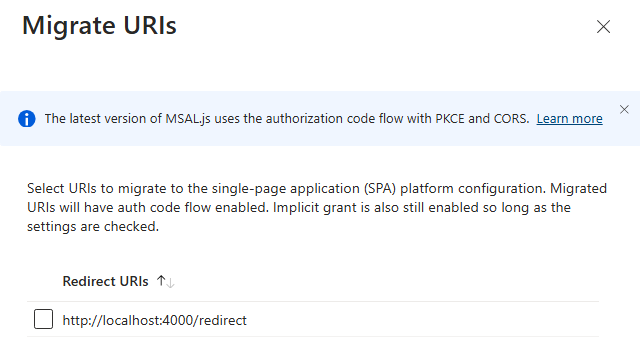
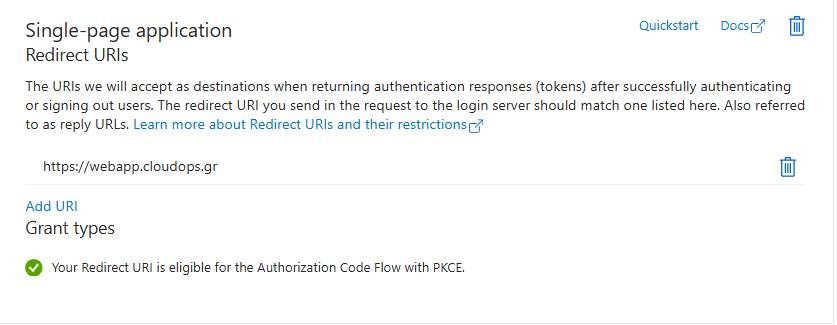
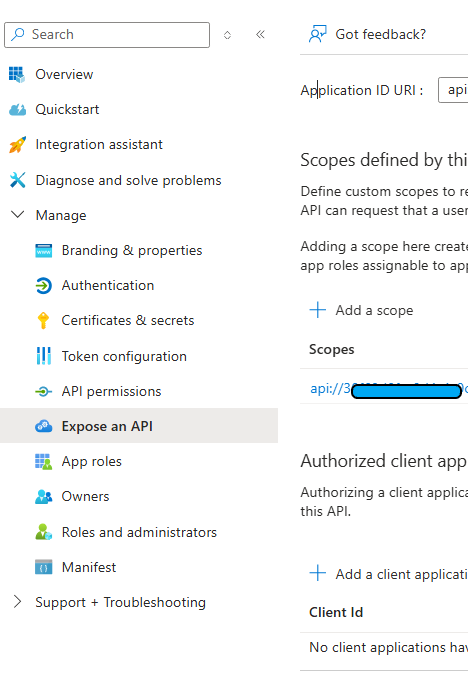
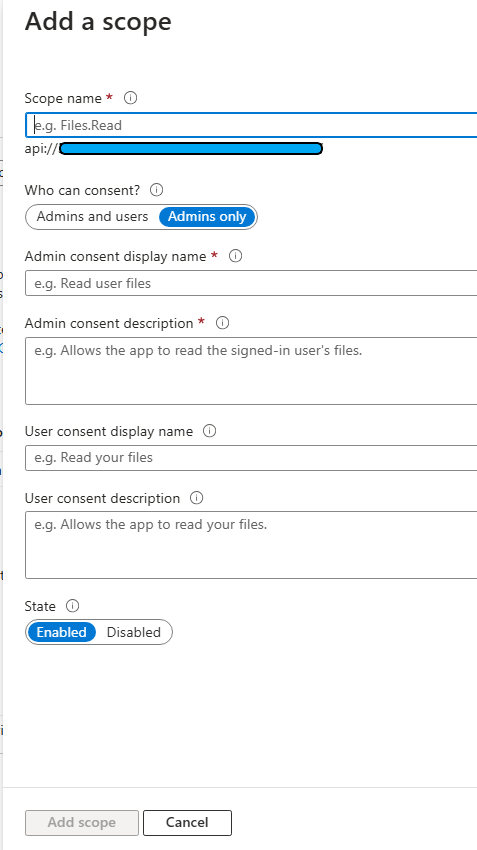
To configure your API scope, navigate to the “Expose an API” menu. Create a new scope, for example, “my_app,” and add the necessary details such as the description and what will appear in the consent requests. Decide if user consent or admin consent is required. The scope will be formatted as api://your-app-client-id/scope_name.
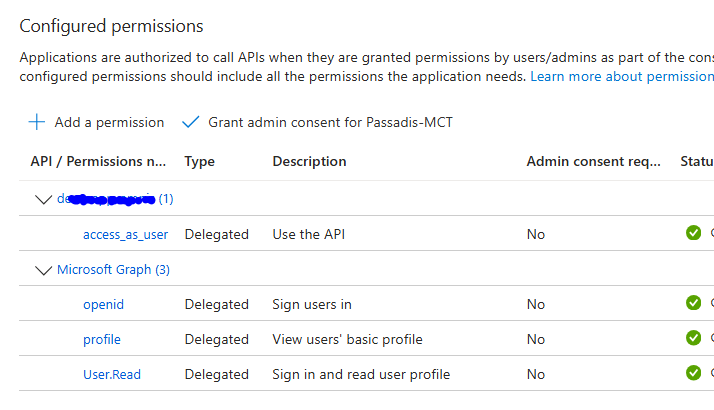
The next step in setting up your Entra ID Application is to assign the required API permissions. Navigate to the “API Permissions” menu and add Microsoft Graph delegated permissions for openid και profile. If additional details are needed for your Application UI, this is the place to include them. For our purposes, we assume that User.Read, openid, and profile are sufficient.
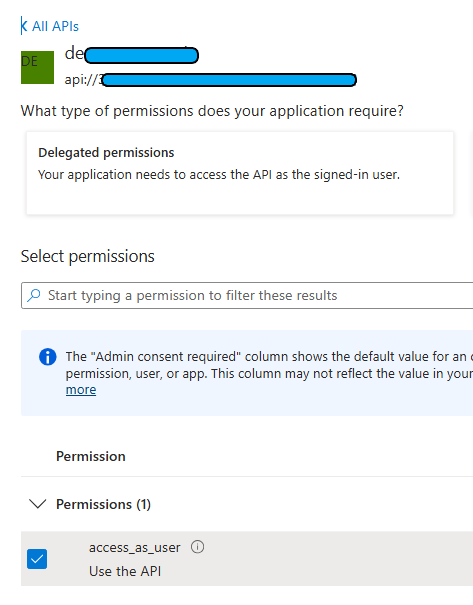
Next, add the delegated permissions from “APIs My Organization Uses”. Search for the Application Registration API we created earlier through “Expose an API”. You will see the available permissions for the scope, simply add the relevant permission.
3. Safe AI Translator Frontend
az containerapp create `
    --user-assigned $IDENTITY_ID `
    --registry-identity $IDENTITY_ID `
    --name $FRONTEND `
    --resource-group $RESOURCE_GROUP `
    --min-replicas 1 `
    --max-replicas 3 `
    --environment $ENVIRONMENT `
    --image "$ACR.azurecr.io/frontend:latest" `
    --target-port 80 `
    --ingress 'external' `
    --enable-dapr `
    --dapr-app-protocol http `
    --dapr-app-port 80 `
    --dapr-app-id $FRONTEND `
    --registry-server "$ACR.azurecr.io" `
--query properties.configuration.ingress.fqdnAnother advantage of Azure Container Apps is that we can build and push directly to the Registry without the need of Docker. In minutes the Container App revision is updated with the latest image. Of course we need the Dockerfile since it defines our image structure
# Build Stage
FROM node:lts AS build

# Set the working directory
WORKDIR /app

# Copy package.json and package-lock.json for caching
COPY package*.json ./

# Install dependencies
RUN npm install

# Copy the rest of the application source code
COPY . .

# Build the app
RUN npm run build

# Serve Stage
FROM nginx:alpine

# Copy custom Nginx configuration for React Router (optional)
COPY custom_nginx.conf /etc/nginx/conf.d/custom_nginx.conf

# Copy build files from the build stage to the Nginx web root directory
COPY --from=build /app/dist /usr/share/nginx/html

# Expose port 80
EXPOSE 80

# Start Nginx
CMD ["nginx", "-g", "daemon off;"]
az acr build --registry $ACR --image frontend:latest .The purpose of this Safe AI Translator Blog Post is to guide us so i will point out the important, focus points of our code while you can grab the whole solution from the relevant GitHub Repo.
We can start by firing up a new Vite + React application from VSCode (or you favorite IDE), and copy – clone the repo files in your directory.
npm create vite@latest ai-translator -- --template react
cd ai-translator
npm install
Be careful to match the name of the App to your package.json file’s first line:
{
  "name": "client", // Change to the name of your App
  "private": true,
  "version": "0.0.0",
  "type": "module",
  "scripts": {
    "dev": "vite",
    "build": "vite build",
    "lint": "eslint .",
    "preview": "vite preview"
  },
There is one important file name authConfig.js, which determines how are we going to Authenticate:
import { LogLevel, BrowserCacheLocation } from "@azure/msal-browser";

export const msalConfig = {
  auth: {
    clientId: import.meta.env.VITE_CLIENT_ID,
    authority: `https://login.microsoftonline.com/${import.meta.env.VITE_TENANT_ID}`,
    redirectUri: window.location.origin,
    postLogoutRedirectUri: window.location.origin,
    navigateToLoginRequestUrl: true,
    protocolMode: "OIDC", // Enable OIDC protocol
  },
  cache: {
    cacheLocation: BrowserCacheLocation.SessionStorage,
    storeAuthStateInCookie: false,
  },
  system: {
    allowNativeBroker: false,
    loggerOptions: {
      logLevel: LogLevel.Error,
      loggerCallback: (level, message, containsPii) => {
        if (containsPii) return;
        switch (level) {
          case LogLevel.Error:
            console.error(message);
            return;
          case LogLevel.Warning:
            console.warn(message);
            return;
        }
      }
    }
  }
};

// Auth request configurations
export const loginRequest = {
  scopes: ["openid", "profile", `api://${import.meta.env.VITE_CLIENT_ID}/access_as_user`],
  responseType: "code", // Request an authorization code
  CodeChallenge: true // Enable PKCE
};

export const apiRequest = {
  scopes: [`api://${import.meta.env.VITE_CLIENT_ID}/access_as_user`]
};Equally important is how we construct App.jsx and Login.jsx:
//...//...//...//
//...code available in GitRepo.../
//...//...//...//

const msalInstance = new PublicClientApplication(msalConfig);

// Initialize PKCE code verifier
const generateCodeVerifier = () => {
  const array = new Uint8Array(32);
  window.crypto.getRandomValues(array);
  const verifier = Array.from(array, dec => ('0' + dec.toString(16)).substr(-2)).join('');
  sessionStorage.setItem('pkce_verifier', verifier);
  return verifier;
};

//...//...//...//
//...code available in GitRepo.../
//...//...//...//

export default App;The Login page is utilizing pkce.jsx a utility module designed to enhance the security of OAuth 2.0 authorization flows by implementing Proof Key for Code Exchange (PKCE). It provides two essential functions:
export const generateCodeVerifier = () => {
    const array = new Uint8Array(32);
    window.crypto.getRandomValues(array);
    return Array.from(array, dec => ('0' + dec.toString(16)).substr(-2)).join('');
  };

  export const generateCodeChallenge = async (verifier) => {
    const encoder = new TextEncoder();
    const data = encoder.encode(verifier);
    const hash = await window.crypto.subtle.digest('SHA-256', data);
    return btoa(String.fromCharCode(...new Uint8Array(hash)))
      .replace(/=/g, '')
      .replace(/\+/g, '-')
      .replace(/\//g, '_');
};These functions ensure that the authorization process is protected against interception attacks, making your authentication flow more secure.
//...//...//...//
//...code available in GitRepo.../
//...//...//...//

const Login = () => {
  const { instance } = useMsal();
  const [isHovered, setIsHovered] = useState(false);

  const handleLogin = async () => {
    try {
      // Generate PKCE code verifier and challenge
      const codeVerifier = generateCodeVerifier();
      const codeChallenge = await generateCodeChallenge(codeVerifier);

      // Store code verifier for token exchange
      sessionStorage.setItem('pkce_verifier', codeVerifier);

      // Request authorization code with PKCE
      await instance.loginRedirect({
        ...loginRequest,
        codeChallenge,
        codeChallengeMethod: 'S256'
      });
    } catch (error) {
      console.error('Login failed:', error);
    }
  };

//...//...//...//
//...code available in GitRepo.../
//...//...//...//Finally our TranslatorApp.jsx page aligns with the rest of our approach:
//...//...//...//
//...code available in GitRepo.../
//...//...//...//

      // Get token using PKCE flow
      let tokenResponse;
      try {
        // Try silent token acquisition first
        tokenResponse = await instance.acquireTokenSilent({
          ...apiRequest,
          account: account,
          forceRefresh: false
        });
      } catch {
        // If silent acquisition fails, initiate interactive acquisition with PKCE
        const codeVerifier = sessionStorage.getItem('pkce_verifier');
        if (!codeVerifier) {
          throw new Error('PKCE verifier not found');
        }

        tokenResponse = await instance.acquireTokenPopup({
          ...apiRequest,
          codeVerifier: codeVerifier
        });
      }

      if (!tokenResponse || !tokenResponse.accessToken) {
        throw new Error('Failed to acquire token');
      }

      // const response = await fetch(`${import.meta.env.VITE_BACKEND_URL}/translate`, {
        const response = await fetch(`/api/translate`, {
        method: 'POST',
        headers: {
          'Content-Type': 'application/json',
          'Authorization': `Bearer ${tokenResponse.accessToken}`,
        },
        body: JSON.stringify({ text: sourceText, sourceLang, targetLang }),
      });

 //...//...//...//
//...code available in GitRepo.../
//...//...//...// Observe the token acquisition process, and also the backend DAPR call in line 32. The commented out lie would be a normal HTTP API Call, in our case we use DAPR Sidecars, one of the many advantages of Azure Container Apps.
For DAPR to work in this Vite + React Docker Image we need to carefully create the Nginx Configuration that will be included in our Dockerfile:
server {
    listen 80;
    server_name _;

    root /usr/share/nginx/html;

    index index.html;

    location / {
        # Redirect all requests to index.html for React Router
        try_files $uri /index.html;
    }

    location /static/ {
        # Serve static files
        expires max;
        add_header Cache-Control "public";
    }

    location /api/ {
        proxy_pass http://localhost:3500/v1.0/invoke/api/method/;
        proxy_http_version 1.1;
        proxy_set_header Upgrade $http_upgrade;
        proxy_set_header Connection 'upgrade';
        proxy_set_header Host $host;
        proxy_cache_bypass $http_upgrade;
    }
}
Finally, remember to use a .env file to store the environment variables. You can always try to research a way to inject those via Nginx for added security.
VITE_TENANT_ID=xxxx-xxxxx-xxxx-xxxxx-xxxxxxxxxxx
VITE_CLIENT_ID=30f69d0f-xxxx-xxxxx-xxxx-xxxxx-xxxxxxxxxxx
VITE_REDIRECT_URI=https://your-frontend-url.com // Must match the URL in Entra ID SPA
VITE_LOGOUT_URI=https://your-logout-url.com/logout
VITE_BACKEND_URL=http://localhost:3500/v1.0/invoke/api/method/ //Dapr in action !
4. Safe AI Translator Backend

az containerapp create `
    --user-assigned $IDENTITY_ID `
    --registry-identity $IDENTITY_ID `
    --name $BACKEND `
    --resource-group $RESOURCE_GROUP `
    --min-replicas 1 `
    --max-replicas 3 `
    --environment $ENVIRONMENT `
    --image "$ACR.azurecr.io/backend:latest" `
    --target-port 3000 `
    --env-vars AZURE_KEY_VAULT_NAME=$KEY_VAULT `
               MANAGED_IDENTITY_CLIENT_ID=XXX-YYYYYYY-XXX-XXXXXX
    --ingress 'external' `
    --registry-server "$ACR.azurecr.io" `
    --enable-dapr `
    --dapr-app-protocol http `
    --dapr-app-port 3000 `
    --dapr-app-id $BACKEND `
--query properties.configuration.ingress.fqdnOur Backend consists of an Express.js server to handle API requests, and includes an additional middleware responsible for the validation of Tokens, and verification checks against our requests to Entra ID for Authorization over our Scope. We are actually protecting the Azure AI Translator and the AI Content Safety APIs so no unauthenticated requests can call them.
Use the npm install command once you have copied all Repository contents, including the Backend directory. All packages will be installed for you from the package.json file. Observe the main server.js file which holds the API Endpoint for the translation, sets the Azure Content Safety thresholds per category and also imports Key Vault Secrets that are shared via config.js file with authMiddleware.js.
const express = require('express');
const cors = require('cors');
const { SecretClient } = require('@azure/keyvault-secrets');
const { DefaultAzureCredential } = require('@azure/identity');
const axios = require('axios');
const authMiddleware = require('./authMiddleware');
const { updateConfig } = require('./config');
require('dotenv').config();

const app = express();
const port = process.env.PORT || 3000;

// Middleware
app.use(cors());
app.use(express.json());
app.use(authMiddleware); // Apply authMiddleware globally

// Thresholds for content moderation
const rejectThresholds = {
  Hate: 2,
  Violence: 2,
  SelfHarm: 2,
  Sexual: 2,
};

// Azure Service Variables
let translatorEndpoint;
let translatorKey;
let contentSafetyEndpoint;
let contentSafetyKey;

async function initializeAzureServices() {
  try {
    const vaultName = process.env.AZURE_KEY_VAULT_NAME;
    if (!vaultName) {
      throw new Error('Key Vault name is required');
    }

    const vaultUrl = `https://${vaultName}.vault.azure.net`;
    const credential = new DefaultAzureCredential({
      managedIdentityClientId: process.env.MANAGED_IDENTITY_CLIENT_ID,
    });

    const secretClient = new SecretClient(vaultUrl, credential);
    const secrets = await loadSecretsFromKeyVault(secretClient);

    translatorEndpoint = secrets.translatorEndpoint;
    translatorKey = secrets.translatorKey;
    contentSafetyEndpoint = secrets.contentSafetyEndpoint;
    contentSafetyKey = secrets.contentSafetyKey;
    clientID = secrets.clientID;
    tenantID = secrets.tenantID;

    console.log('Azure services initialized successfully with Key Authentication');
  } catch (error) {
    console.error('Failed to initialize Azure services:', error);
    throw error;
  }
}

async function loadSecretsFromKeyVault(secretClient) {
  try {
    const [translatorEndpoint, translatorKey, contentSafetyEndpoint, contentSafetyKey, clientID, tenantID] = await Promise.all([
      secretClient.getSecret('TranslatorEndpoint'),
      secretClient.getSecret('TranslatorKey'),
      secretClient.getSecret('ContentSafetyEndpoint'),
      secretClient.getSecret('ContentSafetyKey'),
      secretClient.getSecret('entraClientId'),
      secretClient.getSecret('entraTenantId'),
    ]);

    const secrets = {
      translatorEndpoint: translatorEndpoint.value,
      translatorKey: translatorKey.value,
      contentSafetyEndpoint: contentSafetyEndpoint.value,
      contentSafetyKey: contentSafetyKey.value,
      clientID: clientID.value,
      tenantID: tenantID.value,
    };

    // Update the config with the secrets
    updateConfig({
      tenantID: secrets.tenantID,
      clientID: secrets.clientID
    });

    return secrets;
  } catch (error) {
    console.error('Error loading secrets from Key Vault:', error);
    throw error;
  }
}

async function analyzeContent(text) {
  try {
    const response = await axios.post(
      `${contentSafetyEndpoint.replace(/\/$/, '')}/contentsafety/text:analyze?api-version=2024-09-01`,
      {
        text,
        categories: ['Hate', 'Sexual', 'SelfHarm', 'Violence'],
        haltOnBlocklistHit: true,
        outputType: 'FourSeverityLevels',
      },
      {
        headers: {
          'Ocp-Apim-Subscription-Key': contentSafetyKey,
          'Ocp-Apim-Subscription-Region': 'swedencentral',
          'Content-Type': 'application/json',
        },
      }
    );

    const flaggedCategories = response.data?.categoriesAnalysis?.filter(
      ({ category, severity }) => rejectThresholds[category] !== undefined && severity >= rejectThresholds[category]
    ) || [];

    console.log('Content Safety API response:', response.data);
    return flaggedCategories;
  } catch (error) {
    console.error('Content analysis error:', error.response?.data || error.message);
    throw error;
  }
}

async function translateText(text, sourceLang, targetLang) {
  try {
    const response = await axios.post(
      `${translatorEndpoint.replace(/\/$/, '')}/translate?api-version=3.0&from=${sourceLang}&to=${targetLang}`,
      [{ text }],
      {
        headers: {
          'Ocp-Apim-Subscription-Key': translatorKey,
          'Ocp-Apim-Subscription-Region': 'swedencentral',
          'Content-Type': 'application/json',
        },
      }
    );

    console.log('Translation response:', response.data);
    return response.data[0].translations[0].text;
  } catch (error) {
    console.error('Translation error:', error.response?.data || error.message);
    throw error;
  }
}

// Routes
app.get('/health', (req, res) => {
  res.json({ status: 'Server is healthy' });
});

app.post('/translate', async (req, res) => {
  try {
    const { text, sourceLang, targetLang } = req.body;

    // First check: Content safety on source text
    const safetyCheck = await analyzeContent(text);
    if (safetyCheck.length > 0) {
      return res.status(400).json({
        error: 'Content Safety Warning',
        details: {
          message: '⚠️ Content flagged by Azure Content Safety',
          categories: safetyCheck,
        },
      });
    }

    // Perform translation
    const translatedText = await translateText(text, sourceLang, targetLang);

    // Second check: Content safety on translated text
    const translatedSafetyCheck = await analyzeContent(translatedText);
    if (translatedSafetyCheck.length > 0) {
      return res.status(400).json({
        error: 'Content Safety Warning',
        details: {
          message: '⚠️ Translated content flagged by Azure Content Safety',
          categories: translatedSafetyCheck,
        },
      });
    }

    res.json({ translatedText });
  } catch (error) {
    console.error('Translation or content safety error:', error);
    res.status(500).json({ error: 'Translation failed' });
  }
});

// Initialize services and start server
(async () => {
  try {
    await initializeAzureServices();
    app.listen(port, () => {
      console.log(`Server is running on port ${port}`);
    });
  } catch (error) {
    console.error('Failed to start the application:', error);
  }
})();
The only variables we need to set for this are the Key Vault name and the User Assigned Managed Identity object id.
As you have noticed we use Managed Identity throughout the majority of our services, meaning any variable, like secrets and of course the Custom Domain Certificate, is securely stored and fetched from Azure Key Vault.
Azure AI Translator & Azure Content Safety API
Along with other Azure AI Services, Azure AI Translator has recently launched its Version 3, bringing several new features and improvements. This version introduces a modern JSON-based Web API, consolidating existing features into fewer operations for improved usability and performance.
Notable enhancements include the ability to perform transliteration, translate multiple languages in a single request, and provide more informative language detection results. Additionally, the bilingual dictionary method allows users to look up alternative translations and examples of terms used in context1.
On the other hand, Azure Content Safety Services have also expanded their capabilities. The new Multimodal API analyzes materials containing both image and text content, offering a comprehensive understanding of the content to make applications safer from harmful user-generated or AI-generated content. Other new features include Protected Material Detection for code, which flags protected code content from known GitHub repositories, and Groundedness Correction, which automatically corrects any detected ungroundedness in text based on provided grounding sources.
These advancements in both Azure AI Translator and Azure Content Safety Services demonstrate Microsoft’s commitment to providing powerful, secure, and efficient tools for developers and organizations. Our Safe AI Translator Web App is able to deliver consistent results, protect users from harmful content, with informational messages and a well documented process. We can extend the Application with Caching, Storage of requests and blocked content as well as integration with other AI Foundry services like the Assistants API for controllable interactions via Functions and automation.
Clone or Fork the Git Hub Repo to get all the code of this Project
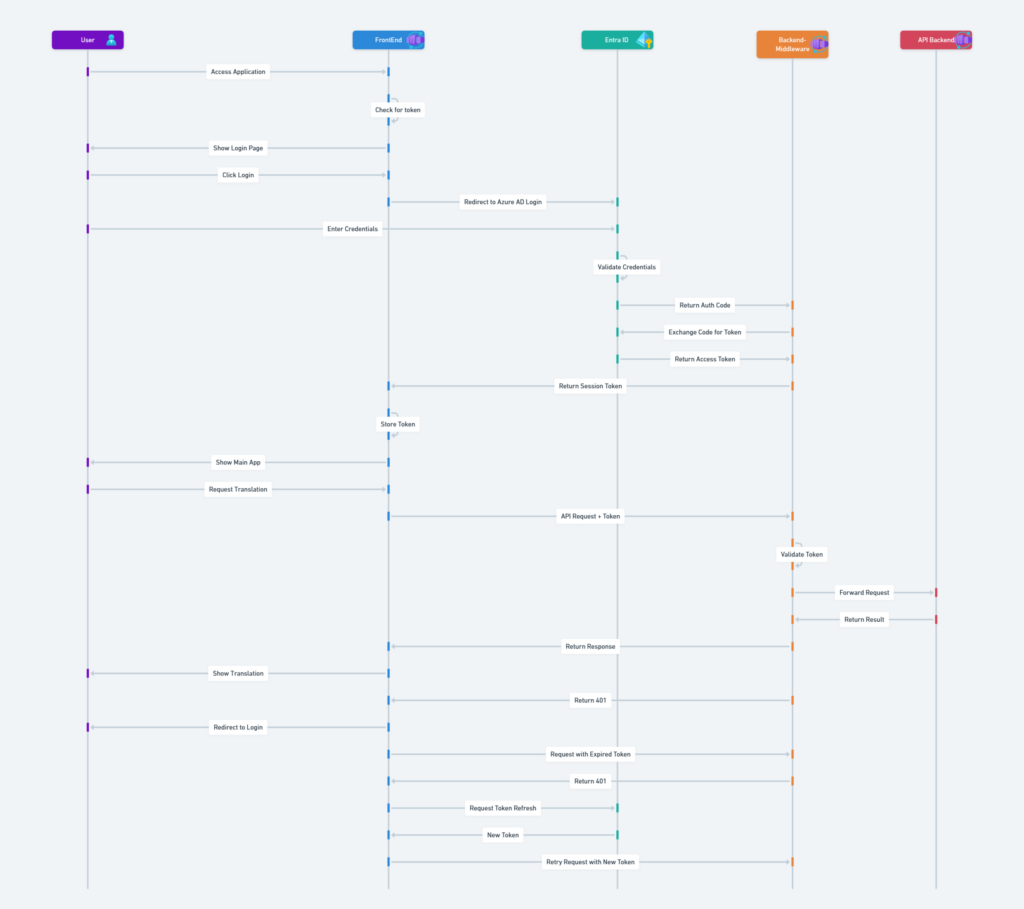
5. Authentication \ Authorization Flow
OAuth 2.0 with Proof Key for Code Exchange (PKCE) provides a secure way to manage authentication and authorization in our Safe AI Translator Web Application.
Here’s how it works: The client application initiates the process by generating a unique code verifier and its corresponding code challenge, which is sent along with the initial authorization request to the authorization server.
Upon user authentication, the authorization server returns an authorization code to the client. The client then exchanges this code for an access token by sending the code verifier to the server.
The server validates the code challenge and verifier to ensure they match, mitigating the risk of interception or code injection attacks. This flow not only secures the token exchange but also ensures that the tokens are only granted to legitimate requestors, providing a robust layer of security for user authentication and API access. In more detail the current backend has increased levels of logging so we are able to capture the process from Azure Container Apps Log Stream:
📝 Token received
=== Token Header ===
{
  "typ": "JWT",
  "alg": "RS256",
  "x5t": "Yxxxxxxxx",
  "kid": "Yxxxxxxx"
}
=== Token Payload ===
{
  "aud": "api://xxxxxxxxxxxx",
  "iss": "https://sts.windows.net/xxxxxxxxxxxxxx/",
  "scp": "access_as_user"
}
🔑 Retrieving signing key for kid: Yxxxxxxx
✅ Signing key retrieved successfully
=== Verification Options ===
{
  "algorithms": [
    "RS256"
  ],
  "issuer": "https://sts.windows.net/xxxxxxxxxxx/",
  "audience": "api://xxxx-xxxx-xxxx-xxxx-xxxxxxxxx"
}
✅ Token verified successfully
=== Scopes ===
Available scopes: [ 'access_as_user' ]
✅ Scope validation passed
=== Token Validation Complete ===Hint: Observe the Logs in your Web App, but once you are ready to expose it publicly remove the Console logging from the Backend, especially from authMiddleware.js:
...//...//...//

// Initialize or update JWKS client if needed
    if (!client) {
      try {
        client = initializeJwksClient(tenantId);
      } catch (error) {
        console.error('❌ Failed to initialize JWKS client');
        console.error('Error details:', error.message);
        return res.status(500).json({ error: 'Failed to initialize authentication client' });
      }
    }

...//...//...//
...//...//...//

    console.log('\n=== Token Header ===');
    console.log(JSON.stringify(decodedToken.header, null, 2));
    console.log('\n=== Token Payload ===');
    console.log(JSON.stringify({
      aud: decodedToken.payload.aud,
      iss: decodedToken.payload.iss,
      scp: decodedToken.payload.scp,
      azp: decodedToken.payload.azp
    }, null, 2));

    let signingKey;
    try {
      console.log('🔑 Retrieving signing key for kid:', decodedToken.header.kid);
      const key = await util.promisify(client.getSigningKey.bind(client))(decodedToken.header.kid);
      signingKey = key.getPublicKey();
      console.log('✅ Signing key retrieved successfully');
    } catch (error) {
      console.error('❌ Failed to retrieve signing key');
      console.error('Error type:', error.name);
      console.error('Error message:', error.message);
      console.error('Error details:', error.stack);
      return res.status(500).json({
        error: 'Failed to validate token',
        details: process.env.NODE_ENV === 'development' ? error.message : undefined
      });
    }

    const verifyOptions = {
      algorithms: ['RS256'],
      issuer: decodedToken.payload.iss,
      audience: `api://${clientId}`
    };

    console.log('\n=== Verification Options ===');
    console.log(JSON.stringify(verifyOptions, null, 2));

    ...//...//...//
Safe AI Translator Authentication \ Authorization Sequence Flow
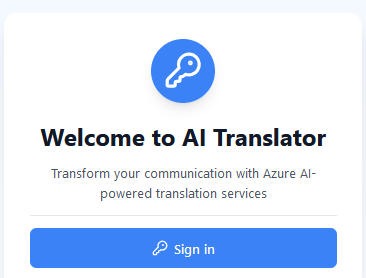
Safe AI Translator Screenshots

Κλείσιμο
By combining the advanced capabilities of Azure AI services with a modern tech stack, we have successfully demonstrated how to build a secure, AI-powered translation application, known as the Safe AI Translator. Our solution leverages the strengths of React for a dynamic frontend, Express.js for a robust backend, and Azure AI Translator and Content Safety for intelligent and secure operations. Additionally, with Entra ID authentication, we have ensured secure access, making this application suitable for enterprise-grade deployments.
This approach not only highlights the power and flexibility of Azure but also showcases best practices for creating innovative and secure AI applications. Therefore, we hope this tutorial has provided valuable insights and inspiration for your next AI project.
Αναφορές:
- Azure AI Translator
- Azure AI Content Safety
- Content Moderation with Azure Content Safety by CloudBlogger
- Azure AI Translator API v3
- Azure AI Foundry – Start your AI Journey here
- Auth Flows for MSAL
- Azure Container Apps with WAF

